
TABLE OF CONTENTS: There’s 4 sections to this post:
- 1. My Completed Cage in my jeep
- 2. What I thought about when building my cage
- 3. Links to dicussions about my cage
- 4. Other roll cage images
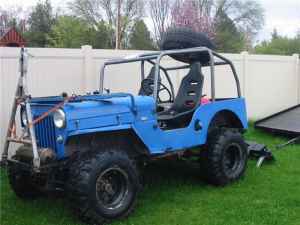
1. MY CAGE:
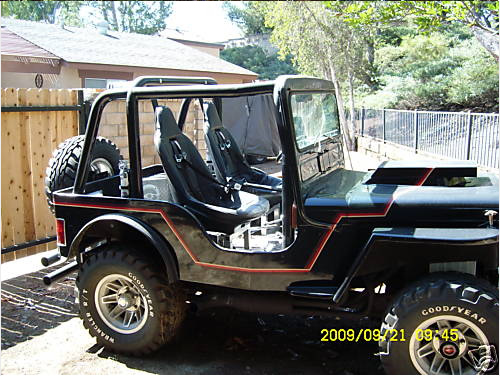
Here’s the cage in the jeep. Yeah, I’m happy about this. It’s a little chromier color than I wanted, but I suspect I’ll be covering it with wrap soon. I already hit my head once, lol …


And here’s a video:
2. MY THOUGHTS ON BUILDING THE CAGE
And an overview of my experience:
This post reflects my experience researching and building my roll cage. My goal with this post is to eliminate the need for others to spend the hours and hours I spent researching weighing options and deciding upon a cage. Note that while I have had a couple cages and my dad built two cages (back in the 70s), this was the first cage I designed, bent and built myself.
CLICK ON THE LINK BELOW TO READ MUCH MORE ….
I do not have an engineering degree, I am not a design expert, My fabrication expertise is limited to the few tools I have in my garage and past projects I have done. I am simply a guy trying to build a reasonably safe roll cage that will protect me if my fairly light jeep rolls over.
So, let’s begin at the beginning … The Roll Cage … WHY A CAGE?
I designed my jeep to (1) drive down the highway (3:73 gears), (2) hit mountain trails, and (3) do at least a little racing. Each of these pursuits provides differing types of rollover risk, the results of which a cage can help minimize. I also redesigned my suspension to further reduce rollover risk (specifically outboarded rear springs). But, in the end, the jeep and jeeping is a risky endeavor, but then so is riding a motorcycle, riding a horse, driving a car, marriage ….
Now, I could do (1) & (2) without a cage, but not (3), as there are requirements for PNW4WDA Racing, such as a cage must have a minimum 1-5/8” OD tubing, with a minimum 0.090 wall thickness.
But, in fact, I have never rolled while racing, though I only raced a year. Instead, I rolled while driving around my pasture after hitting a barrel (the barrel catapulted my front passenger wheel upwards and I flipped right over — I used to have a video of it). It was my first real test of my old jeep, little did i know I’d be testing the roll cage too.
Also, in fact, my dad never rolled while racing. Instead, less than a year after installing his rollcage back in the 70s, he tumbled down a hill while jeeping in the family CJ-5, doing several barrel rolls and end-over-end rolls, reaching heights of about 10ft in the air according to witnesses. He had been heading up a difficult, chuckholed filled hill when the rear drive line twisted apart. He tried to pull off onto the side of the hill, but the jeep wouldn’t stay there. So, the rolling commenced. He survived with a single scratch caused by loose safety belt, though he I don’t think he ever enjoyed jeeping the same after that.
What he learned in the process of tumbling down the hill was that several of his welds broke on the cage. He also learned that the tubing was strong enough to take the beating, but the rear wheel wells started collapsing (yes, this was a metal body). So, when he rebuilt his next cage, he added metal plates and bracing that went from underneath the wheel wells to the frame. I asked dad about the specs of the roll bar he used, but he couldn’t remember. I suspect he had a 1.75″” diameter CREW/HREW that was probably .09 to .12 thick for both roll cages. You’ll note that he added additional support in the cage for the second jeep. But then, that was a very heavy jeep.
So my reasons for building a cage are (1) Safety, (2) My personal experience with jeeps and (3) I grew up with them, so jeeps look odd without them to me.
Ok, so I need a cage, what were my first decisions?
Because I started building upwards from the frame, my first decision was how to hook the rollcage to the frame. In my case, hooking the cage to the frame was a MUST because I have a fiberglass body.
HOW TO MOUNT TO FRAME:
Probably the easiest decision I had to make was how many times to hook the cage to the frame, which was six: two mounts in front, two in the middle and two in the rear. In the front, the top and bottom plates are 1/4″ thick (only 3/16″ req by PNW4WDA). There are four bolts at each plate corner. The nuts are all self locking. The body will be compressed between the plates in between the front and rear loop plates and the frame mounts, though the rear loop has a limiter to keep the body from being compacted too much.
WELD OR BOLT MOUNTS:
Next, I had to decide how to connect the mounts to the frame. I could either weld them or bolt them. Don Williams built a race rig in the mid eighties and created some well built cage mounts that slipped over the frame and then bolted in place. I don’t remember why he did it that way, but it was nicely done. I chose to go the welding route, simply because I couldn’t think of any specific reason I would want to bolt them in place.
SIZE OF BOLTS:
The PNW4WDA requires “All Bolts will be a minimum 3/8” diameter steel and all bolts will be grad 5 minimum bolts at a minimum”. I am using a mix of 3/8″ and 1/2″ bolts.
CAGE MATERIAL:
Let the debates begin. I used 2″ outside diameter (OD) .12″ thick CREW tubing for most of the cage. The front cross bar is 2″ OD .95″ thick CREW tubing.
To get a handle on my tubing options, I read as many different sites on the topic as possible. Frankly, the discussion is pretty overwhelming and confusing. Some people argued passionately for DOM, because no expense should be spared when it comes to your life. Other people argued that they have bent, built and seen CREW/HREW sustain roll overs just fine and that for most folks, DOM is wasted money. The DOM folks argued for the superior strength of DOM. The CREW/HREW champions argued for the give of the CREW/HREW, which will help reduce impact forces. The DOM folks argued that they had seen CREW/HREW tears develop during bending because it was soft. The CREW/HREW crew said they had seen tears develop during bending because it was unforgiving. Some people got out their science books to make their point, others did experiments on different types of tubing to make their point.
In the end, I went with my experience — CREW — neither Dad nor I have ever had DOM and we have walked away from roll overs, banging up against trees, and more. The same cage I started with in 1985, built in the late 70s, was still going strong when I sold the jeep in 1991. Given the PNW reqs of a minimum 1-5/8” OD tubing, with a minimum 0.090 wall thickness and their decades experience with racing safety, I feel very secure with my 2″ OD .12″ wall.
3. A LIST OF LINKS
For those investigating the issue, here’s a list of possible tubing types and their acronyms (from this website http://www.nwhydroshots.com/links/rcd101.htm):
CREW = Cold Rolled Electric Welded
HREW = Hot Rolled Electric Welded
ERW = Electric Resistance Welded
CDS = Cold Drawn Seamless
DOM = Drawn Over Mandrel
HFS = Hot Finished Seamless
CDBW = Cold Drawn Butt Welded (Continuous)
W&D = Welded and Drawn
Here’s some descriptions of each of these
And a list of discussions:
http://www.therangerstation.com/tech_library/rollcage.htm
http://www.fabwright.com/roll_cages.html
http://www.jeepforum.com/forum/f37/senior-design-project-roll-cage-631178/
http://www.offroadfabnet.com/forums/showthread.php?t=2924&page=2
http://www.links4jeeps.com/forum/index.php?topic=9166.0
http://www.mig-welding.co.uk/forum/showthread.php?s=3b69d4c77a55923bbc26dcc7f0fd9cf2&t=3986&page=2
http://www2.pirate4x4.com/forum/showthread.php?t=386480
http://www.syncnotcher.com/procedure.html
http://www.rodandcustommagazine.com/techarticles/0811rc_metal_tube_bending/photo_22.html
http://www.izook.com/spy/rock4x/rock4x.htm
CAGE DESIGN:
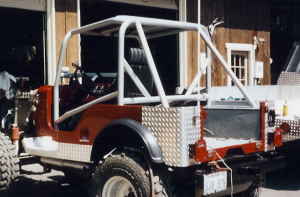
As I have mentioned in a previous post, my cage design is mostly based on my previous cage, the looks of which I always liked. However, when I did this build, I located the mid loop frame attachments closer to the seats then I should have. It took me a long time of staring at the differences between my old and new designs to figure out what I had done wrong, but by then, it was too late. So, I had to design around this ‘problem’.
My first step to cage design was to purchase some 1 1/2″ PVC and some 90/30/15 degree elbows. Then, I started experimenting with looks. As I played with it, I realized the middle hoop had to be at an angle to work correctly, which I didn’t like as much. So, after thinking over a variety of solutions, I came up with the final design.
I also watched for interesting designs as I updated ewillys. Here’s a link to a page of designs (http://www.nwhydroshots.com/links/rcd101.htm). I also came across this website on cage design, which I thought was straight forward. In fact, I have violated one of the rules, but I decided that, again based on my experience, that my cage should hold up fine.
BENDER:
I didn’t find a Bender to rent, so I had to decide whether to build or buy my bender. I was wondering whether i wanted to build a bender, but then reminded myself I was just about done building a custom jeep, so a bender should be a piece of cake (which it was). After looking around at different plan options, I decided to purchase the GOT TRIKES plans from Frank Takacs. Frank was great and very responsive. The plans were very professional. The plans include all the information and parts sources necessary to build the bender and include a discount on the Dies that easily covers the cost of the plans.
Of course, my Bender build deviated from the plans because I couldn’t leave well enough alone and because I had a bunch of extra steel that I wanted to use up. I also didn’t care what it looked like, I just wanted it to work. Here’s a post with pics of the Bender.
For a list of Benders and Notchers, visit this post.
4. A LIST OF PICS
Finally, here’s a bunch of cages as examples:


 http://www.ewillys.com/wp-admin/post.php?action=edit&post=19334
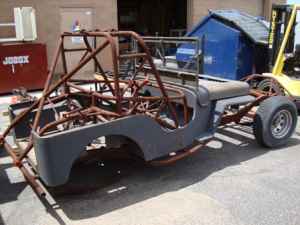
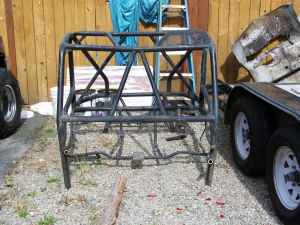


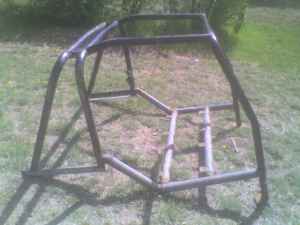
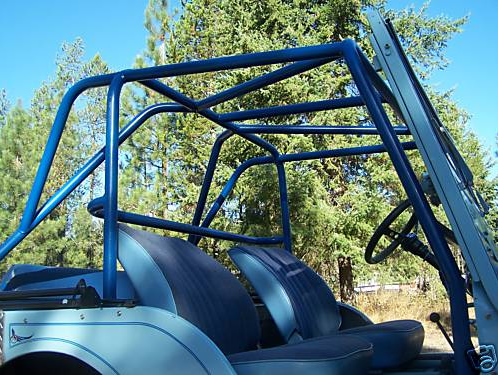
Below are two pics of my old cage:


Looks real good Dave!
very nice, I am going to start the build on my cage next year, trying to get the CJ ready for paint by the end of the year, I like your cage alot!
It looks tough…I’ve never really want to ever get in the position I might need a roll bar…a strong winch yes! But glad I had one on my John Deere, flipped it on level land…perhaps I might reconsider for my Willys….safe Willy-ing