Biscuit Research Archives

My Rebuild

To Top

My Build – Fans

• CATEGORIES: Biscuit This site contains affiliate links for which I may be compensated.

I went shopping at the junkyard today.  After a couple hours I came back with a steel fan and a flex fan (I couldn’t decided between them), a transmission cooler, some brake lines, and some other parts.  Yes, I had fun as usual and was only out $15.

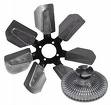
I tried mounting the steel fan, but the bolt holes weren’t quite right.  I tried the flex fan and that will work, but I am worried about the integrity of it.  So, I decided to get online and learn more about fans.  One bit of info I ran across concerned horsepower vs. different types of fans.  Here’s the info from the site.

“Was reading the May 2000 ‘Car Craft’ and I came across something very interesting. They did a dyno test on a 496 horsepower chubby, {yes, I know — but we can still get some useful info on this…} and they tested different cooling fans to see what kind of drag each different type has.

Alternator, no fan: 496 hp
Black Magic electric fan:494 hp
Thermal clutch fan: 487 hp
Nonthermal clutch fan: 485 hp
Heavy duty thermal clutch fan: 476 hp
High performance flex fan: 476 hp
Stock four blade fan: 473 hp
Low profile flex fan: 466 hp
One piece plastic flex fan: 460 hp
OE replacement six blade rigid fan: 449 hp

They found the alternator alone, a 63 amp unit, only sucked 1 horsepower.”

[fb_button]
 
To Top

My Build – Fender Update

• CATEGORIES: Biscuit, Features This site contains affiliate links for which I may be compensated.

I made good progress over the weekend. As you can see, I was able to mount the fenders and take a few shots of the jeep with the fenders.  It will look good.

In order to fit the fenders, I had to make cutouts in the wheel wells for the headers.  But, as I mentioned in an earlier post, I wanted to fill around the headers.  So, I bought a little bit of stove pipe and used that as a form to wrap fiberglass around the headers.  

The last pic is the fenders with the new covers for the headers.  To match the rest of the underside of the body, I'm going to paint herculiner on the wheelwell of the fenders (which saves a bunch of finish work) and fill in the gaps and paint the top and inside of the headers.

Here are some pics below.

Continue reading

[fb_button]
 
To Top

My Build – Operation Fender Length .. cont

• CATEGORIES: Biscuit, Features This site contains affiliate links for which I may be compensated.

I made a good deal of progress with the fenders yesterday.  I created a series of mini molds and fiberglassed several times in different sections to successfully capture the right angles.  So, step 1 is complete.

Today I'll be drilling and mounting the fenders so that they fit correctly.  One issue I have to surmount is that the slope on the fenders seems slightly different than the slope on the mount on the body, but I'm sure I can work around this issue.

Once fitted, then I'll have to create the cutouts for the headers and then create the new walls so that the headers are enclosed.  Unlike metal fenders, which wouldn't lose too much strength when cutout for headers, the fiberglass will benefit from having that extra strength.

After the final modifications are made, I will be to run a second coat of resin and cloth along the entire underside of the fenders.  This will create a smoother look and strengthen the fenders considerably.  

The final step will be to use some filler and gel coat to smooth off the top surfaces — then I'll be ready for paint. 

[fb_button]
 
To Top

My Build — Operation Fender Lengthen Started

• CATEGORIES: Biscuit, Features, News • TAGS: This site contains affiliate links for which I may be compensated.

I've started the process of lengthening my fiberglass fenders. I've determined they need to be extended 4.5". 

My first task was to clean the fenders.  This yielded a surprise:  Business cards from the builder of the body were embeded into both fenders.  To the right a shot of one of them. The information suggests the seller was H.C. "Van" Wagner out of Puyallup, Washington.  He sold Custom fiberglass products including Bobcat products.  The name of the company has faded, but I have the address and phone info.

Once the fenders were cleaned, I cut them in half and I cut out the indent (traditionally for the battery) out of the passenger side.  Once they were cut, I tapered down the cut pieces.  To the left are the cut fenders.

The next step is to fiberglass them.  I'm going to try laying down a layer of gelcoat and then lay the fiberglass over the top of it.  I' haven't used gelcoat in my previous patching jobs, but am trying to gain experience so that I can use it when I do my custom hood project. 

[fb_button]
 
To Top

Fiberglass Body and Grille

• CATEGORIES: Biscuit, Body Parts, Features • TAGS: This site contains affiliate links for which I may be compensated.

Here's a few pictures of the Body and Grille I grabbed while down in Springfield, Oregon a couple of days ago. I need to get a few better pics of it.  I've got it listed for $450 on Craigslist.  

The outside of the body is in excellent shape and would make a great racing shell for PNW4WDA racing. The interior of the body is well designed and strong and could make a good jeeping/street body, however the plywood attached to the bottom is bad in spots, but could be fixed pretty easily.  Also, the firewall has an extra large opening that needs to be closed.  Otherwise, the body looks straight and is pretty light.


Continue reading

[fb_button]
 
To Top

My Build — I found some fenders (and other parts)

• CATEGORIES: Biscuit This site contains affiliate links for which I may be compensated.

I’ve located some fiberglass fenders along with a grille, a body, and a tail gate for $600.  While a decade old, these parts never been installed, drilled, or painted.  The seller says he bought these parts brand new and that they were designed for a street application, so they are a little heavier duty than the light racing bodies. That sounded fine to me, so sometime next week I’m gonna head to Oregon to check them out.  The one thing this package lacks is a hood.

These were actually for sale about a year and a half ago.  The craigslist ad had very little info and didn’t list any keywords, so it was a tough ad to find unless you specifically typed ‘flatfender’ into the search field. Also, it was winter time and, at least for me, getting over the snowy passes wasn’t worth the effort.  After being frustrated in my fender search (metal or fiberglass), Yesterday I decided to give him a call.  Sure enough, he still had everything sitting in his garage.

Because of this, I will continue to list expired Craigslists ads for a while since the sellers may not have been able to get rid of their jeep or parts, but got tired of relisting their stuff.  And, if I can get it, I’ll always list the seller’s contact info if they provide it.

[fb_button]
 
To Top

My Build — Transfercase Shifter

• CATEGORIES: Biscuit, Features This site contains affiliate links for which I may be compensated.

While you can purchase a dual shifting unit from Novak for your Dana 20, it's also possible to fashion one from scratch.  Note that I've never used the dual shifter on a Dana 20 transfercase without removing the center pins that move between the shift rods in the the shifting tower.  To remove the pins, you have to remove the shift levers, drill out the plugs on the sides (note where the red gasket sealant is on the side of the shift tower, and then slip out the oblong pins (they are elongated metal balls).  With these removed, you can push and pull the levers all you want (but don't try running high range in the front and low range in the back unless you feel the need to break something).

[fb_button]
 
To Top

How the transfercase shifting works

• CATEGORIES: Biscuit, Features This site contains affiliate links for which I may be compensated.

There was a question about how the shifting in my transfer case works.  (http://www.ewillys.com/?p=797)

The shifting might seem unusual, but it's not.  What's unusual is that I have removed the pins from the shifting tower that slide back and forth between the shift rods.  This allows for more shifting options.  To take advantage of those options, I installed two rather than one stick.   You can see that here in this video I made.

Here's an image the also demonstrates how the shifting works.  Please note if it doesn't make sense:-)

[fb_button]
 
To Top

My Build — A Custom Data Plate

• CATEGORIES: Biscuit, Features This site contains affiliate links for which I may be compensated.

Yesterday I made a first pass at a design for the gauges on the dashboard.  As a part of that exercise, I tried to find a space for the data plate I have.  The data plate is original to the CJ-3A I have and in good shape, except that it is faded, so it is hard to read.  In fact, I tried to scan it into my scanner and the scanner couldn't pick up the words or pictures at all.  After pondering the situation, I decided to recreate a data plate graphic and take it into a print shop to see if I can make a raise print or sticker of some kind.  As part of the customization, I've tried to recreate the fonts as closely as possible, however, much to my surprise, the data plate uses several different fonts, some of which are the same font but stretched or bolded or both.  Also, I've updated the data plate to better reflect the drive train I have installed.

Here's the current favorite mockup so far (note the font kerning and arrangement will be more precise on the final high resolution version).

[fb_button]
 
To Top

My Build — Boner Award: Cutting my brake line

• CATEGORIES: Biscuit This site contains affiliate links for which I may be compensated.

I made excellent progress yesterday completing and installing a variety of parts (including the custom steering column rod and u joints, additional hydraulic lines, electric fuel pump, fuel line to carburetor).  Unfortunately, in the midst of all this success,  I screwed up. 

For reasons that still baffle me, I mistook the rear brake line (which isn't hooked up to the master cylinder yet — note the pathetic attempt at an excuse) for the gas line to the tank (which isn't there at all).  Despite the fact that they are different size lines and despite the fact that the brake line has the threaded nut at the end (which somehow I didn't notice), I managed to mistake the brake line for the gas line.  Even right after I cut it I didn't realize my mistake (clearly my mind was elsewhere!).  

The good news is that I can still take it off relatively easily and get it reflared and it shouldn't cost more than a few dollars — Andy's Supply, here I come.  Though it's now shorter, fortunately it's still long enough to use — in fact, it might even work better as a slightly shorter length.

[fb_button]