Paul-M38 Research Archives

To Top

Wheeling Discs and New Tires

• CATEGORIES: Builds, Features, stainless/jewels • TAGS: This site contains affiliate links for which I may be compensated.

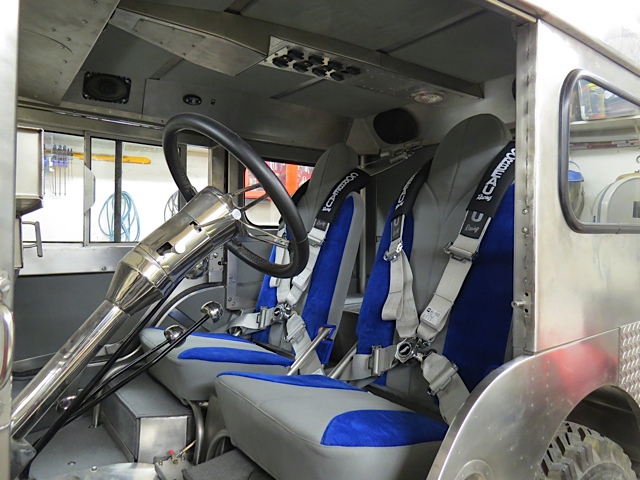
Paul continues to make progress on his jeep. He received his tires and has made some custom stainless rim discs.
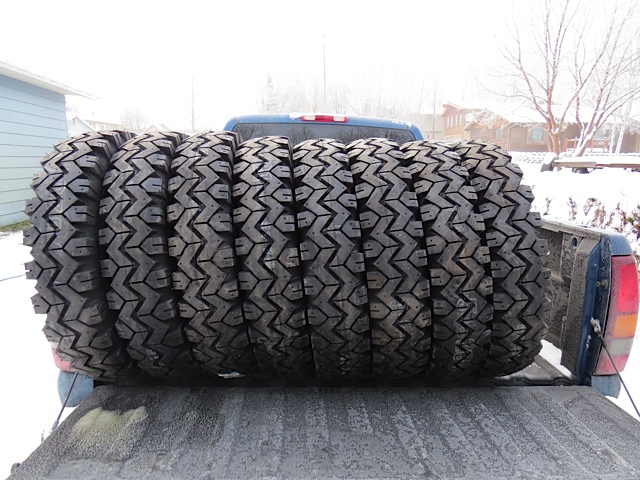
tires

Paul’s new tires

TIRES:

He writes, “The New Tire Fairy arrived at the house today with eight brand new STA Super Traxion 6.50-16 tires along with eight new inner tubes for the little Willys. I’d been searching the internet for a vintage looking narrow tire with an aggressive tread design that would look good on the Willys so shortly after I discovered these tires I put my credit card to work and placed my order.

I wanted to replace the brand new but 30 year old tires on the Willys so that accounted for 5 tires and I needed 3 more tires for the military trailer (I want the trailer to have it’s own spare tire) so that’s why I bought eight. Shipping wasn’t too expensive since I wasn’t in a hurry and compared to Coker tire who wanted to ship their tires 2nd day air ($1,100 for the tires and an additional $900 for shipping) it was down right reasonable by Alaska standards.”
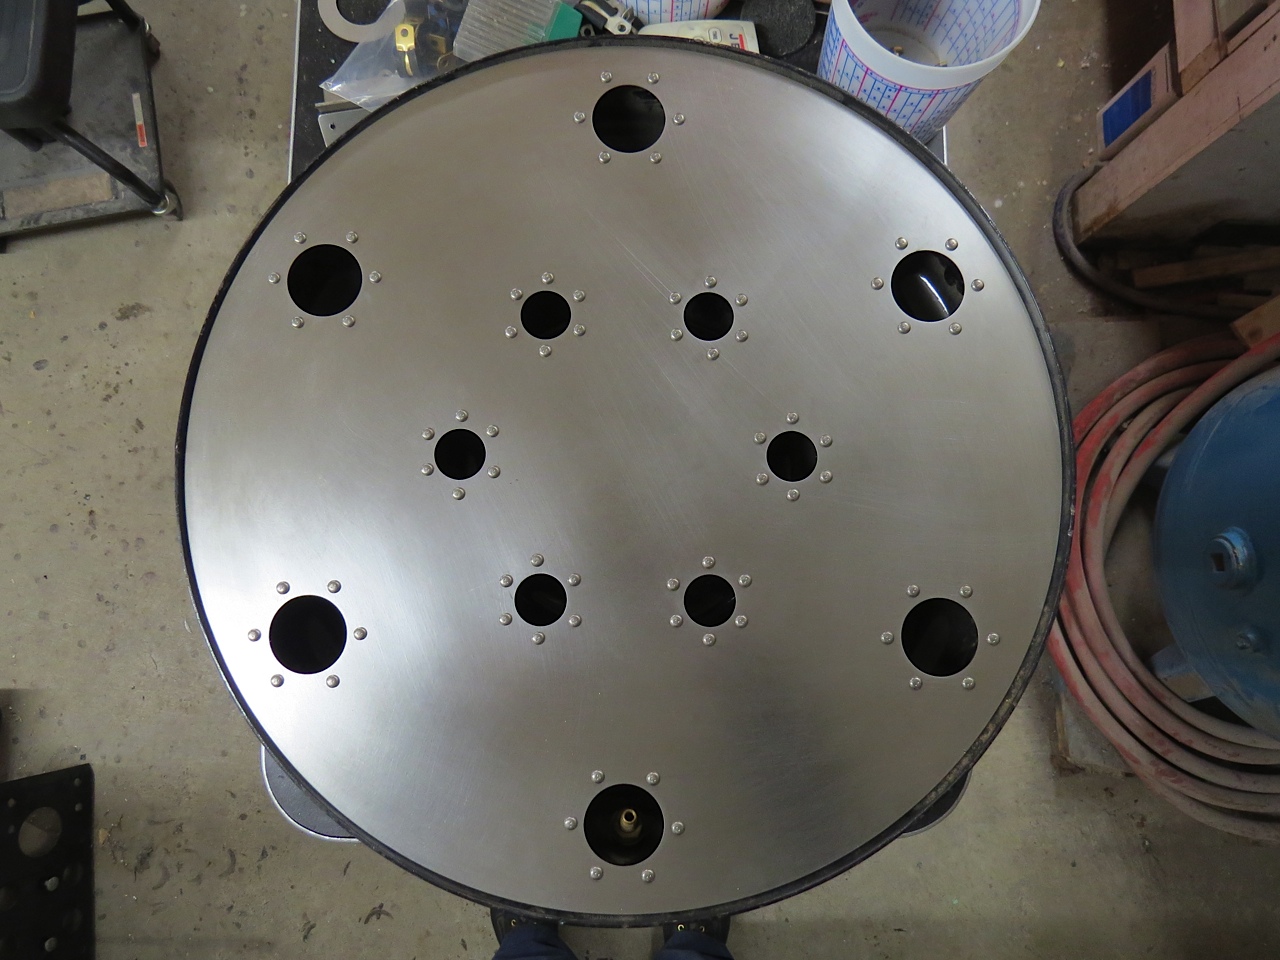
WHEEL DISCS:

wheel-discs-test

In this photo he’s testing out the disc concept with poster board.

He writes, “I bought some poster board that was large enough to make full size mock ups of the stainless steel wheel covers I’m thinking of making to cover the plain steel wheels I’ll be using on the Willys. The six larger holes are 1 & 1/2 “ diameter and the smaller holes are 1 “ in diameter. I’ve made other discs, some with more holes and some with less holes on each disc in various patterns but I keep coming back to this design. It’s simple, the spacing of the holes is easy on my eyes and the wheel covers make the tires appear larger and more heavy duty.

Each hole will have a reinforcing ring fastened to the back side of the disc either by 1/8th inch diameter monel raised head style rivets or 3/16” dimeter stainless steel machine screws (the size of the machine screws used on the door just below the window). These doublers and rivets are for style only and not necessary for strength. Each disc will be attached to a wheel by six stainless machine screws and these screws will thread into steel mounts welded to the wheels.”

wheel-disc1

A completed disc.

“Above is the first wheel disc with the holes drilled and the rivets installed. I gave the plain disc a brushed finish to see what it would look like … I think it’s about as close as I can come to matching the body finish. These wheel discs need to be easy to clean and easy to touch up the finish so a mirror polished disc would require lots of maintenance to keep the metal shiny. I don’t have enough energy to keep up with the mirror finish. 

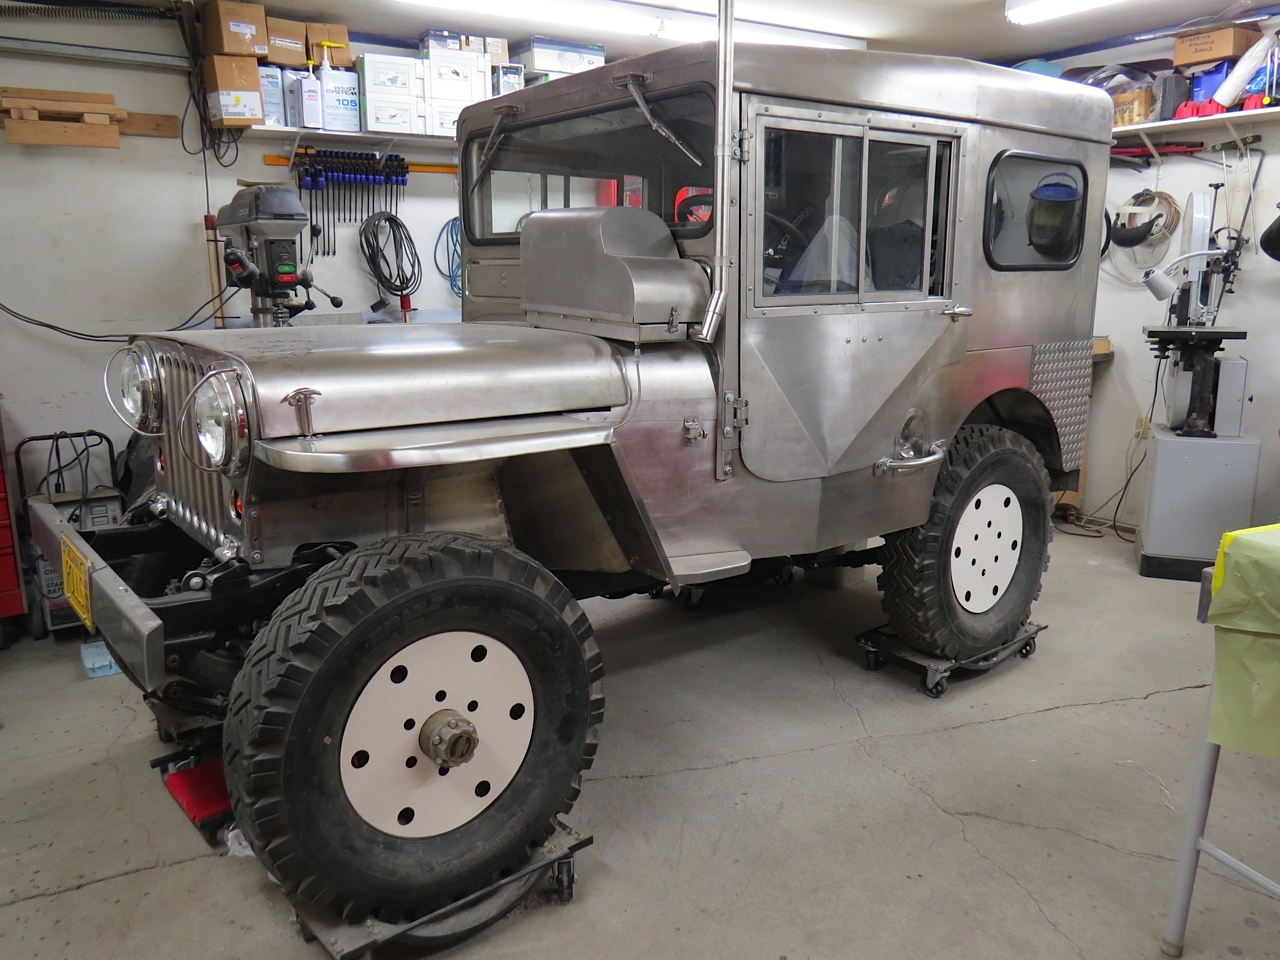
I finished riveting the last two wheel discs today then I cut a hole thru the center of the front wheel disc slightly larger than the Warn hub so these discs could be test fitted to the wheels on the Willys. The tires on the Willys are still the old new ones and not the new, new ones I recently received since the steel wheels currently on the Willys have the wrong offset and will be replaced with the correct wheels in the near future. Anyway, I think these discs match the Willys much better than the aluminum wheels I was originally planning on using.”

wheel-disc2

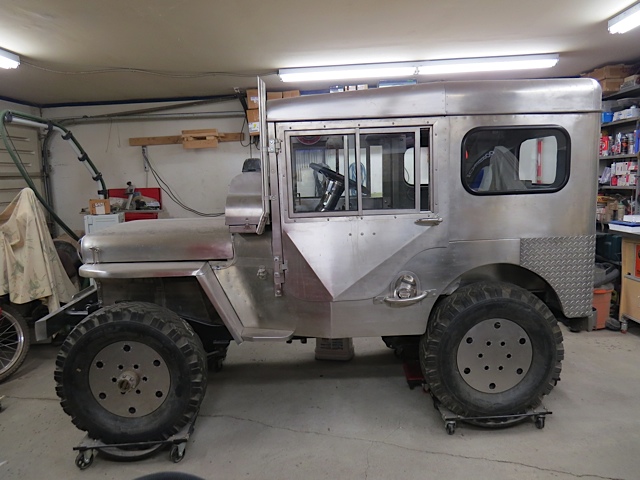
The wheel discs attached. The discs came out a little darker, but that’s probably because of the angle. The discs are made of the same stainless as the rest of the jeep. These are the old tires, not the new ones.


[fb_button]
 
To Top

Paul’s Getting All Charged Up

• CATEGORIES: Builds, Features • TAGS: This site contains affiliate links for which I may be compensated.

Paul’s made some additional progress over the last month on his stainless jeep.

Paul writes, The upholstery is done, the driver’s seat has been installed and the seat belt/shoulder harness combos have been adjusted for length and bolted in place. The passenger seat will still need to be removed to allow access to the battery mount and cable connections in the electrical box but progress is being made.

interior-stainless-paul

Corbeau three inch wide belts with a cam lock release and in a color that goes well with the upholstery and stainless steel.

interior-stainless-paul2Paul has also been working on the battery installation. He continues, The open space on the right side of the electrical junction box should be filled with a new Odyssey AGM side post battery

battery-box1

Here I’m comparing the size of the Odyssey battery to the mockup battery I taped together out of poster board. I used the mockup battery to locate the attach points for the battery hold down bracket in the electrical junction box.

battery-box2

The battery fits and there’s even room for a longer battery. This small battery weighs 45 pounds so I don’t believe there’s any need to get a larger and heavier battery anytime in the future.

battery-box3

This hold down bracket is slightly bigger than the battery but the battery is firmly held when the attach hardware is tightened. The bracket consists of eight separate pieces of stainless held together by 40 rivets.
battery-box4

Now it’s time to start smoke testing the wiring and that might take a while.

[fb_button]
 
To Top

Paul’s Getting Serious

• CATEGORIES: Features, stainless/jewels • TAGS: This site contains affiliate links for which I may be compensated.

Paul really seems serious about finishing his jeep! Below he shares photos and updates:

All sidewall and top upholstery panels have been installed so I began cutting foam for the front seats.

2014-10-15-paul1

Still waiting on the carpet for the rear wheel well tops, the rear floor and the front seat footwell areas.

2014-10-15-paul2

Here you’re looking at the rear window panel and the left rear wheel well. I think the gray fabric and the stainless steel look pretty good together.

2014-10-15-paul3

I’m looking forward to getting the seats upholstered. The gray and blue seat colors should add a bit of color to the interior.

2014-10-15-paul4

Front seats reinstalled, the foam is rough cut and the combination of thick foam for the bottom and thin foam for the back will allow enough room for me to reach all of the controls and still see out the windshield. The side windows are another matter. I should have Sumo-sized my Willys.

2014-10-15-paul5

[fb_button]
 
To Top

More Progress From Paul

• CATEGORIES: Features • TAGS: This site contains affiliate links for which I may be compensated.

Paul’s added more panels to his M-38. The gray panels look real nice inside. Somehow, he managed to arrange an earthquake in Alaska just to test the design!

paul-upholstery-m38-6

I purchased more shower curtain rods so I could speed up my progress on installing the Willys interior panels. I’m excited seeing the improvement the fabric panels make over the bare stainless and it seems Mother Nature is excited also. Yesterday (Sept. 25th) we had a 6.2 earthquake rumble thru town and this evening we had another smaller earthquake measuring only 5.0. The 6.2 quake managed to knock some stuff off the shelves in the garage and some items stored in the crawlspace were broken but we had no damage to the house or the Willys so I’m a happy guy. Here’s a picture of two more interior panels being held in place by 10 curtain rods (upholstery tensioning devices) and you can see the gray fabric panel slightly above the center of this photo. Tomorrow I’ll install two more overhead panels and prep the two vertical corner pieces if the earth quits moving long enough for me to reposition the tension rods.

paul-upholstery-m38-5

As you might have noticed, I clamped the rear window upholstery panel into position this morning. The interior panel is protected by a 2 inch thick white foam overlay and cardboard taped to the stainless protects the surface from scratches from the vise grip clamps. paul-upholstery-m38-4

Two inch thick foam overlay protects the upholstery panel and spreads the clamping force. Two smaller finished pieces are installed and clamped by the famous adjustable tension rods. I’ve used 34 tubes (12.9 ounces each) of black silicone to attach 15 interior panels and I still have 18 panels left to install.

paul-upholstery-m38-2

I never expected shower curtain rods and foam insulation were necessary tools for installing upholstery in the Willys. As you can see on the right Vise Grips, thin plywood and pink foam are also needed. Yes, we embrace diversity here in the northland. paul-upholstery-m38-1


[fb_button]
 
To Top

Paul’s Back Playing with his Willys

• CATEGORIES: Features • TAGS: This site contains affiliate links for which I may be compensated.

With the return of cold weather to Alaska, Paul’s back in the garage putting some finishing touches on his long-time project.

Paul writes,
All the wood projects are put away for the winter and I’m back working on the Willys fitting upholstered panels to the interior. Sheets of white high density foam have been cut into the necessary shapes and (depending on their location) either covered with fabric or bonded to .050″ stainless steel. A silver/gray fabric will be used on most of the interior but six panels (three on the left and three on the right) will be attached to metal pieces for extra abrasion resistance in the front seat footwell area. I’ve coated the inside of the Willys with 2 layers of black silicone but I still need to apply the silicone to the open cell interior foam before I can begin installing the upholstery. My plan is to work from the top down so the six overhead panels will be the first fabric covered sections to be installed. Since the silicone takes 24 hours to cure I needed to come up with an easy way to hold these pieces in position while the silicone cured.

footwell-panels

The shower curtain rod, oops I mean the upholstery clamping fixture is pressing against the foam block holding the kick panel in position.

The Goddess suggested I lay on my back inside the Willys (just aft of the front seats) where I could hold four panels in position using both my hands and feet. She said 24 hours isn’t that long to stay in one position and after all I’d be laying on my back so it’s not like I’m doing any work or anything like that. Even her offer to bring me some food and a blanket for the night hours wasn’t enough to convince me this was a good idea so I attempted to find a different solution. What I wanted was an adjustable length tube where the clamping force could be increased or decreased as necessary and it should be reasonably cheap. Time to visit Lowes and wander the aisles to see what I could find. The solution to my problem was waiting for me in the bathroom fixtures aisle where I saw a fantastic display of assorted length adjustable shower curtain rods. They were designed as shower curtain rods, they were manufactured as shower curtain rods and they were sold as shower curtain rods but now they were Willys upholstery installation tools. The best part of this deal was the low price of each upholstery tensioner allowed me to buy four long ones (44 to 72 inches in length) and three short ones (24 to 48 inches in length) without spending very much money. I was happy and my back was happy.

interior-upholstery

Since I was going to be climbing into and out of the Willys a lot I removed the front seats and the fuel tanks so I’d have more work space.

Today I positioned one of the long tubes from the interior of the left side of the Willys, across the transmission tunnel and over to the right side footwell to provide clamping pressure on the abrasion panel. It worked GREAT! There were two more metal clad panels ready for installation (below the door openings) but here I used adjustable clamps along with some small foam board pieces to spread out the clamping force during installation. I’ll send you pictures to go along with my words so you’ll have a better idea of what I’m doing.

interior-upholstery2

Since I was going to be climbing into and out of the Willys a lot I removed the front seats and the fuel tanks so I’d have more work space.

interior-upholstery3

Notice the black silicone trimmed from the edge of the window opening? I still have a little cleaning to do in this area.

To prevent problems with the upholstery I removed the glass from both side windows and the rear window before I applied the black silicone on the interior of these top panels. Not having the glass installed made applying the silicone much easier but I managed to smear silicone where the rubber H channel (used to hold the glass to the metal panels) grips the metal edge. While I let the silicone cure I thought about how I could carefully trim the unwanted silicone from the window opening on the top panels. I could use a razor blade and make the cut free handed but I was hoping to be a little more precise than that so I dug thru my tool box and I came up with a simple but accurate solution. I found an old compass (the circle kind, not the where are we kind) and after removing the pencil I was able to fit a clone of a small Exacto knife where the pencil would go. Using the center pivot as an edge guide I adjusted the blade position by using the knurled knob so the cut would be made slightly past the edge of the rubber H channel. A quick pass around the window opening and the silicone was trimmed back the needed amount.

special-edge-trimmer

This little cutter worked great, I lucked out and had a cutter that was the same diameter as the average pencil so everything fit together with no problems.

[fb_button]
 
To Top

Knardly Rolls gets Busted — Sort of

• CATEGORIES: Features, Reader Stories • TAGS: This site contains affiliate links for which I may be compensated.

Most of you are familiar with Paul’s stainless M-38 project that’s going on its 26th (?) year (He’s almost done). However, according to the City of Miami, the project is roaming the streets of Florida. I’ll let Paul explain.

For many years my friends have been asking me when the stainless Willys would be back on the road. Thru the years I tried to offer an accurate estimate of when I thought (or hoped) the Willys would be back together but as each deadline passed I realized my completion plans were wildly optimistic. Until today.

I just received official notice from the United States Post Office that not only is my Willys runnable, but during the first week of May 2014 my Jeep was cruising southbound on Biscayne Boulevard in Florida!

How cool is that? I feel like a putz, I had no idea I was finished with my long term rebuild but I can live with that. What really bothers me is my Willys went cruising without me, geeze after all I’ve done for my Jeep I’m quickly cast aside like a used kleenex when it’s time to play. Unfortunately my Willys had a bit too much fun and ended up running a red light. I know things happen and all that but now the city of North Miami wants me to send them $158.00 just because my little Willys turned renegade. There’s even an official photo recording this illegal event. Zowie!

I’m sure this ticket is real, it’s from: City of North Miami

Intersection Safety Program
PO Box 22091
Tempe, AZ 85285-2091

If that’s not enough to convince you I’m supposed to pay the fine to: City of North Miami

Payment Processing Center
PO Box 742527
Cincinnati, OH 45274-2527

paul-ticket2

And best of all the official driving infraction photo doesn’t show a Willys, the vehicle isn’t green (the old body color was OD but the local DMV called it green) and the license photo shows a different license plate design that what’s on my Willys so what’s an owner to do? I feel so cheap and used. I gave this Willys the best years of my life, I ate the cheap cuts of macaroni so I could purchase the parts necessary for rebuilding my Jeep, I stayed late in the garage ignoring friends just so I could have quality time with my Willys and this is what I get? My innocent Willys has turned Renegade and left me for a good time in sunny Florida so here I sit staring out the window watching fresh snow being deposited on the mountains!

My heart is broken, I’ll never be able to trust my Willys again. Yes I heard the often repeated stories about how your Willys will turn on you, how the good times will roll until someone better comes along but I didn’t believe this. I told my friends my Willys was different, my Willys is loyal and my Willys would never get into trouble. I’m so ashamed my Willys is like all the rest, just out for a good time and forget about everything else.

A word of warning to all who read these words…

Your Willys will get you into trouble!

Thank you

A very sad Paul Bierman

[fb_button]
 
To Top

Update From Paul on His Stainless Flattie’s Progress

• CATEGORIES: Builds, Features • TAGS: This site contains affiliate links for which I may be compensated.

Paul’s made some progress on his Willys. You can read past posts about his jeep, Knardly Rolls, here: http://www.ewillys.com/tag/paul-m38/paul-stainless-jeep-top-1

Paul writes, I’m using thin poster board to make patterns for the interior panels on the Willys. Since the reinforcing structure for the top and doors will be visible from the inside and not covered by upholstery I’ve had to make 33 individual paper patterns so far. After adjusting the fit of these patterns I’ll transfer their measurements to 3/4 inch thick high density foam and then it’s time for the upholstery wizards to work their magic. Fourteen yards of fabric are on order so that should be enough to cover everything but the floor. All of the top and side wall panels will be covered with a silver gray fabric and this same fabric will be used on the seats with the exception of blue insert panels covering the center of the seats. That’s the plan right now. I still need to buy some thick upholstery foam so I can begin cutting out the padding for the seats but I wanted to finish with the patterns first.

paul-stainless-jeep-top-2

More pattern pictures. To have enough room to make the patterns and install the upholstery pieces it was necessary to remove the fuel tanks and both front seats. The more work I can do myself the lower the cost will be to get the upholstery done so I don’t mind constantly climbing into and out of the Willys all day long. Things would be a lot easier if the Jeep was just a little bit bigger or I was just a little bit smaller. Oh well, I guess I need to call a Waaaaaaaaaambulance. Paul

[fb_button]
 
To Top

Always FOLLOW a Half Track . . .

• CATEGORIES: Event, Features, M-38, Reader Stories • TAGS: This site contains affiliate links for which I may be compensated.

Paul forwarded these pics to consider. The moral is, always follow a half track!

Last Saturday I visited the local military vehicle show and I saw an amazing sight.  Among the various military trucks, Jeeps and one half track on display there was a Willys  M 38 which had suffered a bit of body damage when the previously mentioned half track didn’t quite stop soon enough.  I don’t know the reason for the meeting of these vehicles but the attached pictures show the results of contact between one very light and one very heavy military rig.  The poor M 38 got the worst of this bump but the half track also suffered when it received a scratch in the paint on the front drum.  Sad to see but I don’t believe anyone was hurt.”

m38-halftrack-rear-ended1 m38-halftrack-rear-ended2 m38-halftrack-rear-ended3

[fb_button]
 
To Top

Knardly Rolls

• CATEGORIES: Builds, Features • TAGS: This site contains affiliate links for which I may be compensated.

Paul gives an update on his jeep build. (View past posts by Paul here)


2012-10-12-photo1-1

“I’ve been making some progress on the Willys this winter but my wallet can’t keep up with my plans so I’ve had to scale my work back to consist of lower cost but necessary tasks which must be done but aren’t the flashy jobs that get noticed. One of these simple items was fabricating a license plate mount on the front bumper. I didn’t want to mount the plate on the grille where it would restrict the airflow heading toward the radiator and attaching the plate right above the bumper could restrict the visibility of the front turn signals. Hanging the plate below the front bumper would expose the plate to damage by snow piles and make it more difficult to see so I ended up mounting the plate on the center of the front bumper with some 1/8th inch thick angle stainless providing the needed support. These angle sections were cut so they were slightly wider and taller than the plate, the edges were filed and contoured to match the plate and riveted to a 16 gauge stainless sheet which fits just behind the license plate for added support.”

2012-12-26-photo2-1

“With these parts together I riveted this assembly to the upper and lower surfaces of the front bumper. All rivets were flush head style which not only look smoother but prevent interference with the mounting of the license plate. The attach hardware for the license plate ended up being too close to the bumper structure so I had to hand file four openings in the bend radius of the reinforcing angles to allow clearance for the washers and nuts. The license plate mount is pretty sturdy and doesn’t restrict airflow or visibility so I like it. I’ve attached pictures of this mod so you can make sense of what I’m talking about.

By the way, the license Rolls is an old joke which began in either late 1972 or 1973. With the original four cylinder engine and the 5.38 axle ratios this poor Willys was slow. I drove many miles down the shoulder of the roads while faster vehicles (furniture vans, garbage trucks and kids on bicycles) zoomed past me. Naturally, my friends seemed to notice how slow my Jeep was and were often surprised to see a speedometer in the gauge cluster. They thought since the Willys was so slow I’d use a calender to measure my driving speed. Somehow the general opinion came to believe this Jeep was not built by WillysOverland but by a company called Rolls Knardly because the Jeep Rolls down one hill and Knardly make it up the next one. The name stuck and I paid extra to have Rolls as a personalized license plate much to the enjoyment of my friends. I still have the plate and someday I hope to have the all new and improved Rolls Knardly back on the Alaskan roads, I might even try to pass someone!”

[fb_button]