Rusty-DJ-3A Research Archives

To Top

And Then My iPhone Landed in My Soup ….

• CATEGORIES: Features • TAGS: This site contains affiliate links for which I may be compensated.

This story deserves a much longer telling, but let me cut straight to it. I’m in Seattle to work on Rusty. I dropped my iPhone in a bowl of Pho Soup. Not good. I rushed home and set it up to dry. Shortly afterward, I removed Rusty’s heater, only to find someone had built an expansive home inside the heater. This explains some of the missing cushion from the seats. As I was taking pics with the Nikon, the battery died. So, I turned to my computer, but the photos were much worse than I imagined. Not a great tech day.

On the bright side, I tested the heater fan and that works. Also, my phone seems to be drying out … finally.

As you can see below, the inside of the heater is almost entirely filled with stuff:

2016-11-17-heater-core-stuffed

And this is how it looked after that stuff was removed (and after my iPhone started working a little better). I now need to remove debris from the fins and repair the lower tube.

2016-11-17-heater-core-stuffed-cleaned

I also disassembled my speedometer. The rod that powers the pointer had broken. I will see if there is any way to repair it. The part looks awfully like later speedometers, so there may be hope for replacing it, but I first have to disassemble the front plate from the mechanism. Based on what I’ve read, it might never work quite right. But hey, it doesn’t work quite right anyhow!

2016-11-17-speedometer-pointer-rod


[fb_button]
 
To Top

The DJ-3A “Wire Gauze” or “Dry Air” Filter

• CATEGORIES: Builds, Features • TAGS: This site contains affiliate links for which I may be compensated.
1954-kaiser-darrin-dry-airfilter

A pretty correct looking dry air or wire gauze filter from a 1954 Kaiser Darrin. Not the diagonal wire mesh on the exterior and the two prominent lips on the lid. The rubber piece on the top is unique to the Darrins. The DJ-3A did not use the rubber top piece.

UPDATE: This modification of the Oil Bath system into a dry air system by installing an air filter inside the oil bath canister might interest some readers: http://z4.invisionfree.com/CJ3B_Bulletin_Board/ar/t1267.htm

On DJ-3As, the stock air filter is a  “Wire Gauze” or “Dry Air” filter type. The oil bath filter commonly seen on earlier L-134 engines was an upgrade option on the DJ-3As. When I looked to see whether my firewall had the holes necessary to mount the oil bath filter, I found the firewall had not been drilled. So, Rusty must have been equipped with a dry air filter.

As far as we know, Willys Motors only installed the dry air filter on the DJ-3As. This same filter appeared chromed on some 1953 & 1954 Corvettes and some 1954 161 Darrins (perhaps other years, too). It’s likely that if someone has one of these lying around, they probably don’t know what it is. If you happen to have one, I’d be interested in it.

Below is one example of a filter about to be restored with a modern mesh in the middle. Charles explained how the NOS filter material can be reproduced: “A NOS corvette, Darrin, or DJ filter core is rare and expensive. Once in a couple of blue moons they show up on eBay. However, they can be made easily . The inner and outer ring are made of extremely thin expanded metal. Make the inner ring, wrap around some air filter grade copper mesh wrap (eBay) and then wrap the outer ring and secure. Unfortunately, the copper would deteriorate over the years and has been talked about badly. Even though they were called dry air filters they were supposed to be kept oiled.”

According to Bill Brown, there’s a K&N filter that can be used. He couldn’t remember the part number, but the “OD of it is 6 3/8″; the ID is 5 1/4″; and the height is 1 1/2”. This is a filter with an accordion fold all the way around with a molded “rubber” top an bottom. Molded into both the top and bottom are a pair of K & N marks the Identification AO62B4 and the words Oil Type.”

dry-filter-1964-surrey1

This photo shows some of the parts to build a custom dry air filter. The bottom is original. The mesh left and right should be criss cross in diamond shapes rather than circles. The air filter at the bottom is meant to replace the shredded copper originally between the circular mesh. The felt circle helps seal the top lid to the tops of the mesh. The item on the lower right compresses the felt onto the mesh.

Here are examples of the filter installed. The diameter of the top lid is about 6 3/4 inches:

dry-filter-1964-surrey2

This rebuilt unit has the incorrect mesh and an aftermarket filter.

Jason64DJ35

This one could be original. I can’t tell what kind of mesh surrounds the shredded interior.

Continue reading

[fb_button]
 
To Top

Rusty / DJ-3A Questions & Needs

• CATEGORIES: Builds, Features • TAGS: This site contains affiliate links for which I may be compensated.

I’ve spent some time over the last couple of days assembling information on what I have/needwant for Rusty.  I’m throwing this info up for questions/answers/comments:

1. AIR CLEANER: Bill has hooked me up with an air cleaner. I just need the horn, seal, and tube –  http://www.jeepsurreygala.com/wp-content/uploads/2012/06/oil-bath.jpg … cj3a looks the same to me? From 3A forum: http://www.cj3apage.com/cgi-bin/3Ayabb26/YaBB.pl?num=1303907998. Nice writeup on air cleaners here. Walcks has an air cleaner sticker, so that takes care of that.

air-cleaner-comparison

2. IGNITION SWITCH: Early ignition switch http://www.jeepsurreygala.com/wp-content/uploads/2012/04/KeychainEmilBruce.jpg. I don’t know if this style was used on any other jeeps? It dishes inward with the word “START”on it.

key-ignition-early-dj3a

3. PARKING BRAKE: I will need parking brake parts: http://www.jeepsurreygala.com/wp-content/uploads/2012/06/62-hand-brake.jpg. Are the later 3B T-handle parking brake setups the same as the DJ cables and parts? I have a handle that is salvageable, but lack the rest. The image below is from a 1962 book. I’ve seen nothing to indicate this changed from early DJ-3As.

1962-dj3a-handbrake

4. TRANNY CROSS MEMBER: I need a transmission cross member: http://www.jeepsurreygala.com/wp-content/uploads/2012/06/55-dj-frame.jpg (image http://s247.photobucket.com/user/64_Surrey/media/rearmount_zpsee48cf46.jpg.html) Should be the same as a 3A/3B/CJ-5? Note the cross member does have the transfercase mounting hole (far bottom) so it may be the same as the typical cross member.

1956-dj3a-transmission-crossmember

Continue reading

[fb_button]
 
To Top

Grilling on Rusty

• CATEGORIES: Features • TAGS: This site contains affiliate links for which I may be compensated.

On Monday I spent some time testing the engine. After lightly sanding the points, the spark began to work, but the engine still didn’t start. I took a second look at the fuel pump and discovered it in fact wasn’t working. When I checked the bolts to remove it I discovered that the bolts were snug, but not tightened. So, someone at some point looked at the fuel pump.

After further examining the non-stock solex carb, I then removed it (I plan to sell it anyway). That’s when I noticed there was a pool of varnish/gas along the bottom of the intake. I decided I would get all that cleaned up before trying to restart it.

I next turned to the grille. The first two photos show how bad the grille was bent. I can’t image what they hit. Thankfully, the radiator seems to be fine.

2016-10-10-grille-rusty-straightened1

2016-10-10-grille-rusty-straightened2

Using a variety of strategies, I flattened the grille and straightened the edges. One side smoothed out quickly. In the pic below, you can see the right side too a little extra bending to come out correctly.2016-10-10-grille-rusty-straightened3

Here’s the final result. I’m pleased.2016-10-10-grille-rusty-straightened4

I will still have to repair both sides of the grille where it mounts to the bottom mount. I haven’t decided how I was to repair those areas. Here’s the right side where it mounts to the frame. As  you can see, the metal was cracked.

2016-10-10-grille-broken

We returned to Pasco late yesterday. I won’t be going back to Seattle until after Halloween, so I brought back a box of goodies to work on.


[fb_button]
 
To Top

No Updates Today

• CATEGORIES: News • TAGS: This site contains affiliate links for which I may be compensated.

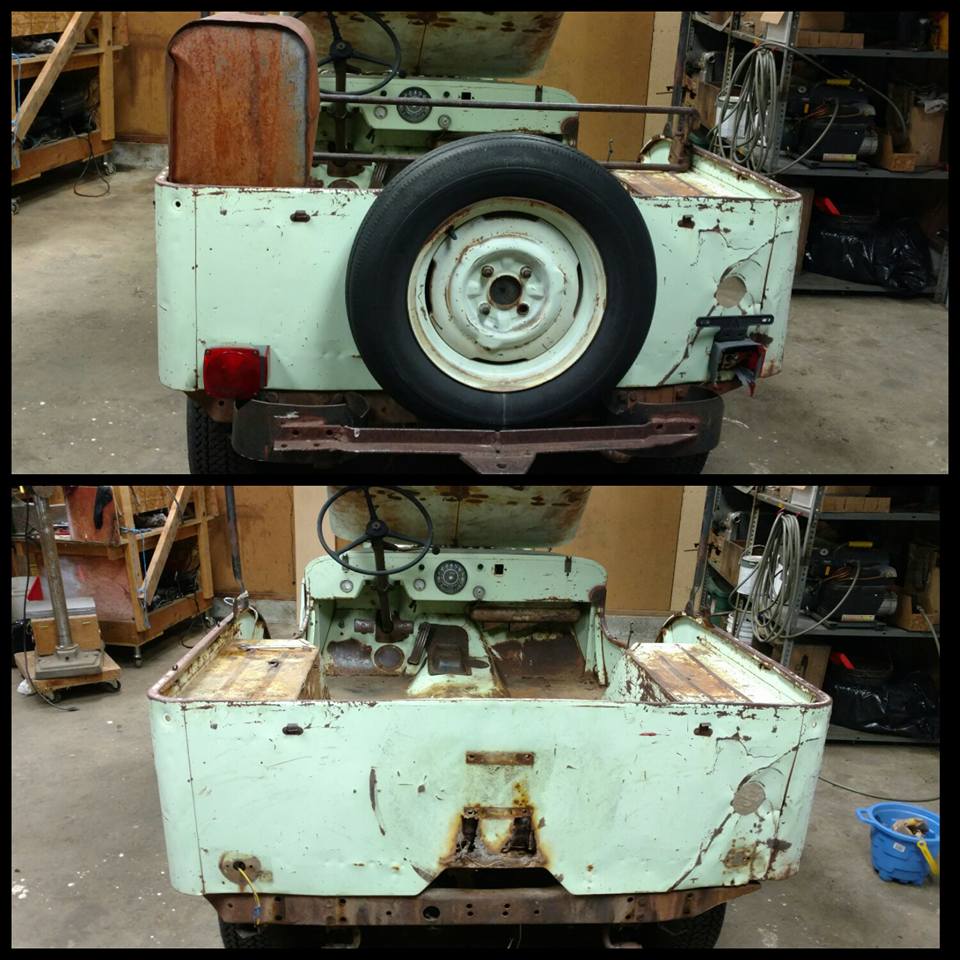
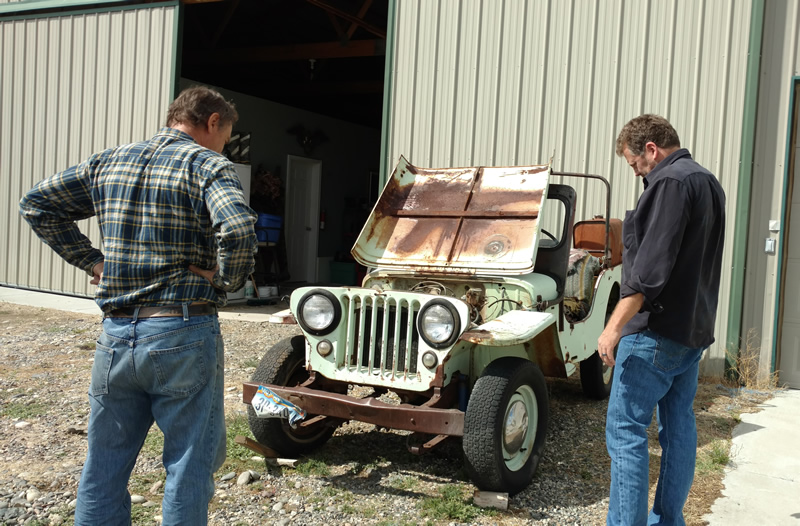
Ann and I have been busy with Rusty today. We removed (no easy task given the damage and rusty bolts) the grille and are ready to straighten it. Ann removed the rear tire, lights, and funky rear tow setup. We bought a battery, changed oil, etc. We learned that the starter spins and the engine turns over smoothly. The fuel pump works, too, but there’s no spark to the plugs just yet (seems to be the points — coil is working).

Here are just a few pics.

10-09-2016-dissassembly-Rusty1

The rust areas in the center are rusted through. The cargo area floor has a similar sized rust problem. Both appear patchable. Ann did all this work.

10-09-2016-dissassembly-Rusty3

This is my wife’s blood. I told her to stop bleeding on the jeep 🙂

10-09-2016-dissassembly-Rusty2

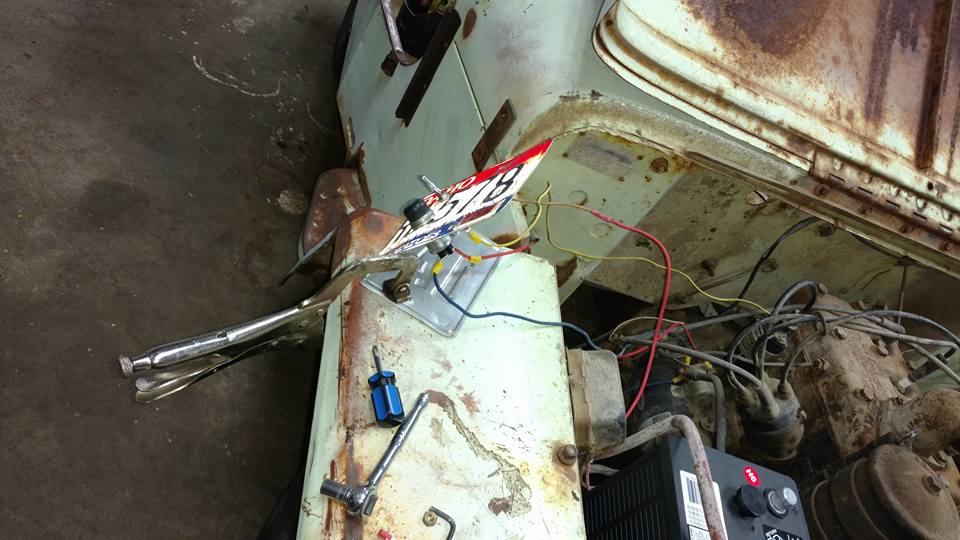
My ignition didn’t come with a key and wasn’t stock anyway, so I ditched it. Instead, I rigged up this fender mounted dash with an ignition switch and button starter.

[fb_button]
 
To Top

Rusty’s Windshield

• CATEGORIES: Features • TAGS: This site contains affiliate links for which I may be compensated.

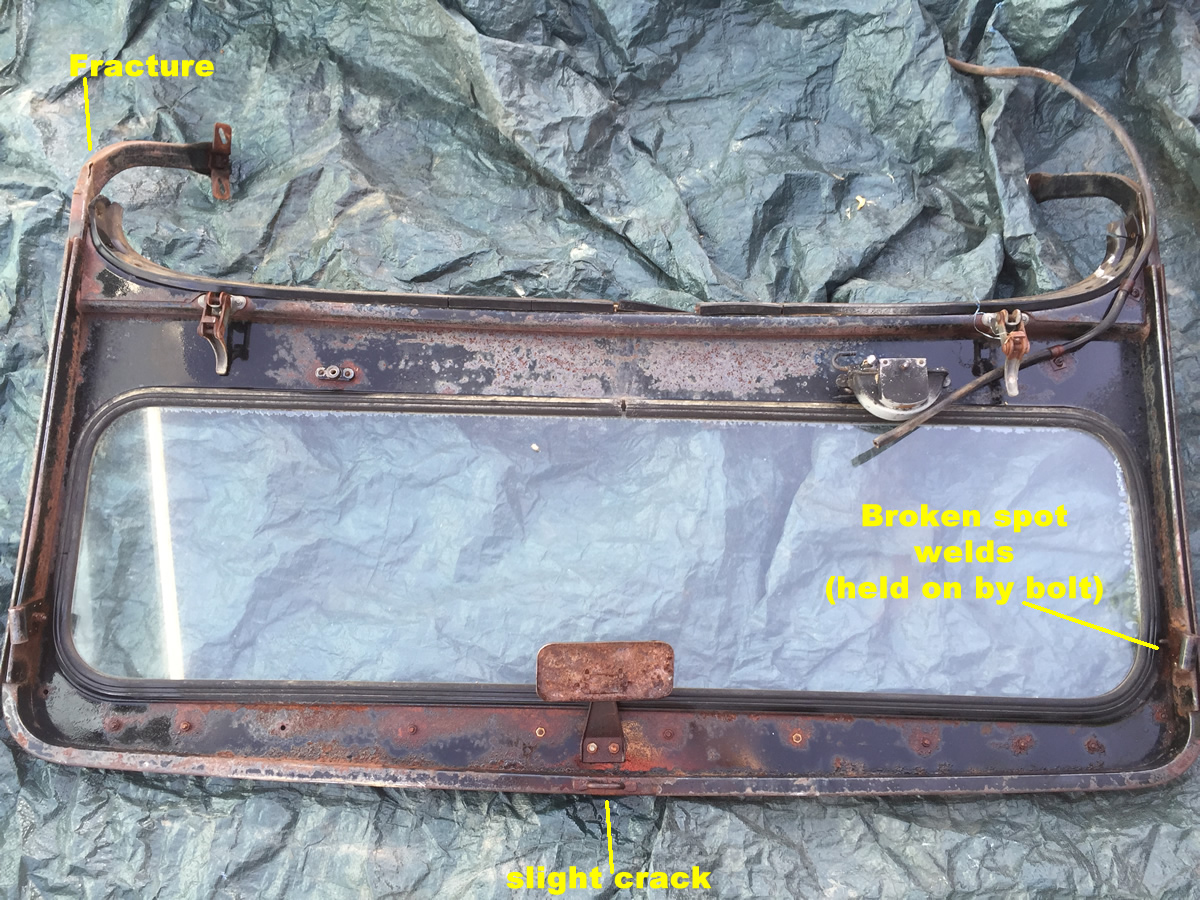
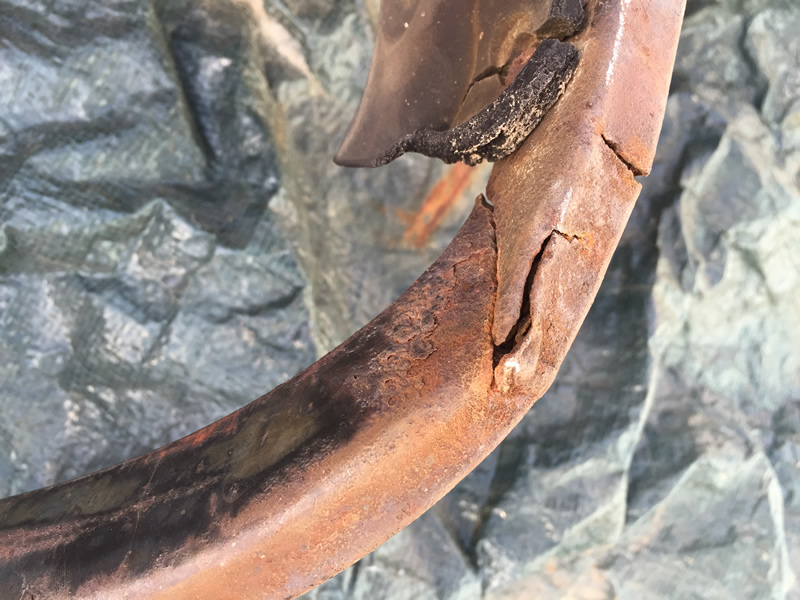
I had a chance this past week to begin taking apart the windshield. The windshield frame has only surface rust, so that’s a relief, but it does have two cracks. One crack should be easily fixed, but the other is on the arm. It is complete severed except for the cables(?) on the inside. This will be a little more of a challenge. Here are some photos:

2016-09-12-windshield

Fractured support arm:

2016-09-12-windshield-crack-support3 2016-09-12-windshield-crack-support2 2016-09-12-windshield-crack-support1

Continue reading

[fb_button]
 
To Top

Rewind — September 5-7: Our “Rusty” Trip

• CATEGORIES: Features • TAGS: This site contains affiliate links for which I may be compensated.
2016-09-06-lloyds5

Lloyd’s modified GAZ. Pretty cool vehicle.

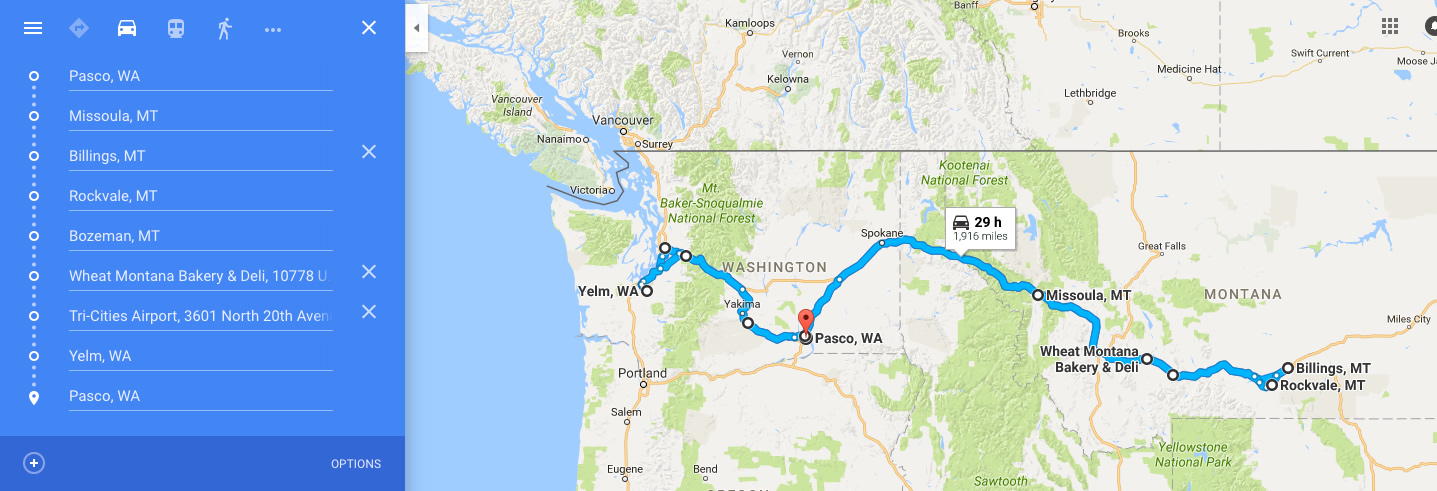
Normally, I’m good about updating our adventures daily, but we usually don’t do these hellacious long drives (which is by design). So, this post will cover the last few days …

map-trip

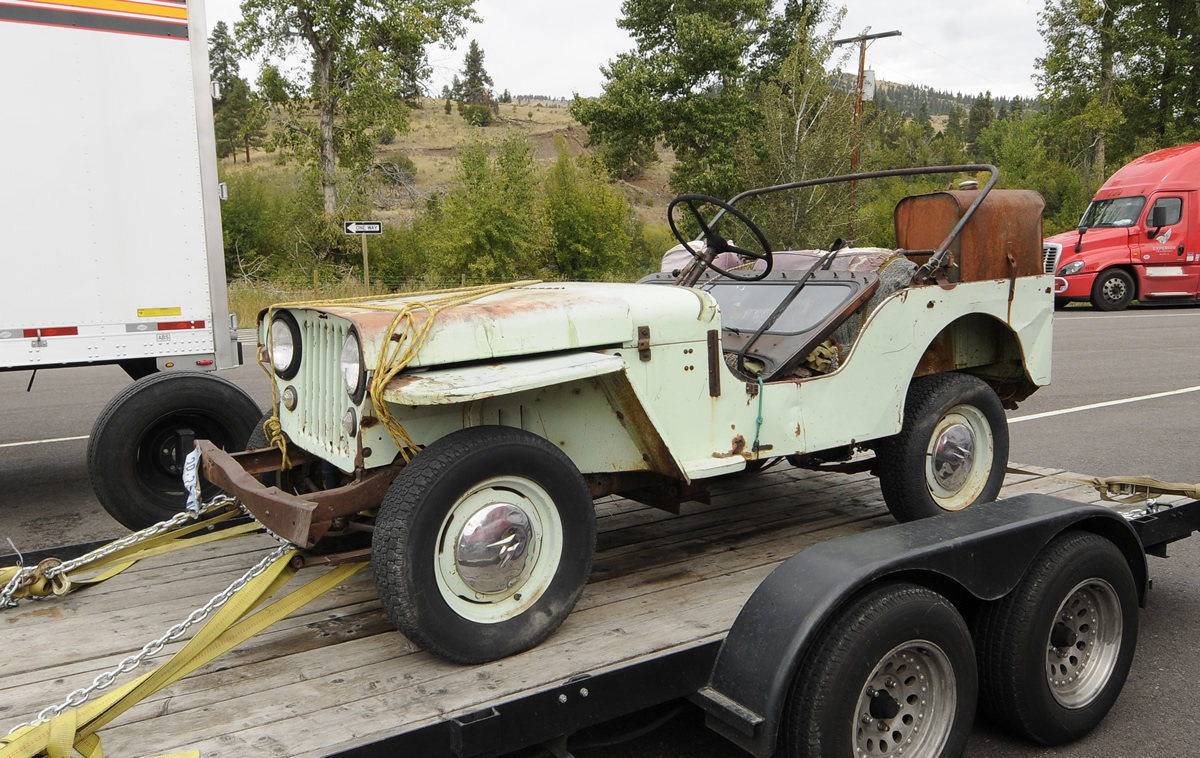
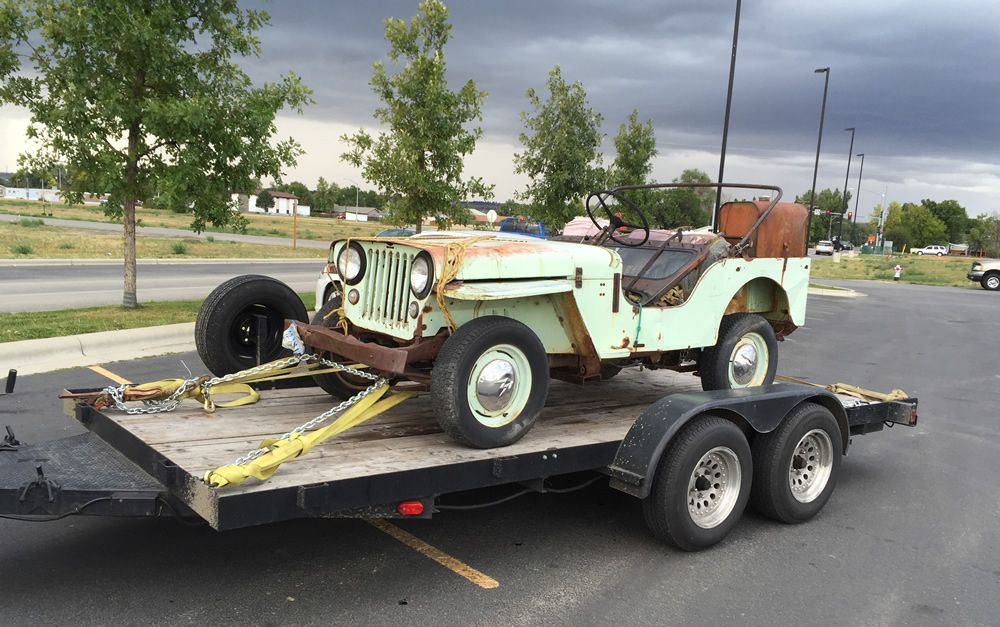
Almost 2000 miles to bring home and store Rusty.

MONDAY SEPTEMBER 5TH —
On Monday morning September 5th we left Missoula, bound for Billings. we arrived at Lloyd’s place near Billings, Montana. We drove a for a few hours, cresting the Continental Divide with temperatures of 34 degrees and some thick almost-snow-like rain, making it clear summer in Montana was near an end. Wanting to avoid putting on chains, I thought it best to avoid going back through in the dark, so I my goal was to sleep Monday night at Bozeman, where we could do all three passes (the divide and the two in Idaho) during daylight hours.

We arrived in Billings in the early afternoon. By then, the clouds that had dogged us since Idaho had given way to sun and warm temperatures. When we pulled in front of Lloyd’s shop, the cross-eyed DJ was parked out front. As soon as I saw it, I was convinced it was going home with us. We hopped out and Lloyd introduce himself.

2016-09-06-lloyds1
A forest fire fighter by trade, the trim sixty-seven year old man still had plenty of bounce in his step. He explained that he spends much of the non-fire months restoring/refurbing vehicles. It was both a passion and a practical way to reduce his taxable income. He estimated he restored one automobile a year.

As I looked over the DJ I asked Lloyd if he’d originally planned to restore it. He said know. He’d seen this parked at a nearby house, but the owner wasn’t interested in selling. When the owner died, Lloyd purchased it at an estate sale. He told me he’d never seen a 2WD jeep and didn’t know anything about the Dispatchers. He just had a gut feeling about it and decided to pick it up (and probably make a few dollars in the process).

2016-09-06-lloyds2

One of the first things I did was try shifting the transmission. I pushed in the clutch, which had good resistance, and awkwardly moved the column shifter about (my first time using one). After some testing, it seems to smoothly move between all the gears (at least that’s my impression). Next, we opened the hood. Lloyd demonstrated that the engine spun. That confirmed I was buying it.

2016-09-06-lloyds3Lloyd’s dog “Crazy” helping me survey the underside of the jeep.

It didn’t take much more looking to see the body wasn’t quite as solid as I’d hoped, with rust a the steps and in a couple spots on the floor. Having seen other save bodies far worse, I knew we were in good shape with this one.

Satisfied, I gave Lloyd his asking price. I felt is was a fair price and I told him that. Besides, not only had he held the jeep for me without a depost, but he was generous with his time. I also hoped he’d give me a tour of his projects.

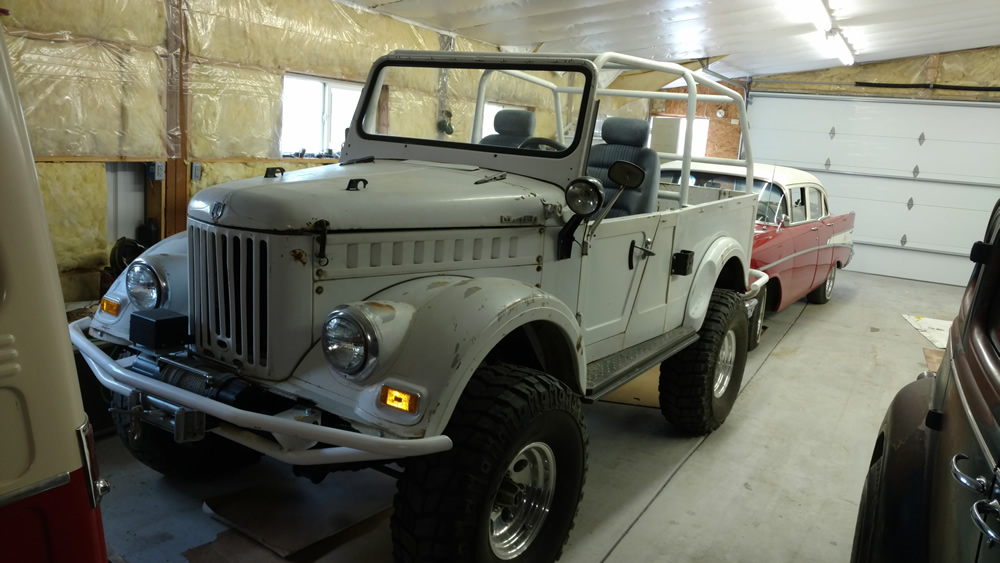
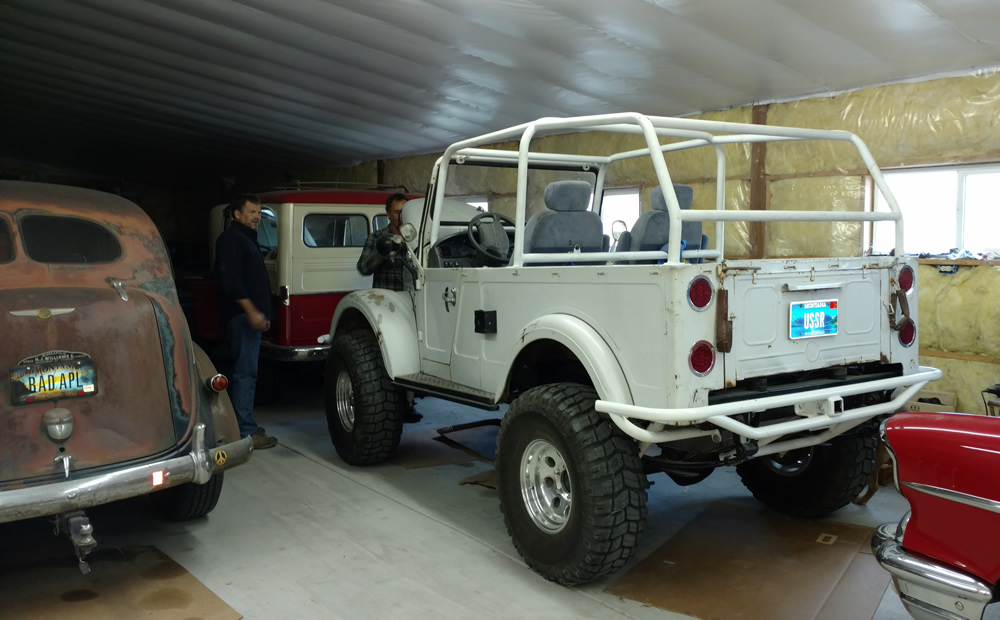
With the deal done, we pushed “Rusty” onto the trailer. Lloyd helped secure it, even giving me a few heavy duty come-a-longs to help secure my back up chains. With the jeep secure, Lloyd asked us to follow him into his shop. He had a jeep he wanted to show us. Here are some photos of the vehicles we saw. This is a Gaz on a modern chassis. I thought it looked pretty cool!

2016-09-06-lloyds4

Continue reading

[fb_button]
 
To Top

“Rusty” Photos

• CATEGORIES: Features • TAGS: This site contains affiliate links for which I may be compensated.

UPDATE: I’ve added engine photos to the bottom of the post.

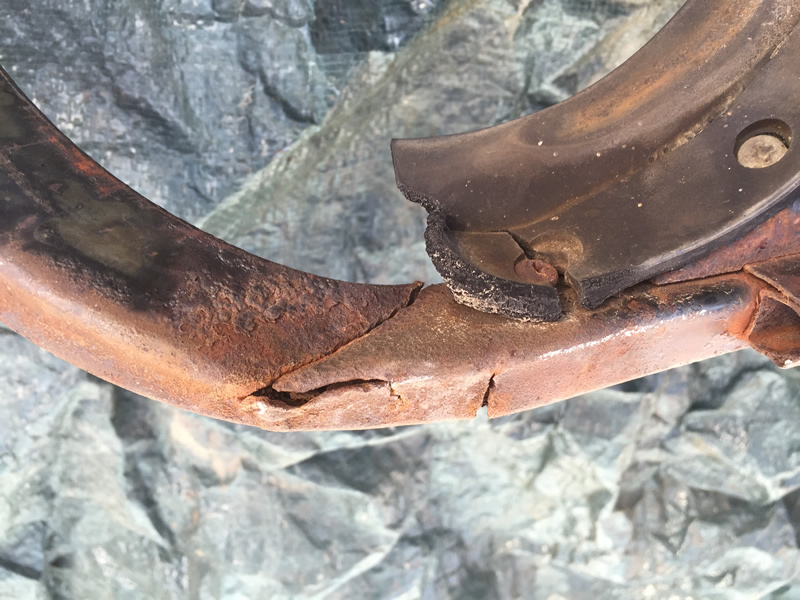
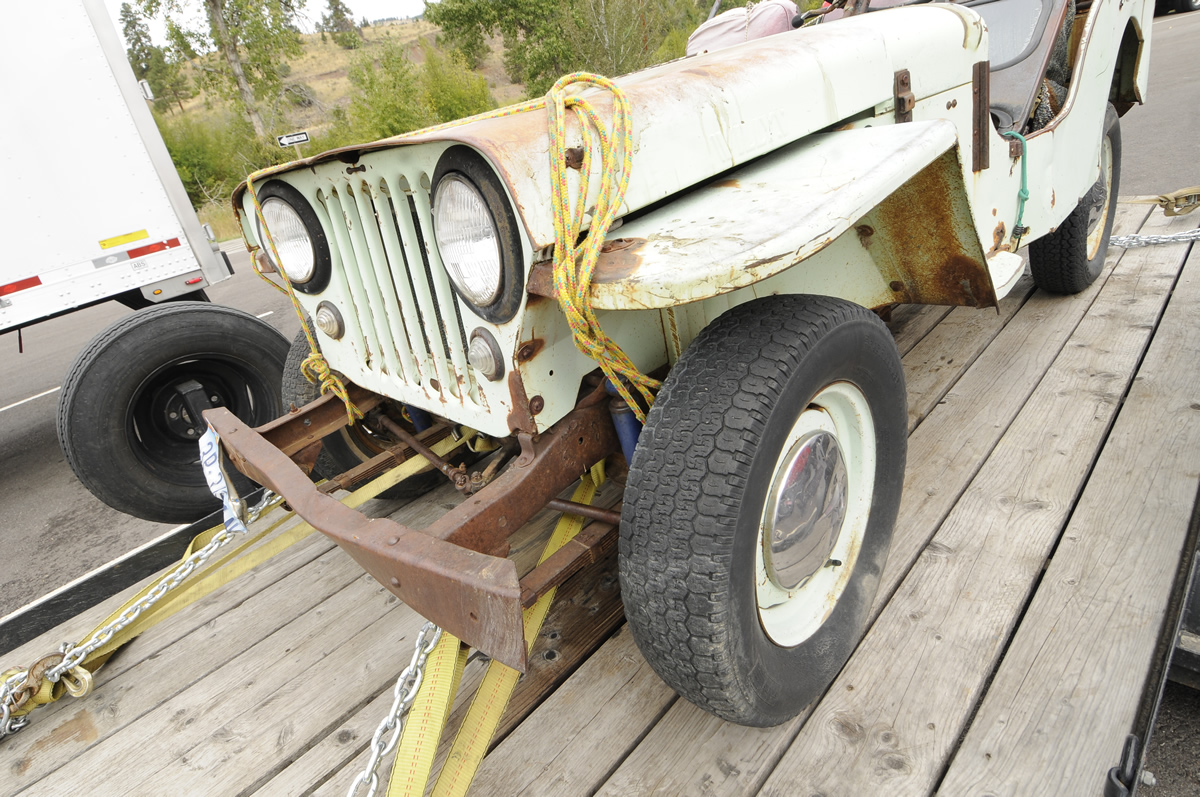
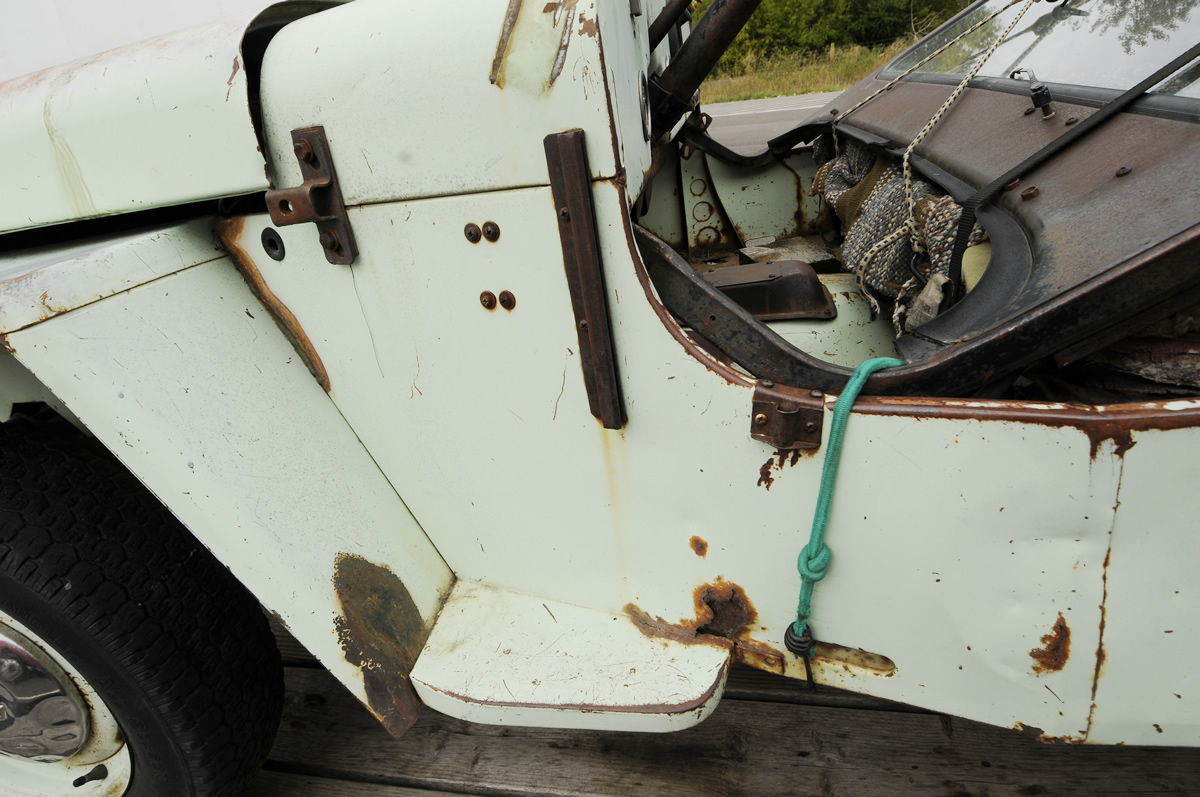
Rusty was owned and driven (apparently very roughly) on a farm near Billings, Montana. There are numerous welds, necessary to fix the cracks that appeared. The hubcaps have all kinds of dents, as does the body, the grille, hood, and the fenders. No part seemed spared. According to Lloyd, the man we bought it from, he purchased at an estate sale. The fact was, the farmer who owned it refused to sell it while alive, so Lloyd had to wait until he died. Lloyd was told it ran until it was parked and that it was parked due to the man becoming unable to drive it. At least, that’s the story. Still, the engine spins, the tranny shifts, and the jeep rolls easily.

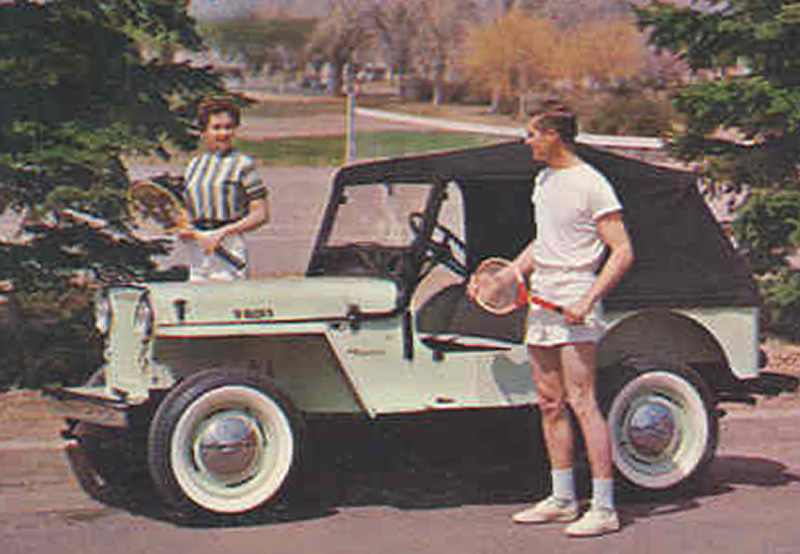
Glenn tells me this was manufactured in late 1955 and made available for sale in 1956. I believe the color is pine tint, not far from the sea foam green color I’d intended to paint Biscuit (before I receive the wrong color from the paint company, but that’s another story).

Here are more than thirty photos that show the good, bad, ugly. What I can’t photograph is the smell emanating from the seats. lol.

2016-09-06-1956-dj3a-pics-on-trailer-1

2016-09-06-1956-dj3a-pics-on-trailer-12 2016-09-06-1956-dj3a-pics-on-trailer-11

2016-09-06-1956-dj3a-pics-on-trailer-10 2016-09-06-1956-dj3a-pics-on-trailer-9

Continue reading

[fb_button]
 
To Top

No Updates on Tuesday

• CATEGORIES: Features • TAGS: This site contains affiliate links for which I may be compensated.

We had a long but enjoyable day yesterday. We picked up the DJ-3A, #56337 10538. Naturally, it will needed more work than it showed, partly because whomever owned it before Lloyd beat the thing up. But, the engine spins, the column-shift transmission shifts. and it’s got plenty of original parts to make it work the trip.

We also had a great time viewing Lloyd’s creations, which I’ll feature on Wednesday, and had a great evening with Robin, who shared his collection of jeeps with us.

1956-dj3a2

Yes, that front grille was pushed inward, I have some ideas for pulling it back out again.

dj3a-postcard

The color isn’t quite right on this, but this is pretty close to what it should look like. I don’t believe mine came with the chrome front bumper.

[fb_button]