emailNeed to contact me and don't have my email? Click on email button.
About eWillys
Welcome to eWillys.com, a website for vintage jeep enthusiasts. I update this website nearly every day with jeep deals, jeep history, interesting reader projects, jeep related info, and more.
These quick searches can help you find things on eBay. People list in the wrong categories all the time, so don't be surprised to see brochures in the parts area for example. This section used to be split into jeeps, parts and other categories, but recent changes to eBay will require this information to be recoded.
The links to posts below show jeeps grouped by models, condition, and other ways. Some of these jeeps are for sale and others have been sold. If you are unsure whether a vehicle is still for sale or not, email me at d [at] ewillys.com for more info.
Importantly, the allure of buying a project jeep can be romantic. The reality of restoring a jeep can be quite different, expensive and overwhelming without the right tools and resources. So, tread carefully when purchasing a "project". If you have any concerns about buying a vintage jeep, or run across a scam, feel free to contact me for help, comments or concerns .
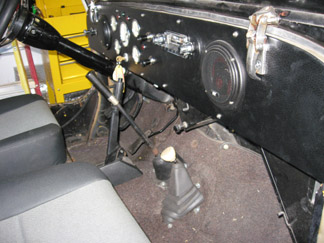
Sam, from Flat Fender Willys, has done a large amount of work on this rig, including the installation of a rack and pinion that makes the steering very tight and responsive. This also has a custom dash that tilts forward. Sam would have painted this too, but the seller’s family wanted to keep it mis-matched because they liked the character. If you are interested in a solid, daily driver, this is worth a look.
““1960 CJ3B – V6, 3sp, soft top, bikini top, runs great, no smoke great compression and can be used as a daily driver. Lots of fun! Must see to appreciate all that has gone into this rare Willy’s model Jeep. 2010 full custom rebuild is 90% complete. Here is the short list:
Body – 1960 CJ3B not perfect but the family likes it that way and won’t let me make it shiny.
Chassis – CJ5 chassis,
Mechanical – Buick V6, 3 speed manual, rebuilt transfer case, new clutch, clutch fork, clutch plate and bearings, rebuilt wheel hubs, bearings, new parts and lines from master cylinder to each wheel master cylinder, installed emergency brake, 3” lift with new suspension, shackles, pins, bushings, center bolts, U-joints, and shocks, starter, plugs, wires, wiper blades, new dual exhaust and thrush mufflers, custom built 18 gallon fuel tank, lines, pump and filters. New starter, one of a kind custom rack & pinion system by “Unisteer” with tilt steering column. Nice tread on all (5) 32×11.50 BFG mud and snow tires mounted and balanced on old school Outlaw I aluminum 15×8 wheels.
Electrical– New starter, electrical fuse block, gages, distributor, wiring, dash, instrument panel, speakers, electronic ignition, extra 12 volt charging outlets, emergency flashers, bulbs etc… plugs, wires.
Interior – All New, custom bulkhead, floor covering, roll bar, three point seat belts front and back, new front sliding bucket seats, new rear bench seat with head rests, new soft top windows, new custom bikini top to cover all passengers, wall to wall black carpeting, custom wall panels, new shifter boots and knobs.. Only thing left to do is a little body sanding, paint.“
Craig’s CJ-3B has been a regular visitor at Sam’s Flatfender Willys shop in Arvada, Colorado, where Craig has allowed Sam to experiment and update his jeep in a variety of ways.
Sam’s not some shade-tree jeep mechanic; instead, he brings 45 years of experience owning, running and working in hotrod shops in California. One of the early projects he worked on was the famous Munster Mobile. Sam tried retiring, but that didn’t work for him, so when he moved to Colorado years ago he started buying jeeps for himself and rebuilding others.
It doesn’t take long when talking with Sam until you realize that he has a lot of ideas, and they all seem to be good ones. So, I am not too surprised that folks in the Colorado area keep him plenty busy restoring, updating and servicing their old jeeps. If you want to contact Sam and talk with him about your jeep, you can email him at flatfenderwillys@comcast.net or call him at 720-841-0614. His shop rates are very reasonable.
In the image below the arrow points to a rubber line. Replacing that was a priority for Sam.
Front floor removed and replaced . Dark Brown is new floor and black is removable two piece front and rear panels for access to transmission. NOTE: the arrow points to the new STEEL fuel line.
A shot of the complete Mutt. When it came time to paint it, Sam was ready, but Craig wasn’t. He said he wanted it to look like a Mutt, so he is keeping the mismatched colors like they are for now.
Since sam last reported about the prototype bolt-on rack and pinion system for early jeeps, he has made a few changes to improve the ability to install the system onto jeeps that have been lifted. He reports that the system is installed on a number of jeeps without any issues. The system dramatically improves steering at low speeds and at highway speeds.
Finished Install before New Exhaust:
Here is close up view of drag link end:
Arrows point to Borgston Joint and shaft support bearing:
Upper View of Rack and Partial View of New Steering shaft and joint. Arrow indicates new steering shaft and joint:
Flatfender Willys owner Sam Thomas scaled back his projects for a while, but plans on creating a little busier shop. After doing some research, he believes he is the only flatfender-specific rebuilder and restorer left along the eastern slope of colorado now that Mile-Hi Jeep has closed. So, he is looking to hire a couple mechanics who are experts with older jeeps. If you are interested, call Sam at 720-841-0614.
If you have been reading eWillys for a while, you might have remembered Sam was working on a simple conversion process for adding a rack and pinion steering system to an older jeep. I will detail that tomorrow.
In the meantime, I wanted to share Sam’s recent project, a trailer designed specifically for carrying a jeep. Here are the specifics.
“TILT TRAILER SPECS
1. Two 5500 lb. Axels with brakes
2. Constructed of 190 seamless square tubing throughout.
3. All wiring runs inside tubing
4. All electrical is armored core electrical cable.
5. Tall lights enclosed in 3/8 channel
6. 20,000 lb. hydraulic Ram
7. Deck is redwood stained and sealed.
8. Square jeep fenders
9. Spring assist rear ramps
10. Bed is 14 X 8 Feet.
11. Front Aluminum utility box
12. Bulldog front hitch
13. Brake Away Brake system
14. All LED lights.
15. LoJack equipped
16. Powder coated
17. Wheel Bolt Pattern 5 on 5 1/2…Jeep
18. Side Pockets all the way around.”
If you want Sam to build you one, call him to learn more. What isn’t shown in the pictures is the canvas top and the kayak side racks (added specific for the owner of this trailer).
(Sam, feel free to correct if I have erred with any of my descriptions!)
Sam’s been keeping busy working Craig’s CJ-3B. For example, Craig was complaining that the brakes didn’t work real well. So, Sam took a close look at them and discovered that the jeep was only stopping with one brake! Two of the brakes were completely rusted up and the third brake had suffered a pinched line! So, Sam obtained some brakes off of a Wagoneer (shoot, I can’t remember the details Sam!), installed those and rebuilt the lines. Now it “stops on a dime with 9 cents change” as Sam says.
Another project Sam tackled was the springs. The ride was hard as a rock. Sam told Craig he had a pretty easy solution. Instead of installing new springs, they just needed to pull the leafs apart, clean them up, install new bushings and shackles, and then add a liner between the springs to help quiet the ride and improve the action between the springs. So, Sam put everything back together, saving Craig plenty of money in the process, and the ride improved immensely.
A third project Sam tackled was a lift: Craig wanted the jeep to ride slightly higher, but not as high as a SOA would have been. Instead of using longer shackles, Sam suggested simply adding some blocks between the frame and spring holders. This would provide the lift, but negate the need to change the axle angles. Below are some pics of the finished lift. During the process, Sam also installed new shock mounts in the middle of the frame, which allows for the use of stock shocks.
The blocks were made with 2.5″ x 2″ x 3/16″ square tubing that has been capped on each end. Below pre-paint finished product.
Here is the post paint result of the front hanger (note the color is actually black, but the light faded the color)
You can see the homemade shackles that Sam built which utilize the horizontal piece in the middle. This helps reduce spring sway. He prefers to keep the shackle as short as possible to additionally remove sway.
Here’s a shot of the front of the rear spring.
This shows the ‘new’ brakes, but does not show the lowered top shock mount. It also doesn’t show the updated Rack and Pinion system which should be completed soon (here are some early images and discussion of the process).
Sam, from Flatfender Willys in Colorado, mentioned a few months ago that he figured out how to easily install an off-the-shelf Rack & Pinion into a flattie. He’s installed over 10 of these over that past few years in various rigs with great success.
A number of readers asked for more information. However, Sam chose to delay the information so that he could work with the maker of the R&Ps to develop a Rack designed especially for Jeeps — from old flatties through Wranglers.
What you will see below is the protoype built by the company that Sam has installed into Craig’s CJ-3B. These are early pictures of the process. Once Sam finishes testing this prototype, they’ll be available for sale.
1. This first image shows the Rack tucked neatly under the cross member.
2. Here is an underside look at the setup.
3. Here’s a look at the 7/8″ tubing (I think I have that right). The basic Rack was originally designed for a 4000lb truck and then was modified for the Jeep to insure it was strong enough to handle a variety of situations.
4. For the typical installation, you’d leave the stock shock mount (if you have a mount there), and cut the plate flush with the frame. Otherwise, you can just bolt the plate into position. In this case, Sam had made a change to the suspension and moved the mount down.
5. This image shows that the Rack has an even lower profile than the stock system. Note how far lower the stock system extends.
6. This image shows the 1/2″ plate to which the Rack mounts. shows the Rack doesn’t extend far outside the frame.
No one can say that Sam and his wife Alecia don’t have a sense of humor. This tutorial had me laughing for a while today!
From Flatfender Willys Academy comes Sam’s explanation of the center emergency brake mod. …. Take it away Sam …
E-BRAKE BASIC TRAINING
2. This is a 78 Merc Capri E brake. There are 3 bolts that hold it in place. The wires are for a dash warning light. The hole to cut is just larger then the width of the fulcrum and slightly longer than the fulcrum travel.
3. The part in the image below goes under the floor and the cables from the rear loop through this cable guide. If the cable is too long, cut to length and use your cable locks. The best location for the brake is close to the seat.
4. This is the housing which is screwed down with screws. Use the housing to determine the location of E-brake.
5. Double check for clearance and reach by working lever up and down. If it feels good, install!
6. This E-brake is from a Hyundai. Most Japanese cars will work, but Ford is the easiest way to go.
7. This is also from a Hyundai, but boot needs to be modified. So you get busy with that E-brake while I give that maggot who shrunk my jeep a major malfunction….FALL OUT!
More Information:
It usually takes about a hour to install with 3 bolts, nuts, washers, and two cable clamps. Once you get the brake installed in the vehicle where you can grab it comfortably, hooking up the cable underneath is a no-brainer, no matter what year it is. I have also used this unit on drum type brakes.
In the image below, I’ve installed a brake in a CJ-3B with a CJ-5 Chassis. The installation is slightly different from that of the CJ2 etc. Total cost of the E-brake and cover at Pick-in-Pull for this project was $5.00. Cost of the clamps (2) and 3 bolts was $3.25 for a total of $8.25.
Comment by Dave …. This is the only other floor mounted emergency brake that I’ve seen. Unfortunately, the pic isn’t that good. But, you pull back on the stick to set it and push the button at the top to release it. You can see the rest of the pics related to this jeep here.
The last couple years I’ve made a major update to eWillys every September. This September, based on the feedback I have received, I’ll be making a push to create a better how-to area and improve the ability to find content. As a part of that effort, Sam, who operates Flat Fender Willys in Arvada, Co, has offered to share his knowledge and experience doing a variety of repairs and improvements.
In this example, Sam explains his approach to rewiring a customer’s 1960 CJ-3B.
Sam writes, “This first photo shows what I run into a lot. Wiring that runs nowhere is a rat’s mess just looking for trouble. Notice the quick-fix on the battery cable and length and the mess of wires next to the master cylinder.
On the dash side, we have a photo before taking the dash off. The customer wanted a brushed aluminum dash, so here it is……..nice, but reflected alot of sun and the E-Brake doesn’t work because of too much rust and fire damage.
Now we have two photos that show you what happens when you have a major short and your dash goes up in smoke. I had to strip this 60 CJ3B of all the wiring and build a new harness. Several different owners contributed to the dash being cut out like this, sharp edges and all. Some of the burnt metal is from a torch and the rest is from the wiring harness burning. This jeep had NO protection against shorts. BTW: ALWAYS CARRY A FIRE EXTENGUISHER. You never know where or when or how but it is as important as a good roll cage and harness. Cheap insurance for your (or someone elses) vehicle and piece of mind.
In this photo of the engine bay, you can see how NOT to plum your fuel lines unless you feel real brave. The plastic fuel filter is laying on the hot manifold and rubber fuel hose runs all the way from the tank, dangerously close to the exhaust manifold on the drivers side. Good place for a fire to start…… Also notice all the wires running everywhere on top of the engine and fenders.
In the next photo, of the jeep you’ll notice that this has real potential to be a real top-notch runner. Body is pretty straight and sports new front and rear seats. This is a 60CJ3B on a CJ5 chassis.
In the next photo, we see no.16 wire wrapped together and taped to no. 10 wire to the headlights and back to no.14 wire at the lights……..WRONG, WRONG, WRONG. Also notice how close the battery cable is to the engine fan and the rubber fuel line running beside the exhaust manifold. The fuel line is less than 1/2 inch away.
In the next photo of the engine bay, we can see how the firewall is a mess of wires running averywhere with NO rubber grommets protecting the wires coming through the firewall. Also another good shot of the fuel line wrapped around the distributer. Note, I moved the filter to the top of the heater hose for a moment for picture clarity.
In the last photo, this is the fuel tank that runs the full width of the jeep. Nice fuel capacity but very dangerous. ALWAYS leave CRUSH space between the body and tank. In a case of a roll over, the body WILL fold in at the dip in the body. If you leave at least 2 inches of space between the body and the tank, you’ll have far less chance of rupturing the tank in a roll over. You will also provide the fuel inlet to have room to bend, again less chance of rupture….DO IT RIGHT and LIVE…….SAFETY, SAFETY, SAFETY!!!!!!!!
AFTER WIRING:
In this first image is the finished wire harness. Notice the battery cables are the right color, length, and size with correct ends. I also separated the circuits and fused everything with the exception of the main power source which is on a 30 amp circuit breaker. I have a steel fuel line running down inside the frame rail from the tank and steel from the pump to the carb with a steel filter. ALL of the old wiring is gone and as you can see, everything is put away and secure.
In this photo, I’ve built another dash which won’t reflect light, stays cool to the touch, matches the new seats and does not look old school. I put new guages and radio speakers (two this time) with a original JEEP radio. To the left of the radio are two power sources (cig lighters) up and down to power cell phones etc. I used cig lighters because they are closed and keep dust out and looks better than two holes in the dash. Above the speedo there are two red lights for the turn signals and one for high beam. You will also notice there is no E-Brake in the dash now. I put it on the floor. If the owner wants to work on anything behind the dash, the stainless bolts on top are removed and the dash folds down. It is on a piano hinge along the bottom.
The new E-brake lowers to the floor and is easy to get to and work. When set, this jeep won’t move……we tried grins here. The cost? How about one hour of work and $5.00 for the brake assembly and housing.
The owner of this jeep has asked Sam to do some additional work, so you’ll probably see this jeep pop up in additional posts.
UPDATE: Sam has provided some detailed instructions (which will replace mine) and will also be sending some pics when he completes his next installation.
One idea Sam has shared with eWillys readers was the rack and pinion steering modification he has been doing. He describes this as a pretty straight forward installation that can replace the stock steering in any flattie. Sam says this takes him about four hours to complete. Pics are forthcoming on this modification.
Sam describes the process as follows:
1) Remove Steering: Take out the existing steering mechanism and the mounting plate.
2) Remove Drag Link: Remove drag link from old box to bell crank
3) Layout Straight Edge: With front wheels straight ahead, use a straight edge (anything will do, I use a piece of conduit) and lay one end on the passenger side tie rod from the spindle and the other side on the frame rail directly above the drivers side tie rod end at the spindle This will give you the approximate location for the rack and pinion. DO NOT USE original box location as this will put the cross link through the engine block.
4) Where to Mount Vega Plate: Take the Vega box mounting plate (The plate Sam uses is this plate from Unisteer.com) and using a large C-clamp, attach to frame with the top of the plate even with the top of the frame. This will put the mounting holes in the right place. You will notice the top two holes are inside the opening of the frame and the third hole is below the frame as it should be.
5) Temporarily Mount Rack: The rear edge of the Vega plate should be ONE inch ahead of the line from the tie rods towards the front of the vehicle. NOTE….at this point, it is very important to temporarily mount the rack (You may use longer bolts to clear the C-clamp). Once mounted, move the wheels all the way to the right and make sure you have at least one inch clearance between the cross link from the Rack and the oil pan. Do the same with turning the wheels to the left. If you have the proper clearance, you have the right location for the mounting plate for the Rack and Pinion.
6) Weld Plate to Frame: Weld the Vega plate in place and be sure to use the supplied gusset ( I use two of them, as I have found that with one gusset, there is a chance for mount twist under harsh conditions such as four-wheeling……strongly suggest you do the same grin grin)
7) Attach Rack and Pinion: Bolt the Rack and Pinion in place and attach the cross link to the Rack and with the Rack centered and the wheels dead ahead, mark the cross shaft for cutting allowing for the length of the tie rod end. Now you may cut, thread, and install the tie rod. The unit Sam uses is this cross steer rack from unisteer.com (that link is dead, but this may be the one).
8) Determine Steering Rod Length: Using the conduit, determine the route from the bottom of your steering column to the Rack and Pinion. This varies with engine and frame variations but is very simple. Usually all that is required is to determine if the column needs to be shortened or if a double joint is needed. At this stage, determine what your shaft is…..splined, D shape, square, etc. This will determine which joint to use. If round, (with roll pins) I strongly suggest you modify it to D-shape for strength. Sometimes you have to use TWO rods from the column to the box. If so, USE ROD SUPPORTS before and after middle joint. You can get everything you need from Borgson Joints. If you choose the shorten your column (to use One Rod) you can can get the necessary seal and bearing from them too.
9) Double Check Everything: Double check everything for tightness and clearance and YOU ARE DONE — smile, have a beer.
This sounds simple and it really is, I’ve done soooo many of them, that I can do it start to finish in four hours. If anyone still needs help, just call me or Dave and I’ll be more than happy to walk you through it. The last one I did cost $612.42 for everything, Somewhat cheaper than regular boxes and a whole lot better looking and steering.
If properly installed, you’ll notice the steering much tighter while driving and capable of easily turning under the weight of even a V8 when parked.


