Biscuit Research Archives

My Rebuild

To Top

My Rebuild — Modifying the grille

• CATEGORIES: Biscuit This site contains affiliate links for which I may be compensated.

UPDATE: I wrote this post a year ago in May.  A reader recently asked about why my headlights looked different, so I am reposting and have updated it with info from the Classic Oldsmobile Forum.

One of the modifications I wanted to make was to change the size of the headlights from 7″ to 5 1/2″ to give my jeep a little different look.  I’ve only seen these smaller headlights on two jeeps (both of which had fiberglass grilles), one set was on my first jeep, pictured to the right (which shows my first set of lights on the left and then the bigger, standard lights after I switching to a metal grille on the right), and on a jeep called Otis (still owed by the Carter’s, long time family friends who actually named me — that’s another story) pictured below (note that the positions of the headlights seems to have changed between 1981 and 1985, which I just noticed — UPDATE:  Steve Carter tells me the change was due to a rollover involving his mom during a race in 1983.  The wider lights were the result of a new, wider radiator).

otis_headlights

One hitch to my plan was that I didn’t know where to find the 5 1/2″ headlight assemblies and Jim Carter couldn’t remember where he got his headlights.

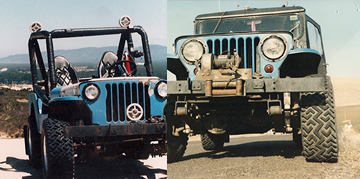
After a good deal of searching, I learned a few things about headlamps.  First, the 7″ lights were mandatory on autos sold in the US starting around 1940.  Then, in the 50s, the laws were relaxed to allow dual 5″ lights.  However, most dual assemblies were combined headlight assemblies, but I needed individual headlight assemblies.  Finally, after roaming a great local junkyard that has a ton of old cars piled two and three high I finally found the individual assemblies, which look like mini jeep headlight assemblies, on an 1959 Oldsmobile dynamic 98.

According to a helpful forum user at the Classic Oldsmobile website, the 1959 and 1960 Oldsmobile Dynamic 88 and 98s used the same size bezels and headlights (with the unique aspect that the bezels weren’t connected to other bezel parts, which makes them look like a jeep bezel), but the Dynamic 88s were Anodized aluminum, while the Dynamic 98s (like mine) were chromed.

Now that I understood what I had purchased, my first step was to creat a mockup.  Using some cardboard, I created some templates to see how the new lights might look in the grille.

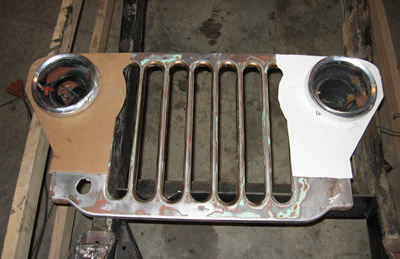
Satisfied that the look is what I’m sought, over the next couple of days I modified the grille to accomodate the smaller headlights.  The first step was to attach the grille to a flat, waxed surface.

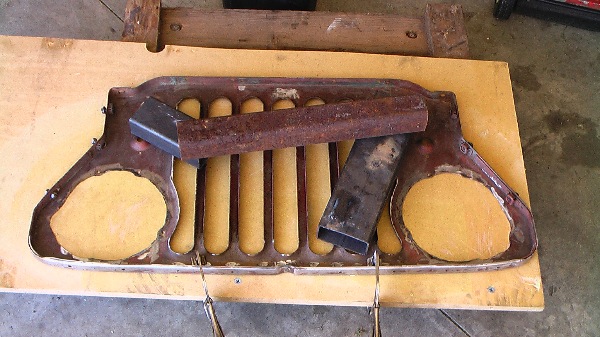
Next, I cut the fiberglass matting to fit the shape.

Continue reading

[fb_button]
 
To Top

My Build: The front clip is together …

• CATEGORIES: Biscuit This site contains affiliate links for which I may be compensated.

These cell phone pics and video aren’t the greatest.  I think I’ll go back to snapping pics with my real camera.  But my phone, a Samsung Instinct, is really handy for snapping quick pics and uploading them to my computer via bluetooth (much easier than an iPhone — and that’s from a Mac guy — which will only awkwardly upload photos one at a time via email).

As you can see, my sons were excited to help me.  My oldest, Karson, who turns 15 soon, has been wanting to learn how to do everything, so I’ve taught him how to use the drill press, grinder, cutter, portable drill, sander and even the arc welder.  That’s been a priceless joy for me.

I’m hoping to get it running on my return from Seattle (Monday June 29 – Friday July 5) before my kids leave in mid-July.

jeep_front_on

jeep_front_on2

jeep_front_on3

[fb_button]
 
To Top

My Build: A Center Console

• CATEGORIES: Biscuit This site contains affiliate links for which I may be compensated.

console_finalI made more progress this weekend on the jeep.  Most importantly, I planned and excecuted a design for my center console.

My center console stands between the front seats.  It’s purpose was two-fold:  1, provide a place for me to put power and ignition/kills switches, along with a start button, and, 2, provide a more accessible location for plugging  in my cell phone (which will sit, along with a few other items, in a compact water proof bike bag that I can easily remove).

Now you ask, and reasonably so, why install a start button and switches when you have a perfectly good key switch on the steering column?

Well, that’s a good question.  There’s only one answer. I always wanted a jeep that started with a simple push button.  So, I just had to get that urge out of my system.  Trust that the key solution would have been easier, as my wiring harness was all set up for a GM column.  This meant I had to remove the GM plugs from the harness, decode the wiring, and rewire the critical wires to the correct points in the center column.

With that said, here’s my console:

After considering a variety of designs, I came up with this simple post and console design.

Below are the steps for cutting out the back of the console.  I had an old hood that I have been using for some spare sheet metal.  Below is the paper template on the hood.  Also on the hood is the bent and drilled console.

console_template_2

Next, I cut out the metal using a grinder with a cutting wheel.  Then I used a paint remover on my grinder to remove the paint.

console_template

Continue reading

[fb_button]
 
To Top

My Build: Turn signals / Parking lights

• CATEGORIES: Biscuit This site contains affiliate links for which I may be compensated.

Hurray!  Thanks to both John and Joshua (who gave me the original glass covers).  Now, I’ve got glass, honeycombed light covers with some real chrome covers (as opposed to my painted ones).  This has been one of those lingering projects that it’s nice to have completed.

More updates later (after I eat some dinner).

final_grille1

final_grille2

[fb_button]
 
To Top

Shortening a Steering Shaft

• CATEGORIES: Biscuit This site contains affiliate links for which I may be compensated.

A reader asked me about shortening a steering shaft.  Here’s one place I shortened a shaft I took out of a late 80s cherokee to put in my jeep.

Frankly, I don’t remember exactly what I started with, but I took a solid steel driving shaft and slipped it inside the cherokee shaft.  Then I welded the two together.  As a safety measure, I also drilled a hole and added a bolt with a self locking plastic ended nut to insure the nut doesn’t come off.

I used the same technique on the other end to get the correct fit for the steering column.

steering_shaft_sizing

[fb_button]
 
To Top

Crap! … I Shattered my Light Cover

• CATEGORIES: Biscuit This site contains affiliate links for which I may be compensated.

broken_lightHorrors!

I had carefully rebuilt a rusted bezel to fit over the clear, glass, honey-comb light covers.  I got everything ready.  Then, while putting it together, the glass slipped from my hand, hit the concrete and shattered (hence the pic to the right).

Below, you can see a picture of the rusted bezel.  Both bezels were in about the same condition (eg.  Bad Condition, with small holes in some places).

To rebuild them, I used some JB Weld that I applied to the inner side of the bezels in a couple layers.  Then, I sanded down the outsides (the chrome was toast), applied some primer, sanded with 220 grit, repeated a couple times and will try spraying on some spray-on chrome, which will work until I can find some original chrome bezels.

Fortunately, it appears the Tail Light King might have the covers I need.

Before:

front_turn_light3

After (bezels are still gray primer):

front_turn_light2

[fb_button]
 
To Top

Roll Cage Tubing in Northwest

• CATEGORIES: Biscuit This site contains affiliate links for which I may be compensated.

bluejeep_inprogress_cageAnyone know any deals on roll cage tubing in the northwest (washington, oregon, idaho)?  I need to get cracking on my cage.  I’ll be up in Seattle for a week over the 4th for sure, though I could be up as soon this weekend if someone has a line on tubing.  Somewhere I’ve got the measurements for what I need, but I need enough for a cage similar to what I had for my last cage, shown to the right.

Thanks, Dave

[fb_button]
 
To Top

My Build — More progress

• CATEGORIES: Biscuit This site contains affiliate links for which I may be compensated.

I made some more progress today, including hooking up the gas filler, attaching the rubber wheel well thingys, installing the choke and some other minor additions.  I’m just about ready to fire up the engine.

passengerside

[fb_button]
 
To Top

My Build – Front brake brackets

• CATEGORIES: Biscuit This site contains affiliate links for which I may be compensated.

Because the frame is about 8″ higher than stock and due to the frame changes, I had to reroute the brake lines underneath the frame rather than through the middle of the frame.  Another advantage of this system is that I can use standard CJ-5 flexible brake lines, which reduces my costs. I considered a variety of bracket ideas, but finally developed the following:

These two brackets were cut from flat steel,  drilled and then bent.

brakes_2

Next, I put it against the frame to figure out the exact position.

brake_2_5

Next, I welded them to each side of the frame. You can’t see it from the pic, but I drilled a hole near the bottom of the bracket so I could fill in the hole and weld the bracket to the frame. I also welded the top of the bracket to the frame.

brake_3

brake_4

And here’s the passenger side with paint and everything tightened.

brake_final

[fb_button]
 
To Top

No Updates Tonight – Squashed Finger

• CATEGORIES: Biscuit This site contains affiliate links for which I may be compensated.

UPDATE:  Well, my finger is better, though swollen and purple, but for some reason the internet is crawling very slowly tonight.  So, I’ve made a couple updates and will try again in the AM (5/25).  I’ll also include an update on finishing up my brakes today (yeah) and a cool video of how to re-seat a tire using WD-40 and a flame.

No updates tonight (5/23), except for the brief info below.  I was pulling off one of my shocks when it suddenly slipped off, catching my finger between the shock end and the brake backing plates.  It’s a nice rosy purple 🙂

The good news is that I got my custom front brake hose brackets cut and bent (pics tomorrow).  I also welded the brackets on to my front housing so that I can attach limit straps for racing.

Tomorrow I’ll weld on the brake hose brackets, reattach my proportioning valve, and hook up my brake lines.

[fb_button]
 
To Top

My Build: My windshield frame painted

• CATEGORIES: Biscuit This site contains affiliate links for which I may be compensated.

Here’s some before, during and after shots of my CJ-3A windshield rebuild.  Special thanks to John for the vent bracket.  Mine broke off and John created a new one for me.  It works beautifully.  I was able to de-paint and can reuse the windshield gasket, so now all I need is the glass and the cowl rubber and it’s completed.  Necessary repairs included welding up 8 holes and welding the crack in the frame.  Next, finishing the brakes.

BEFORE PAINT REMOVAL:

windshield_front

driver_side_crack

windshield_back

Continue reading

[fb_button]
 
To Top

Ya win some and ya lose some …

• CATEGORIES: Biscuit This site contains affiliate links for which I may be compensated.

At the 4wd swap meet  in March, my only purchase was a bottom cover for my TH-350 housing.  I was assured it would fit a TH-350.  I figured, for $10, it was worth a try.

I got it home, cleaned it up, even painting it.  It looked like it should fit.  But alas, no matter how many ways I tried to make it work, the holes didn’t line up.  That will teach me to try something new (as in trying an automatic).  So, my search continues ….. here’s a picture, for what it’s worth 🙂

th350_bottom_not

[fb_button]