emailNeed to contact me and don't have my email? Click on email button.
About eWillys
Welcome to eWillys.com, a website for vintage jeep enthusiasts. I update this website nearly every day with jeep deals, jeep history, interesting reader projects, jeep related info, and more.
These quick searches can help you find things on eBay. People list in the wrong categories all the time, so don't be surprised to see brochures in the parts area for example. This section used to be split into jeeps, parts and other categories, but recent changes to eBay will require this information to be recoded.
The links to posts below show jeeps grouped by models, condition, and other ways. Some of these jeeps are for sale and others have been sold. If you are unsure whether a vehicle is still for sale or not, email me at d [at] ewillys.com for more info.
Importantly, the allure of buying a project jeep can be romantic. The reality of restoring a jeep can be quite different, expensive and overwhelming without the right tools and resources. So, tread carefully when purchasing a "project". If you have any concerns about buying a vintage jeep, or run across a scam, feel free to contact me for help, comments or concerns .
Don’s got a beautiful CJ-3B that he’s clearly spent a great deal of time building. Only a labor of love would produce details as unique as ‘a 4 barrel with a holley from a scout’. If you don’t see this weekly driver around town, then he’s likely in the the hills of Colorado.
Some stats:
A 1954 CJ-3B that has the nomenclature plate for government service.
231 buick bored .030 balanced
Eldebrock performer 4 barrel with a holley from a scout with a small venturi
Vivek purchased a 1967 CJ-3B right hand drive Mahindra at the end of 2004. According to his early blog notes, the jeep barely started, was missing the front drive line, and generally needed a lot of work. When he finally did pick it up, on the way back it stalled, requiring the help of some local builders to move it out of the way of a bus. Fast forward several years later and you can see Vivek and his CJ-3B pictured on the right.
Among Vivek’s challenges was his effort to get the papers. Not only were the papers absent, but apparently the owner wanted to sell the jeep, but the owner’s son did not. It took a few weeks before Vivek could get the original papers, insisting the owner drop the price slightly further for all the trouble the owner caused him. You can read about the purchase here.
Vivek’s working for the next few months in Milipitas, California. When he heads back in December, he hopes to take back a lift kit with him. If anyone has any suggestions, comment below.
A gentleman named Vivek contacted me last night. He ran across ewillys while searching for some jeep parts. He’s from India and owns a CJ-3B that he restored. He’s currently working in California for a few months, before heading back to India, so he’s looking to locate a few parts he can take back with him (there’s enough jeeping in India that maybe I ought to head there and work for a few months — can I get a job with my MBA Vivek?). I’ll be highlighting him and his efforts in a post I’ll write in the next few days.
For now, I want to thank Vivek for opening up the interesting world of jeeping in India to me. After a few email exchanges, he pointed me to a gentleman named Mr. Uday Bhan Singh. Mr. Uday, it turns out, owns 45 flatfenders that he has collected over the span of 40 years. This month, autocarindia did an article on him, which has been copied and posted to the Jeep Thrills website, which is also Vivek’s jeep club.
Here are links to the article pages which is worth reading (once open, click on the page to zoom into it):
To say Mr. Uday is passionate about jeeps likely understates things; The article’s description of him as a Jeep Junkie is likely more accurate. One look at the images of his “great arc” jeep and you’ll see he not only knows jeeps, but uses and jeeps with them. Last year in his MB he navigated the length of the great arc, the 78th meridian that bisects India. The meridian itself stretches about 583 miles as the crow flies, however the actual driving mileage was just under 1200 miles.
To complete this drive, Mr. Uday went prepared. This jeep carries a few extra parts, such as 2 sets of springs mounted to the underside and a special contraption made of poles for helping winch out of difficult places that are strapped to the driver’s side. I highly recommend reviewing the pictures. Even the paint job is nicely unique (reminds me a bit of the follow-me jeep paint jobs).
There are several important lessons I learned from web and software development: 1) Real artists ship, meaning that sometimes you can’t have everything you planned or wanted in a project if you want to get it out the door; and 2) there’s always a 2.0 version.
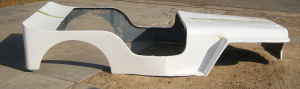
With those lessons in mind, after several days of fiberglass filler and sanding, fiberglass filler and sanding, I’ve finally got a roughed out shape I can live with. The reality is, more sanding is necessary to get the slopes on the bump smooth, but I can live with its imperfectness (like anything else is perfect).
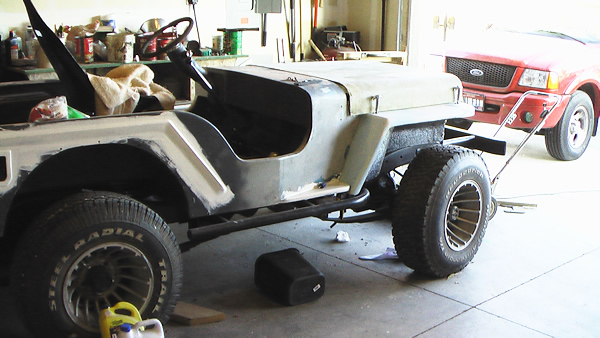
I have a little final trimming on the hood edges. After that, it’s time to pull it all apart, prepare the body for sanding/paint, drill the gauge holes in the dash, fix my brake line, and complete some odds and ends in preparation of permanently putting the body on the frame. Oh yeah, and clean up the garage — it’s looking pretty messy in the pictures!
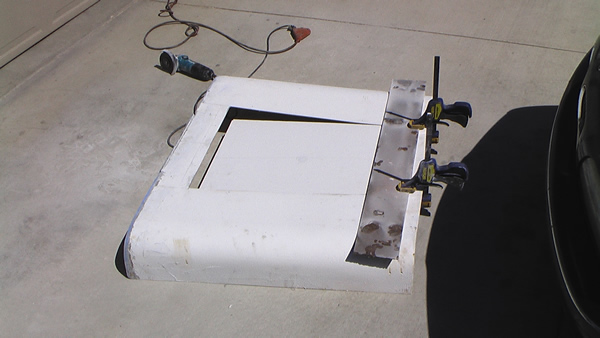
One of the issue’s I’ve put off until now has been the air cleaner. I knew fitting an air cleaner between the hood and carb would be tight, a consequence of the tall Kenne Bell intake manifold. However, I thought I might sneak it in there, but after finally fitting the hood onto the front clip, I discovered that even a low profile air cleaner won’t fit. Unfortunately, the engine can’t drop much more (not that I want to drop and reweld the engine mounts for an extra 1 1/2 inches). The only solution left (that I could think of) was to put a bump into the hood. I REALLY didn’t want to do it. But, I need to keep moving forward on this project, so I decided it was the most expedient solution.
Once decided, I then had to decide the type of bump. After mulling it over, I chose to do a simple bump that follows the lines of the hood. The first step was cutting the hole in the hood. Next, I created a form out of a 2×4, putting a 20 degree edge, the same degree, but opposite, of the angle of the stripe on the body. I laid two coats of fiberglass and resin and let it setup. The good news is that the results are even and the angles correct. The bad news is that I’m not thrilled with the results. I’ve thought about adding some angles to the front to make the bump more interesting, but I think I’ll keep it simple and save the details for version 2 of the hood.
Here’s the hood precut
Here’s the hood with 3 sides cut. I used a cutting wheel to do the cuts and a flat piece of steel as a guide to create a straight line.
Last night i got the hood mounted, trimmed and latched. Once I determine where to mount the blocks (not sure what I'm going to make those out of yet), then it will be ready to patch, sand and paint.
Over the past week I completed the form for the hood, applying a second coat of drywall mud to smooth the curves. I had to create the hood because I lengthened the front clip about 4.5 inches. Following that, I rubbed some turtle wax onto the form as a release agent. Then, I laid 3 layers of fiberglass & resin. Finally, I laid the hat channel I pulled from a different hood I had (which will serve two purposes — to hold the curve of the hood and provide support for the hinge).
As you can see below, the turtle wax didn't completely release well, so there will be some sanding. Also, rather than apply the gelcoat to the surface of the form (which I figured would not release well at all), I have decided to apply it once I finish sand the hood. Finally, I have done an initial trim on the hood and it fits well, but not perfect. It will take some additional trimming, patching and sanding to finish this, but it should do fine for a first hood (much better than the first hood on my first jeep).
I've decided to tackle the hood. Because of the 4.5" extension to the front clip, I've had to decide what to do with the hood. As I documented in previous posts, I've lengthened the fenders. Now, instead of trying to lengthen an existing hood, I've decided to create my own fiberglass hood: Nothing fancy, just a straightforward simple hood. I'll save a more complex hood for a second form.
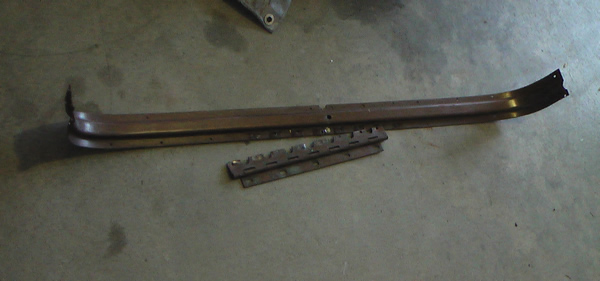
Since I had an existing hood that had a good hinge and a good rib, I decided to remove those from the hood and use them on the fiberglass hood. To do this, I had to drill out the rivets that attached the rib to the hood. Once drilled out, the rib came right off. You can see the rib and the hinge below.
James found this cj-2a with a m38 body on Craigslist for $2,000. He pounced on it immediately. I'm not sure how I missed it during my searches! Just goes to show I can't find them all.
This is an excellent find, especially since the body is in excellent condition reports James. It's also one of the best California deals I've seen …
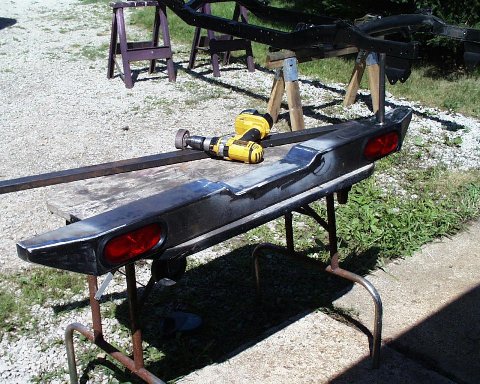
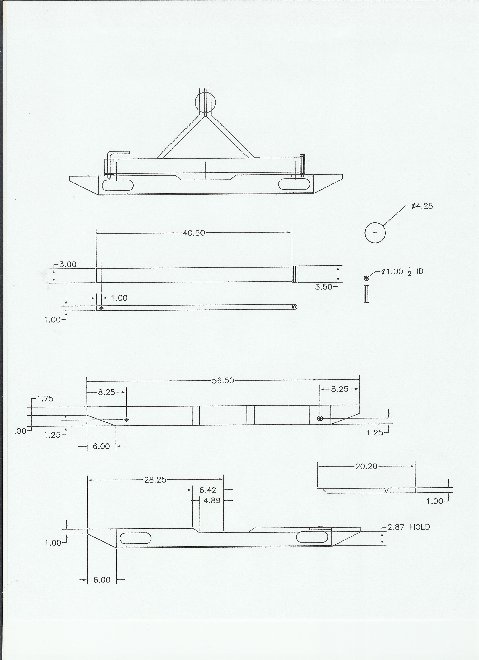
Brian's been busy creating a new bumper for his CJ-3B build. He's says it's nothing fancy, but I think it's pretty nice. Here's a start-to-finish explanation of the work it took to make his bumper. Thanks for sharing Brian!
"Because the springs are longer than stock, I had to come up with a way to lengthen the frame a little in the rear. So, I fabricated a new rear bumper and incorporated a swing out spare tire mount. In addition, rather than cut holes into the body, I decided to put the tail lights in the bumper. To make the bumper, I only need to use a grinder, drill press, and a Mig welder — it's nothing fancy."
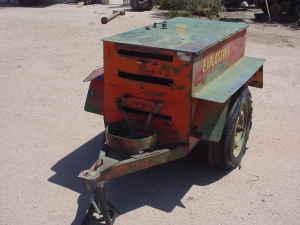
One of the ewillys readers asked me about jeep trailers for sale in the northwest. A quick search yielded a particularly interesting trailer from ww2 — a signal corp trailer.
" WW2 Jeep K38 trailer used by the U.S. army signal corps. This one looks like the one shown in a U.S.M.C manual from 1945."

 Don’s got a beautiful CJ-3B that he’s clearly spent a great deal of time building. Only a labor of love would produce details as unique as ‘a 4 barrel with a holley from a scout’. If you don’t see this weekly driver around town, then he’s likely in the the hills of Colorado.