Builds Research Archives

To Top

Jordan’s 1964 Tux Park CJ-5: “The GoGo Gadget Jeep”

• CATEGORIES: Builds, Features This site contains affiliate links for which I may be compensated.

cj5-jordan-california006-lores

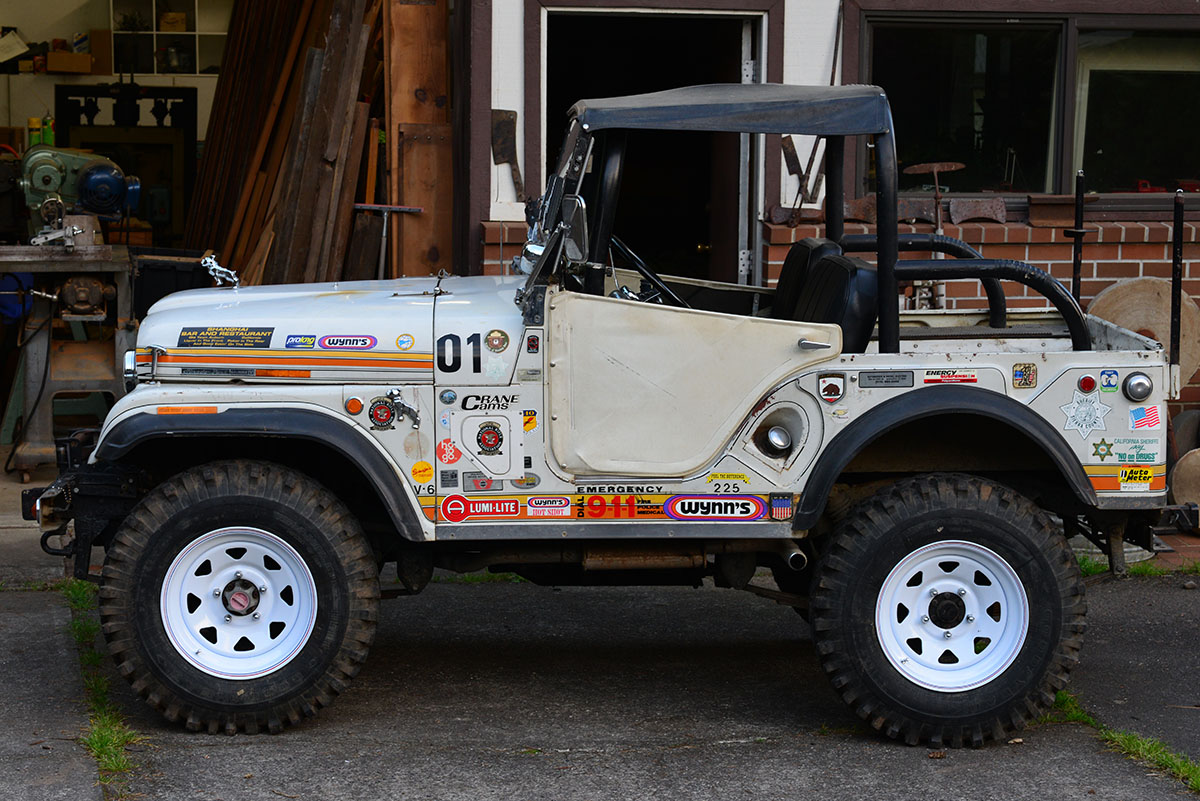
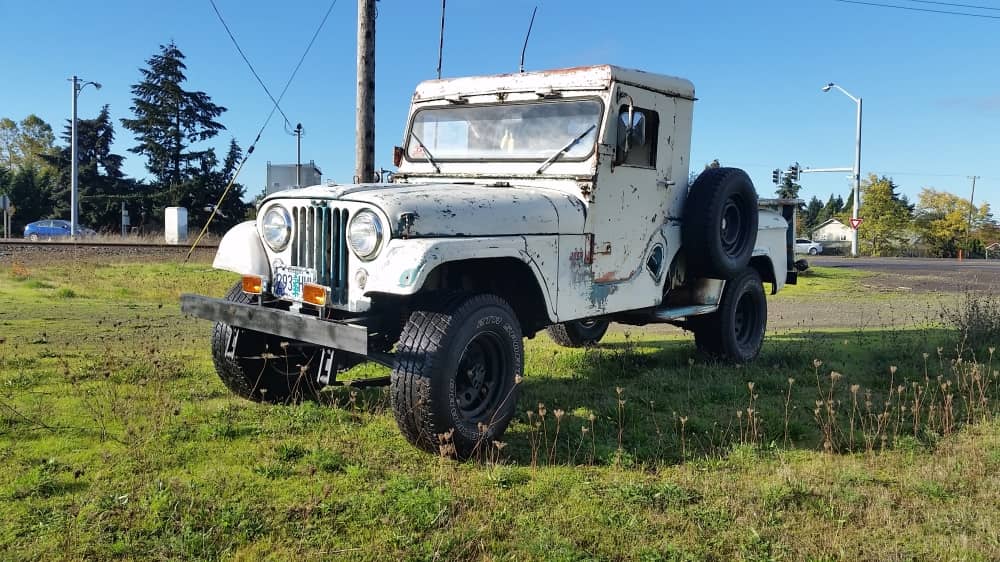
Jordan offered to share some pics of his uniquely modified CJ-5. It’s a pretty cool jeep with lots of details. It looks like it was a serious jeep for off road exploration. Here’s Jordan’s story:

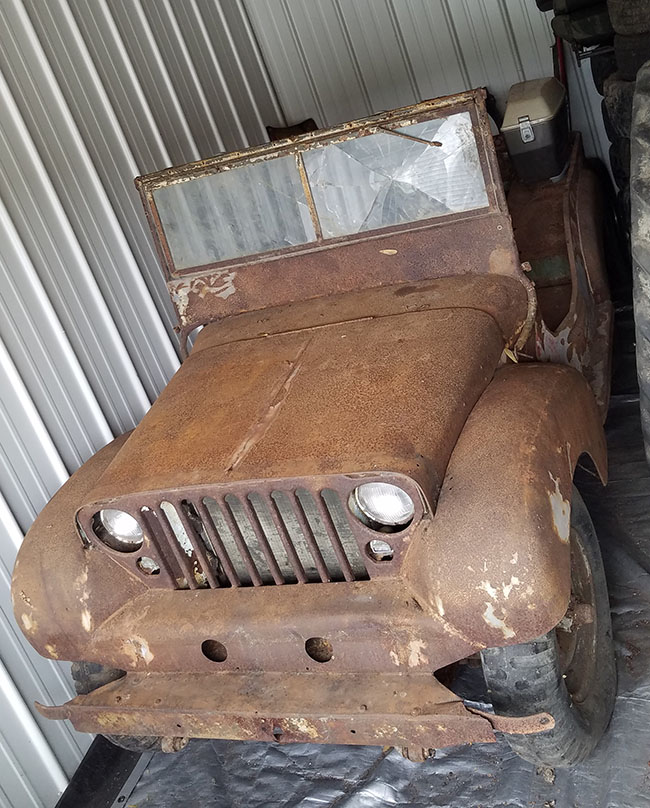
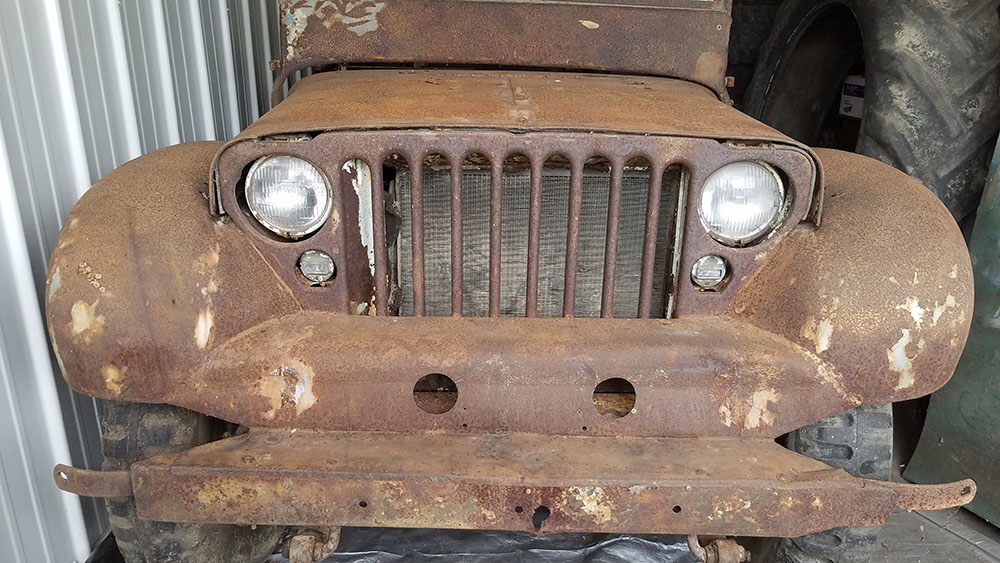
I call it the GoGo Gadget Jeep. I bought this CJ-5 about 7 years ago in the foothills between Sacramento and Tahoe. The guy I bought it from had not had it very long and had not done much with it. He bought it from the estate of the guy who built it. It probably sat around since the early ’90’s when the guy died or just stopped driving it.

Apparently the original owner did search and rescue work with it in the Sierras. I have taken some stuff off that I did not want, a rack over the rear bumper, 9 horns, a single side band radio, a winch fairlead that folded down (probably built to pull rigs up cliffs), and a few other things.

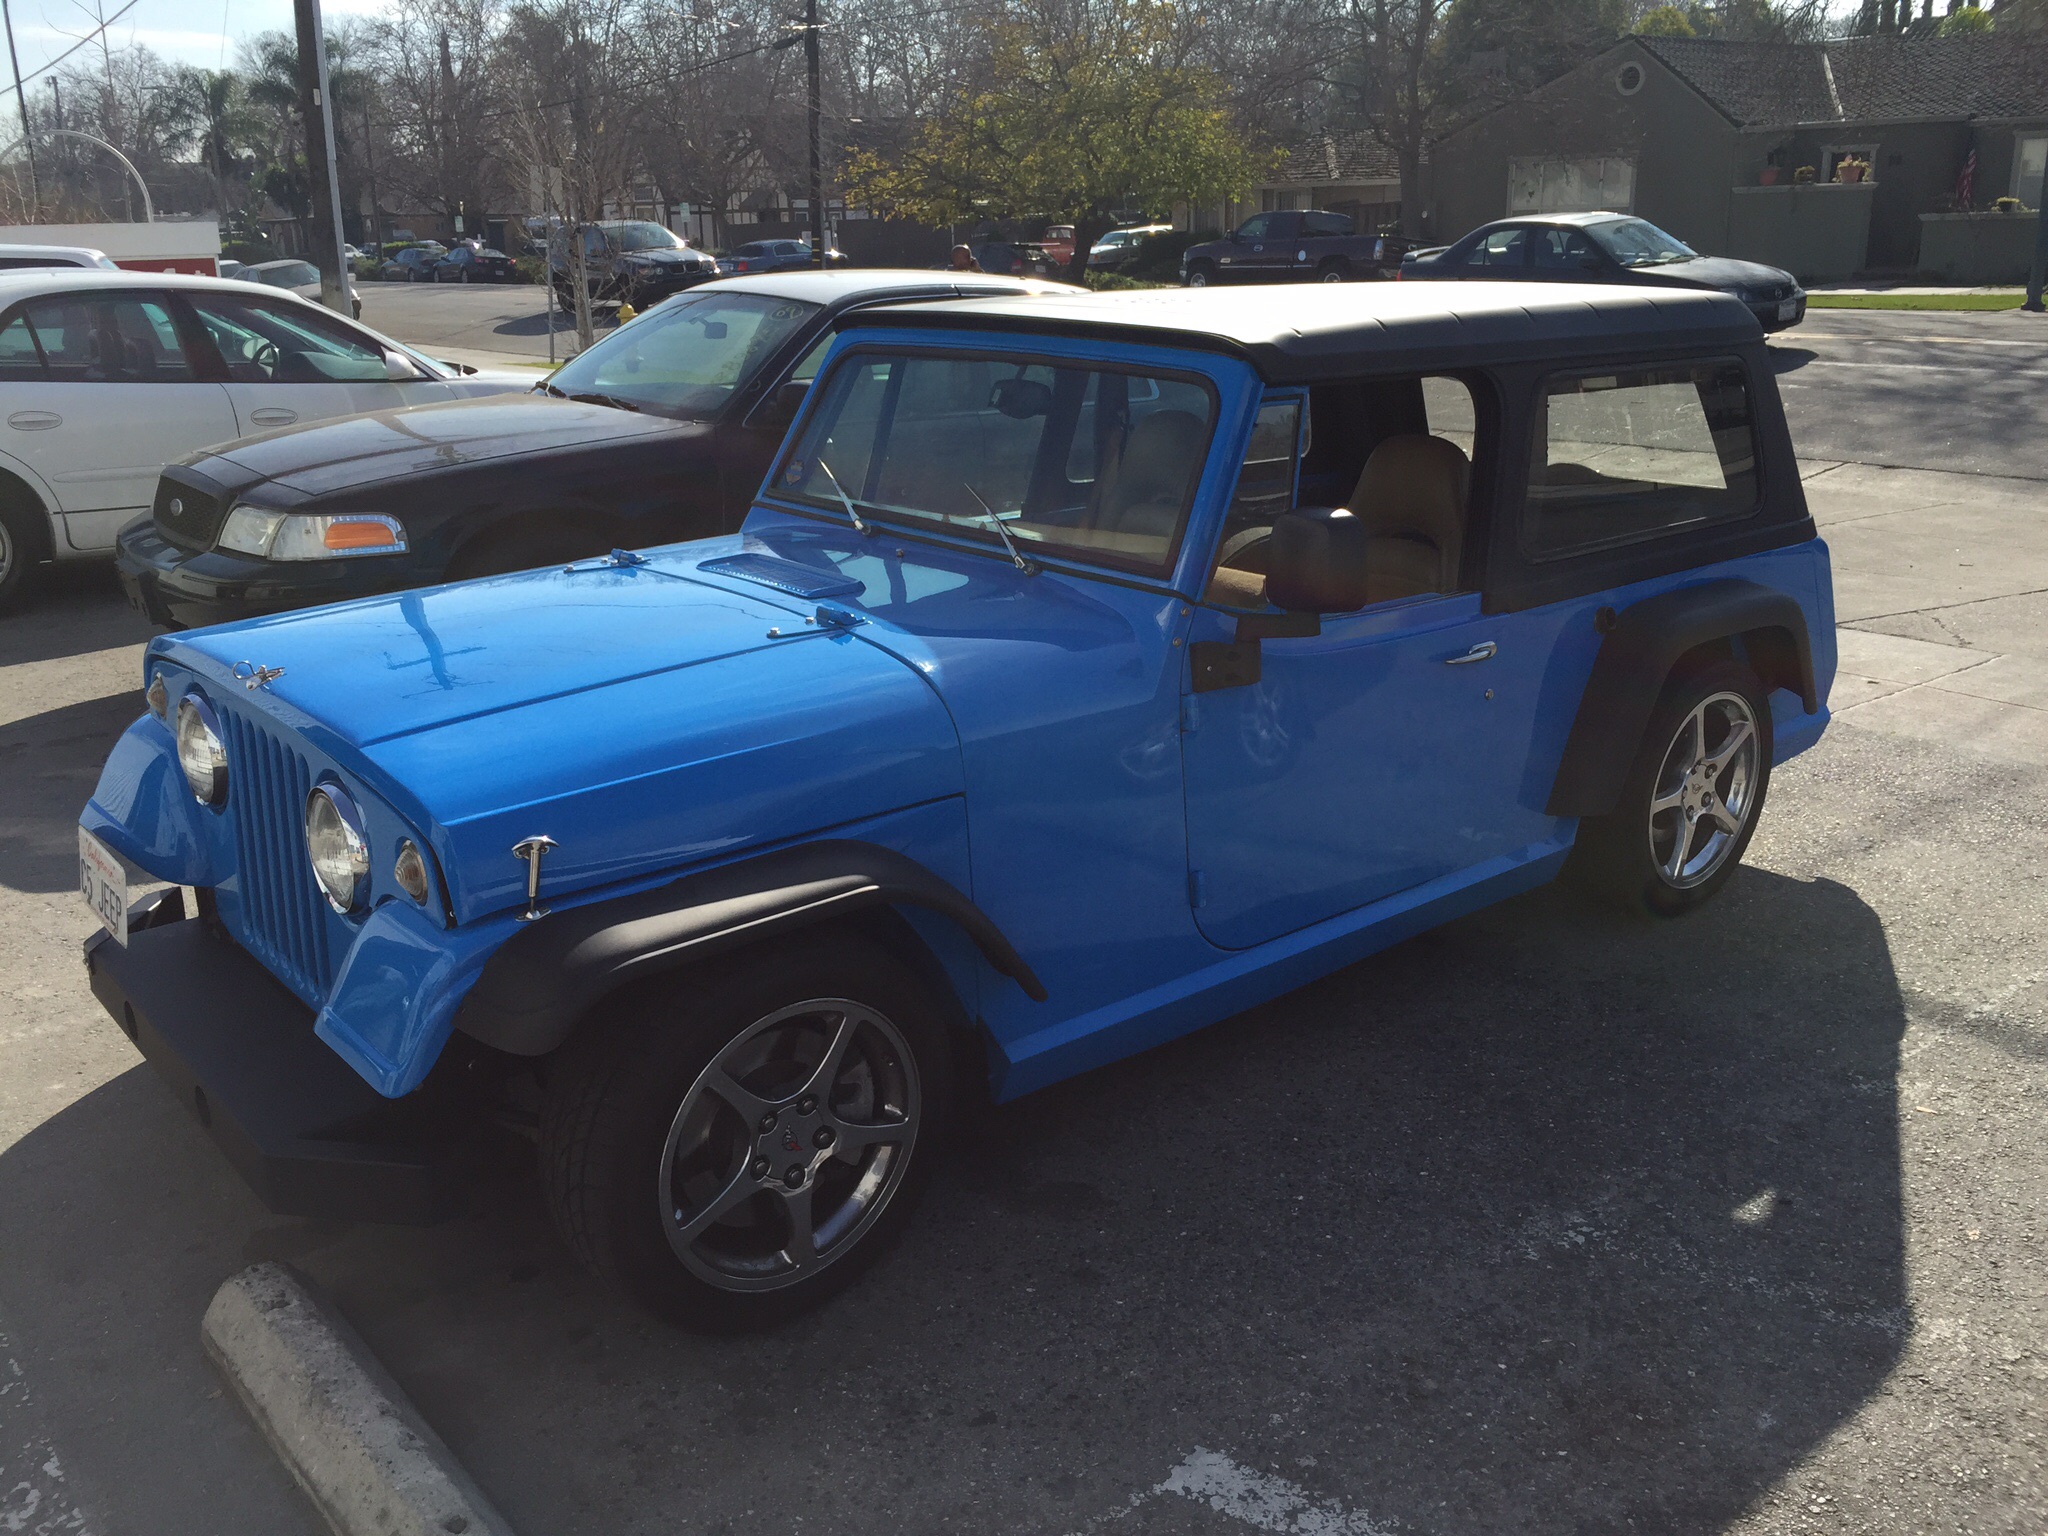
The wiring is still a mess, but I am driving it around the Estacada, Oregon, area. It came with a brand new in the box full top (white), the bikini top in the pice, a worn out full top, some extra motor parts (Buick 225), a second set of tires that are in some of the pictures-I had to get new rims because I got 5 tires, but 3 rims of one type and 3 of another), and a few other odds and ends.

The extra set of tires are Goodyear Wrangler Mud Grips. I have only found one picture of them online, and no info.

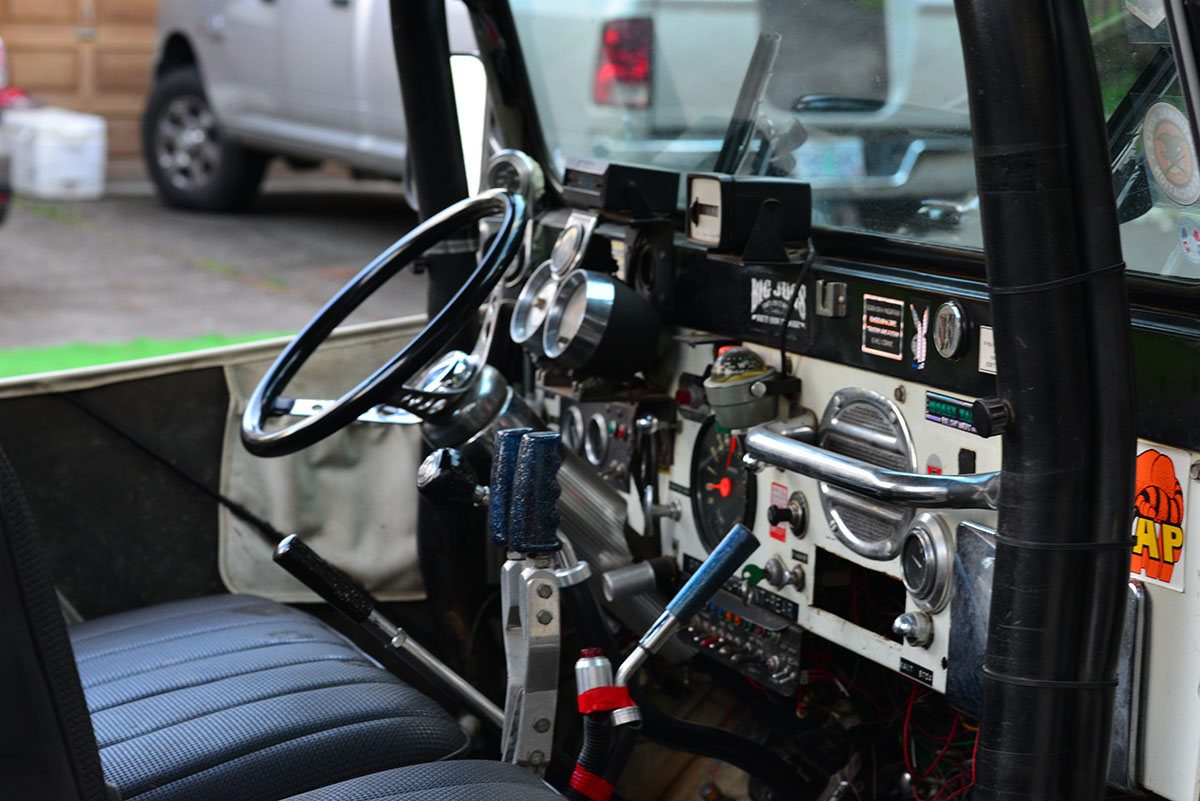
It runs great with about 40,000 miles, overdrive, PTO Winch, turning brakes (those are the tall levers between the seats). The levers between the seats are the turning brakes, then the PTO engagement lever, then the overdrive lever, and then the shifter. The transfer case shift or is down below the dash.

I wish I would have met the guy that built it. It seems he was an aerospace engineer, based on some of the stickers on it. It may be that someone on your site will recognize the jeep. I would love to hear from them if so. I imagine that it was well known when it was running around the Sierras way back when.

cj5-jordan-california18-lores

cj5-jordan-california19-lores

cj5-jordan-california11-lores

cj5-jordan-california12-lores

Continue reading

[fb_button]
 
To Top

Scott’s “De Luxe” Wagon Remodel

• CATEGORIES: Builds, Features This site contains affiliate links for which I may be compensated.

Speaking of De Luxe wagons,  I wanted to share Scott Gilbert’s effort to create a De Luxe looking wagon from his wagon. He was diligent enough to locate NOS cane stickers for the sides, an item stored away for years that was owned by someone on a non-jeep forum. I’m looking forward to seeing how his wagon looks once he finishes the restyle.

willys-scotchlite-cane-design-stickers1-lores willys-scotchlite-cane-design-stickers2 willys-scotchlite-cane-design-stickers3 willys-scotchlite-cane-design-stickers4 willys-scotchlite-cane-design-stickers5 scott-wagon-mesh-lores

[fb_button]
 
To Top

Anyone Recognize Tracy’s 1944 MB

• CATEGORIES: Builds, Features, Sedan-jeep • TAGS: This site contains affiliate links for which I may be compensated.

Tracy shared pics of his grandfather’s WW2 jeep that was customized at some point, either motor-pool modified or post-war modified. He’s hoping someone might have more information about it.

1944-mb-tracy7

1944-mb-tracy1“This Willys came to me by way of my grandfather, a WW2 veteran of Normandy where, D-Day+1 his unit was shelled by 88’s and he lost his leg.

I have no idea when he, himself, acquired it as I never even knew it existed until I was called to remove it. Since my father never mentioned it to me, it is likely he didnt know either.

I can only assume he had visions of restoring it. Now, that falls to me, and I gladly accept that.

My plan is to do more of a “restification” on it than an all out restoration.

You see, the modifications that have been made are completely, and thoroughly welded in place. As it looks to have been this way since, at least, the era that it was acquired as surplus, if not before, it has really become part of the vehicle’s story and it will remain. The workmanship is very well done and, whoever did these modifications was a very skilled welder/fabricator as all welds, fit, and finish are top notch.

So, I share it here in hopes that I may find information on that history.”

1944-mb-tracy2

1944-mb-tracy3 Continue reading

[fb_button]
 
To Top

2004 “Corveep” Build

• CATEGORIES: Builds, Features This site contains affiliate links for which I may be compensated.

Here’s a unique build that married a wrecked 2004 Corvette with a free 1968 Jeepster Commando. The builder calls it a “Corveep”. There’s a series of pics that document some of the challenges involved in marrying the two vehicles, including lengthening the Commando body.

http://bobpelikan.com/?p=54#more-54

2004-corvette-commando-corveep

[fb_button]
 
To Top

Jane Bundy’s 1947 CJ-2A

• CATEGORIES: Builds, Features This site contains affiliate links for which I may be compensated.

This nice looking CJ-2A wasn’t restored to 100% original, but it sure looks nice and will provide owner Jane Bundy with a great vehicle for years to come. The Miller Brothers Hot Rod Barn in Wilkesboro, NC, did the work.

https://statesville.com/news/local/my-classic-car-jane-bundys-1947-cj-2-willys-jeep/article_0b29b0b2-2394-11eb-a8cb-9f13bbeae594.html

1947-cj2a-jane-bundy

[fb_button]
 
To Top

A Turbo Hayabusa Suzuki Powered Jeep Build

• CATEGORIES: Builds, Features, videos This site contains affiliate links for which I may be compensated.

Bill shared this post from thedrive.com about a youtuber named DJ (youtube channel Limitliss) putting a Turbo 1.3 liter Suzuki Hayabusa engine into a jeep-rod build. He was originally going to install a ZX10R, but found it to be too damaged to proceed, so he switched to the Suzuki engine.

https://www.thedrive.com/news/37571/a-turbo-hayabusa-powered-willys-jeep-is-enough-to-make-you-forget-ls-swaps-forever

Here’s Limitliss’ ‘reveal’l of the jeep build, but it’s not the first episode (call it episode 0):

This is episode 1:

You can follow the rest of the build here: https://www.youtube.com/playlist?list=PLNbNJv69UAARr6Sqxaq-RqBM10eKKaYkp … there are currently 19 episodes.

[fb_button]
 
To Top

Willys Truck & 2014 JK Chassis

• CATEGORIES: Builds, Willys Trucks This site contains affiliate links for which I may be compensated.

UPDATE: apparently, this one is up for sale

This nice looking truck is a Willys body and look adapted to a 2014 JK Chassis. No doubt it cost a few bucks to assemble. The result sure looks nice. Note that the whole truck had to be widened.

See all the pics here: https://www.quadratec.com/c/blog/brothers-challenge

Some of the stats:

  • 1955 Willys Truck mounted on 2014 JK chassis
  • 118” wheelbase
  • 4800 pounds
  • 3.6 Pentastar with RIPP Supercharger
  • Automatic transmission
  • 440 hp at crank
  • Dual exhaust with catalytic converters.
  • Fuel 17” wheels
  • Toyo Open Country C/T 35” tires
  • 3.5” Rock Krawler Long arm lift kit
modified-truck-moab

PHOTO CREDIT: Quadratec.com

[fb_button]
 
To Top

The Jeep-Engine Powered Chum

• CATEGORIES: Builds, Features This site contains affiliate links for which I may be compensated.

Gayland shared this do-it-yourself boat project that’s designed around a jeep-engine. It’s called the Chum. Below is the first page. Download the PDF to see all the instructions. There’s even a Willys marine engine for sale right now.

https://www.diy-wood-boat.com/support-files/chum.pdf

[fb_button]
 
To Top

The Hudson Hornet Steering Modification

• CATEGORIES: Builds, Features This site contains affiliate links for which I may be compensated.

Just a few posts today, but some good ones!

hudson-swap-adam3-lores

1951-1953 Hudson Hornet steering box installed on John’s CJ-2A.

I’ve been very interested in the Hudson Hornet Steering Modification since I heard about it a decade ago. Unfortunately, there’s scant information about implementing the modification, but reports were that it was a relatively easy one that produced fantastic results, offering a power-assist feel to the steering and reducing play (a similar, alternative steering modification is the use of a 1980s Ford Ranger box, which Lawrence Ellliot shared back in 2018).

Now, thanks to Adam, we have some new insights into the obstacles and benefits of installing a Hudson unit into a vintage jeep! Perhaps the most difficult obstacle to overcome is locating the steering box itself! Adam’s provided some great details below, but If you want to ask Adam more questions directly, he’s offered his email ahedgcock @ gmail.com (remove the spaces around the @).

Below, Adam shows some of the differences between the Hudson and Ross (Willys) units:

hudson-steering-box-willys-box-differences

Here’s Adam’s description:

  1. Find box. Perhaps the most difficult task .. 51 to 53 Hudson Hornet.
  2. Pitman Arm/Get Drag Link. Try to get the bell crank and drag link. The Hudson splined pitman shaft is quite a bit larger than the willys splined shaft so it is good to use the original. The pitman arm itself is similar in how it bends, but is 7” long ( instead of 5” on the willys)
  3. Pitman Arm Ball. The pitman arm ball end on the Hudson is larger than the willys, so I welded the Hudson drag link end onto my willys drag link.
  4. Hudson Box bolts right up, but …The Hudson box could be bolted directly to the frame rail with 3 bolts, but the steering column will be 2.5” too far on the drivers side to hit you body tub hole. Having all stock brake and clutch pedals, and not wanting to make my tub Swiss cheese, I chose to move the box 2.5” off the frame with a fabricated spacer. This would be similar to the level of fab needed to convert a Saginaw box up front.
  5. Or Shift the Hudson Bracket. The cast steel Hudson bracket could be cut and re-welded to the box 2.5” over also, with the same results.
  6. Modify the Column Tube. The steering column is similar to the willys but the Hudson column tube is larger than the Willys. I welded a larger OD sleeve at the base of an existing willys column, cut a split in it and welded on 2 ears so I could clamp it tight.
  7. Steering Shaft Differs. The steering shaft does not have the same end spline for a willys steering wheel, so you can either cut and weld a willys spline to the end, or find a Hudson steering wheel.
  8. Gear ratio. I did not take the box apart, but it is clearly a roller bearing worm shaft, and this thing came tight, even after presumably many years of use. The Hudson box is 6 turns lock to lock, and the Ross is 3 turns. It is worth noting the pitman arm is longer, 7” vs 5” on the willys, but you get a definite advantage in ratio. A bit less than half the effort to turn the wheels. I have taken it on road, and there is not the same “twitch” at speed, and off-road it does not tear your thumbs off like before. The wheel still happily spins back to center by itself nicely when you let it go, just more revolutions.
  9. Placement of box. This will be subjective, I have a Buick V6 and I found the longer pitman arm worked better because it swings below my bellhousing rather than ramming I to it with the Ross. Just like placing an engine, you would want to mock up the ideal spot, and make the bracket accordingly.
  10. Original look. This is basically a similar box, and does not effect the outward appearance at all.
  11. Finding parts…this is the fun part, I needed to talk to people, and ultimately find a person willing to go digging through an old barn. Once I found my source, I bought 2. Paid $200 each.
  12. Very fun swap, more original than the Saginaw, similar performance to a manual Saginaw provided to have a good tight bell crank and good tie rod ends.. I don’t see any need for a steering stabilizer

Hudson Horney Box casting number 34641.

hudson-steering-box-casting

Continue reading

[fb_button]
 
To Top

John’s Cutlas Selective Hub Rebuild

• CATEGORIES: Builds, Features, How To • TAGS: This site contains affiliate links for which I may be compensated.

John recently rebuilt a set of Cutlas Selective Hubs, the type with the knob that rotates to engage and disengage the hub. There appear to be at least two styles of these hubs, one with a flat top and one with a groove, so that a tool (or improvised tool) can be used to help engage, disengage the hub.

This exploded overview from 1961 shows how the parts assemble (see the full brochure below this post):

1961-12-01-cutlas-selective-drive-model100-2-partial-lores

As you can kind of see from this diagram, there are two sections: 1) is the hub cap that holds the knob and the spring in place (from part 107-2 in the middle and everything to the right of it) and 2) the hub base (part 108-2 and everything to the left of it).

John wrote, “Overall I’d say these are my favorite hubs I’ve worked on so far. I have a pair of Warn hubs (with the tiny needle bearings) and a pair of Selectro hubs (big chrome knob type). The Warns seemed like a real pain to rebuild since the needle bearing were in rough shape. And the Selectro hubs, while very easy to operate, were probably the weakest design I’ve seen.”

Here’s a look at John’s finished product, as it’s the best example a complete hub next to a hub with the top separated from the base:

cutlas-hub-groove-rebuild-john8-lores

I went with a 2 tone paint job just for fun. If it doesn’t last for any reason I’ll end up with the whole thing gloss black and a chrome knob. The body was so badly pitted there was no saving the original finish

HUB CAP:

We’ll start with the hub’s cap first. John provided the following note: “To remove the coupling piece (part 102-2 Coupling) from the chrome cap (with the cutlas knob) you have to line it up right with the correct groove, then push down firmly against the spring inside (part 110-2 coupling spring). While pushing down spin the coupling, and then the coupling spring will pop the coupling right out and its free.”

cutlas-hub-groove-rebuild-john3-lores

cutlas-hub-groove-rebuild-john4-lores

With the inner portion of the cap apart, you can see the coupling ring, the coupling, the coupling cam spring (part 107-2) and the coupling cam pins (parts 105-2).

cutlas-hub-groove-rebuild-john2-lores

Continue reading

[fb_button]