Biscuit Research Archives

My Rebuild

To Top

Anyone know where to find Vintage Mud Flaps?

• CATEGORIES: Biscuit, Features This site contains affiliate links for which I may be compensated.

This afternoon I spent some time searching the internet to find some type of vintage mud flaps, without much success. I’m looking for some flexible rubber flaps with some type of 4×4 image or logo on them. Here’s an example of what I had on my last jeep (I should have kept those …).

 
To Top

My Build — Small wins

• CATEGORIES: Biscuit This site contains affiliate links for which I may be compensated.

Small wins continue to push Gus forward.  This weekend I finished hooking up the transmission lines to the transmission cooler.  It’s a good think I pulled the lines apart and double checked them as one had a crack near the entry to the th350.  A quick stop at Andy’s Supply in Boise and the crack was taken out and the line repaired (Boy, do they give great service!).

My radiator hoses were a challenge.  I stopped in at my local Schucks and wandered back to their radiator hose area.  After seeing that none of their hoses would work, I finally selected two that I could cut, bridge and fit.  After cutting the hoses and bridging both radiator hoses (inlet and outlet) with a metal tube, I finally got a fit I can live with — however, it’s not a solution I’m thrilled about.

This is one of those situations I’m gonna let digest for a few days while I tackle some work projects and deal with replacing the waterpump on my 540i (which over the last month has seen the thermostat go bad [$100], the alternating belt break [$25], and the waterpump go [$150] — each requiring an online purchase and a week wait).

 
To Top

My Build — Combination Valve and Oil Filters

• CATEGORIES: Biscuit This site contains affiliate links for which I may be compensated.

I’ve been a little side tracked from Gus due to a recent neighbor’s problem with a mail box — her son hit another neighbor’s mail box with her car, damaging the mail box (it’s actually two mailboxes and paper boxes that sit on a single pole).  By now, the whole neighbor knows me as the ‘guy with a jeep’; so, it was only a matter of time before it was my welder to the rescue (ok, it was a bit more complicated than that).

Now, back on track, I’ve made some progress on some trivial details.

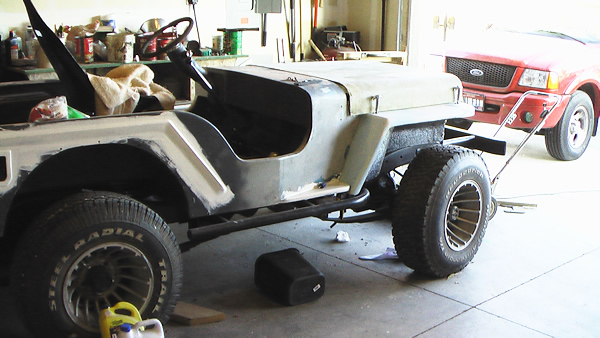
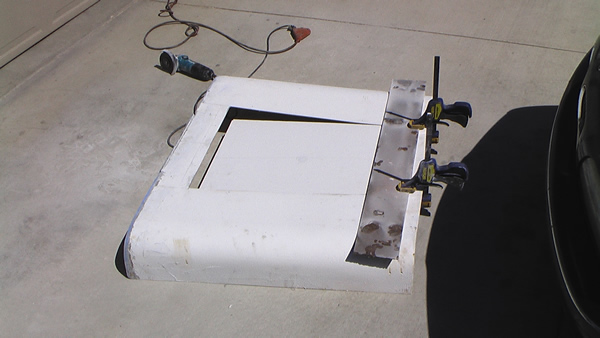
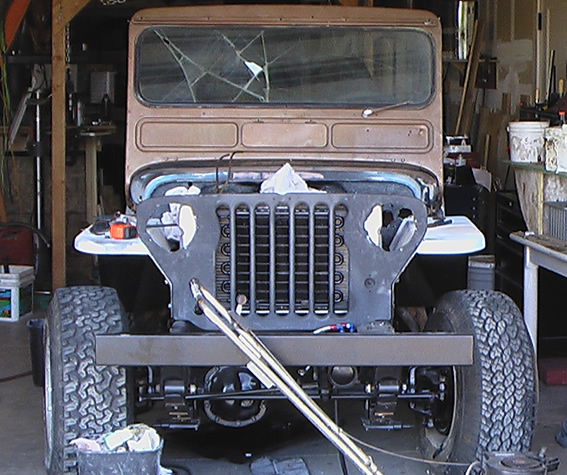
Oil Filtering System: When I bought my V6, the seller included an external dual oil filter system.  I decided to install the system because (1) I would increase the available oil in the system, (2) having the filters external of the engine would reduce engine oil temperatures, and (3) having two oil filters would help with the engine oil temperatures even more.  Since I’m of the opinion that my last engine blew up due to oiling problems (though that was a much older 225 engine), I’m hoping this helps stalls potential problems.  I’ve also been on the phone with TAPerformance and they suggested the use of a specific pressure spring for use in buick engines with high pressure attachments.

In the image, you can see how the oil filters will sit above the filter base and the hoses will wind down to the oil filter and the forward, passenger side of the engine.

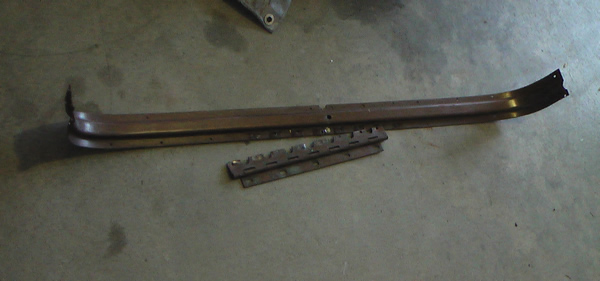
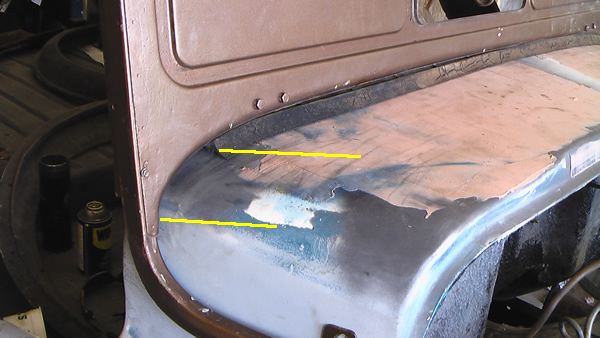
Combination Valve: A Combination Valve is simply a proportioning valve and a pressure differential valve that is combined into one unit.  I got one from a junk yard early 90s cherokee.  I grabbed the valve, the valve bracket and some of the lines.  The lines between the valve and the master cylinder were long enough that I can attach the valve to the frame.  So, I welded a small bracket to the frame and now the valve bolts to the frame.

In the image, the valve looks very close to the front of the tranny, but fortunately, there’s plenty of room.

 
To Top

My Build — More on the hood

• CATEGORIES: Biscuit, Features This site contains affiliate links for which I may be compensated.

There are several important lessons I learned from web and software development:  1)  Real artists ship, meaning that sometimes you can’t have everything you planned or wanted in a project if you want to get it out the door; and 2) there’s always a 2.0 version.

With those lessons in mind, after several days of fiberglass filler and sanding, fiberglass filler and sanding, I’ve finally got a roughed out shape I can live with.  The reality is, more sanding is necessary to get the slopes on the bump smooth, but I can live with its imperfectness (like anything else is perfect).

I have a little final trimming on the hood edges.  After that, it’s time to pull it all apart, prepare the body for sanding/paint, drill the gauge holes in the dash, fix my brake line, and complete some odds and ends in preparation of permanently putting the body on the frame.  Oh yeah, and clean up the garage — it’s looking pretty messy in the pictures!


To Top

My Build — The hood vs. the air cleaner

• CATEGORIES: Biscuit, Features This site contains affiliate links for which I may be compensated.

One of the issue’s I’ve put off until now has been the air cleaner.  I knew fitting an air cleaner between the hood and carb would be tight, a consequence of the tall Kenne Bell intake manifold.  However, I thought I might sneak it in there, but after finally fitting the hood onto the front clip, I discovered that even a low profile air cleaner won’t fit.  Unfortunately, the engine can’t drop much more (not that I want to drop and reweld the engine mounts for an extra 1 1/2 inches).  The only solution left (that I could think of) was to put a bump into the hood.  I REALLY didn’t want to do it.  But, I need to keep moving forward on this project, so I decided it was the most expedient solution.

Once decided, I then had to decide the type of bump.  After mulling it over, I chose to do a simple bump that follows the lines of the hood.  The first step was cutting the hole in the hood.  Next, I created a form out of a 2×4, putting a 20 degree edge, the same degree, but opposite, of the angle of the stripe on the body.  I laid two coats of fiberglass and resin and let it setup.  The good news is that the results are even and the angles correct.  The bad news is that I’m not thrilled with the results.  I’ve thought about adding some angles to the front to make the bump more interesting, but I think I’ll keep it simple and save the details for version 2 of the hood.

Here’s the hood precut

Here’s the hood with 3 sides cut.  I used a cutting wheel to do the cuts and a flat piece of steel as a guide to create a straight line.

Continue reading

 
To Top

My Build — Hood Mounted

• CATEGORIES: Biscuit, Features This site contains affiliate links for which I may be compensated.

Last night i got the hood mounted, trimmed and latched. Once I determine where to mount the blocks (not sure what I'm going to make those out of yet), then it will be ready to patch, sand and paint.  

 
To Top

My Build — Hood version 1

• CATEGORIES: Biscuit, Features This site contains affiliate links for which I may be compensated.

Over the past week I completed the form for the hood, applying a second coat of drywall mud to smooth the curves.  I had to create the hood because I lengthened the front clip about 4.5 inches.  Following that, I rubbed some turtle wax onto the form as a release agent.  Then, I laid 3 layers of fiberglass & resin.  Finally, I laid the hat channel I pulled from a different hood I had (which will serve two purposes — to hold the curve of the hood and provide support for the hinge).

As you can see below, the turtle wax didn't completely release well, so there will be some sanding.  Also, rather than apply the gelcoat to the surface of the form (which I figured would not release well at all), I have decided to apply it once I finish sand the hood.  Finally, I have done an initial trim on the hood and it fits well, but not perfect.   It will take some additional trimming, patching and sanding to finish this, but it should do fine for a first hood (much better than the first hood on my first jeep).

Continue reading

 
To Top

My Build — Creating the Hood

• CATEGORIES: Biscuit, Features This site contains affiliate links for which I may be compensated.

I've decided to tackle the hood.  Because of the 4.5" extension to the front clip, I've had to decide what to do with the hood.  As I documented in previous posts, I've lengthened the fenders.  Now, instead of trying to lengthen an existing hood, I've decided to create my own fiberglass hood:  Nothing fancy, just a straightforward simple hood.  I'll save a more complex hood for a second form.

Since I had an existing hood that had a good hinge and a good rib, I decided to remove those from the hood and use them on the fiberglass hood.  To do this, I had to drill out the rivets that attached the rib to the hood.  Once drilled out, the rib came right off.  You can see the rib and the hinge below.

Continue reading

 
To Top

My Rebuild — The Windshield

• CATEGORIES: Biscuit This site contains affiliate links for which I may be compensated.

The first time I tried to fit the windshield onto the body last year, it was too narrow to fit correctly.  At that point, I put it aside to deal with later. 

Well, yesterday I decided that now was 'later'.   After playing around with the windshield some, I realized a couple things:  1) Someone had welded a crack on the driver's side leg, so I had to grind that down a bit to help it fit; 2) The cowl of the fiberglass body was not shaped quite right, so I would have to 'trim' some of the rubber gasket to get the window to fit (the rubber needs replacing anyway, so I hacked it for test purposes — as can be seen in the closeup photo below); 3) Even with the rubber hacked, the windshield likely won't fit as tight as I'd like, but I can live without a tight seal as I doubt I'd be driving in much rain anyway.  

With those decisions/concessions made, I had to choose where to drill the holes for the windshield mounts.  The key for me was to get the right tilt to the windshield angle, making sure the horizontal part of the legs looked pretty level and making sure that when the windshield was tipped forward that it would rest level (something that I couldn't do after mounting the windshield to my first jeep).  Finally, I had to make sure the windshield was back on the cowl far enough so that the windshield frame binders could be mounted to work correctly (I'm calling them binders here, but what do you call the two devices that pull down and secure the windshield?). 

Another task I tackled today was the brake pedal.  I took a brake pedal assembly out of a junk yard '90 cherokee.  Originally, I had the pedals all set up for a clutch and brake pedal.  After getting that setup complete, I changed my mind to go with an automatic. With that decision, I chose to get a wider automatic brake pedal.  Fortunately, the cherokee's also came with automatics (and hence automatic brake pedals) and they used the same brake/clutch assembly system, so all I had to get was a brake pedal and resize it.  So, if I do decide to switch to a stick/clutch, changing out the brake pedals and adding the hydraulic clutch mechanism (which I already have) will be a snap.

 
To Top

My Build — Radiator and Tranny Cooler Install

• CATEGORIES: Biscuit This site contains affiliate links for which I may be compensated.

While building my last jeep, I remember the difficulty of making the radiator fit.  I believe I finally used a pinto radiator I had laying around and, fortunately, had a hood that allowed the radiator to sit just barely above the grille. With that experience in mind, I've been puzzling through how I wanted to deal with the radiator for a while. 

This weekend I finally got to installing my radiator and tranny cooler.  Selecting a radiator was the first challenge.  I had planned to use the radiator from the CJ-5 I bought last year, but I couldn't make it fit (I ended up selling that radiator).  Then I found a brand new $15 chev radiator that was pretty small off of craigslist.  I purchased that radiator, but it turned out that wouldn't fit either.  Finally, I broke down and purchased a 15" high and 26" wide Griffin Aluminum radiator from Doug Herbert (it was about $30 cheaper than Summit).  That was the shortest radiator they sold and it fit perfect … well, almost perfectly as I had to cut into my cross member to make a little more room.

Continue reading