Idea Factory Research Archives

Idea Factory

To Top

Jeep Grille & Hood Garage Art – Auction

• CATEGORIES: Auctions, Idea Factory This site contains affiliate links for which I may be compensated.

Couple of interesting (and similar) auction items caught my eye this week…

I always find these types of artwork interesting, as it really showcases the creativity and ingenuity of our Jeep hobbyists, and it always gets me thinking about all the “spare” parts that I have in the garage, and perhaps things I might be able to do with them (besides saving them for spares).

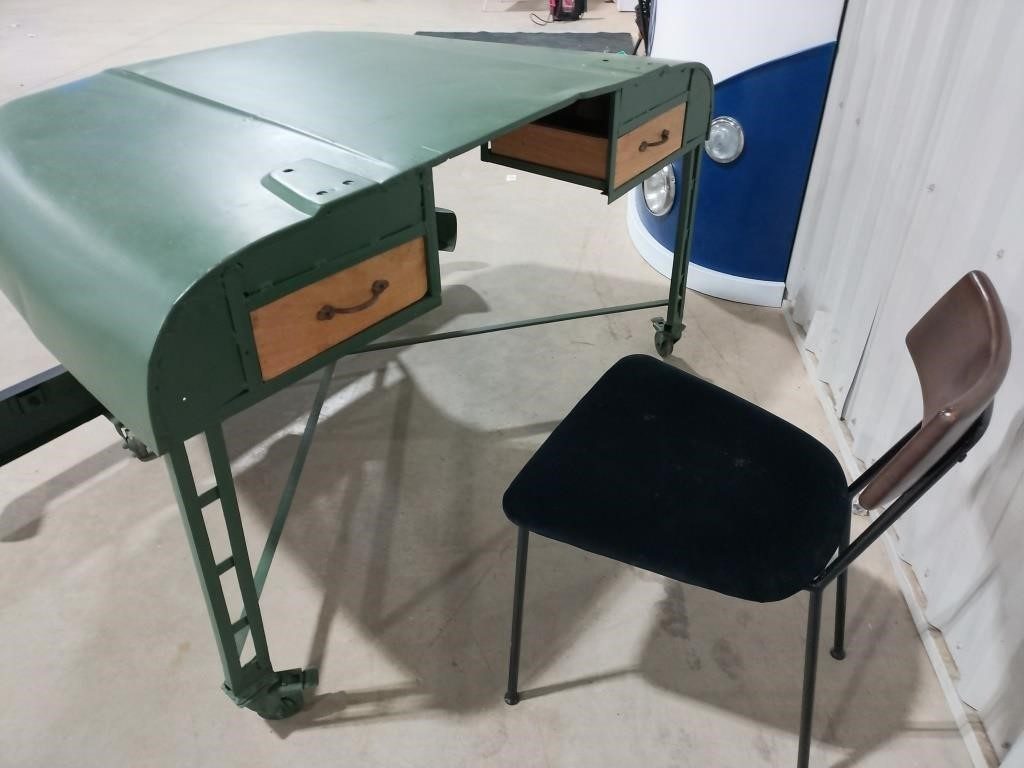
Jeep Hood Desk & Chair

Location: Puslinch, ON N0B2J0

I actually like this idea quite a bit, and I love the idea of the drawers in the back. I’m not sure I would have used the bumper (as it seems a bit large and out of place) as do the rear struts. I’m surprised the hood is a bit dinged up, and that there are now turn signals installed. But again, I love the idea, and the drawers in the back.

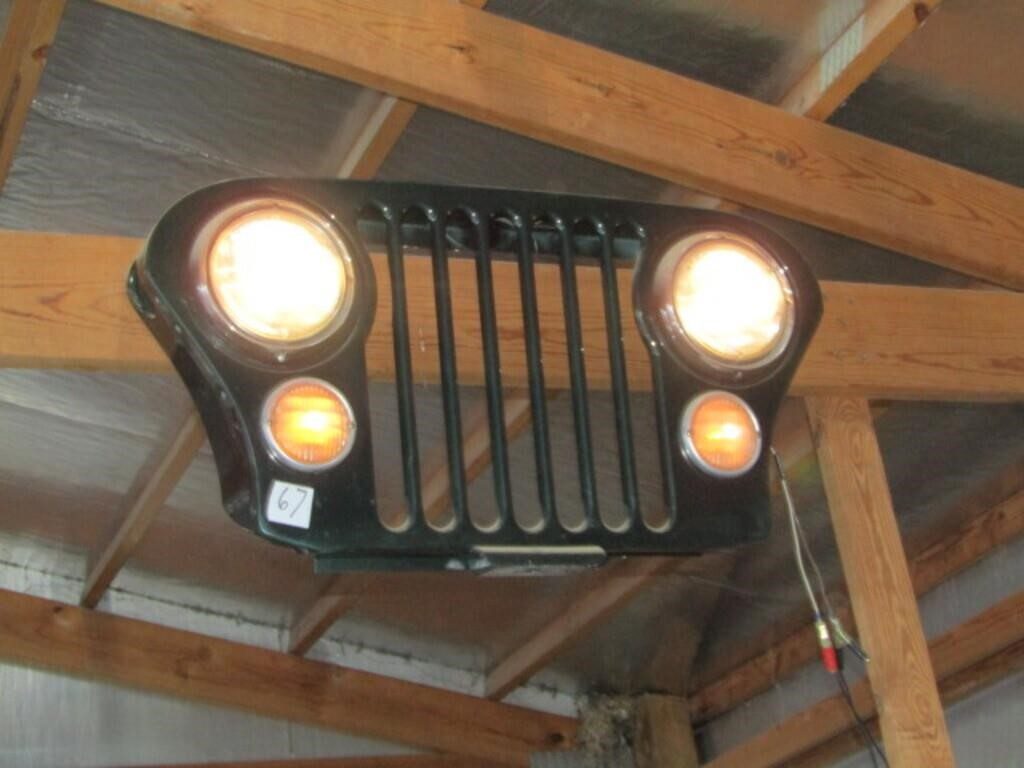
Jeep Grille Wall Hanger Decor

Location: Newton, IL 62448

Love this wall hanger, and especially that the lights are functional (have to say I wish the lights on the desk above were working also). Just a cool piece of garage art (and I’m sure this could also be “recovered” and used as a spare if the need ever arose).

Introduction

A quick introduction (as this is my first post on eWillys) – my name is Dan, and (like most of us) I’ve been a car guy forever. Primarily LBC’s (little British cars – MG, Triumph, Healey, Jag, etc.) but also have had a CJ3a for probably a dozen years or so now.

I’m also a bit of an online auction junkie – not so much eBay, but some of the lesser known sites (e.g. estate auctions, farm auctions, etc.) and it’s surprising the types of things you can find (including WIllys items). So from time to time, I’ll be posting here on eWillys some of the interesting things I’ve come across during my time perusing my favorite auction sites.

A Note on Auctions

A couple of things I’ve learned about online auctions that might help if you’re considering bidding on any items:

  1. Pay attention to location as many items will not be shipped by the auctioneer. Most of the time, the auctioneer is just interested in selling items quickly and moving on, and especially with larger items, these will be LOCAL PICKUP ONLY.
  2. Having said that–if you contact the auctioneer and ask, you may be able to arrange for shipping. I’ve found most auctioneers will consider shipping if you’re nice, and if it would be reasonable for them to ship. HOWEVER – ask about fees!
  3. Handling Fees – some auctioneers charge a handling fee, especially for items that are being shipped. Read the rules for each auction (and if in doubt, ask)
  4. Shipping Fees – all auctioneers charge a shipping fee, usually just a “pass thru” but sometimes with a surcharge. Read the rules for each auction (and if in doubt, ask)
  5. Buyer’s Premium – you’ll also pay a percentage of the bid as a “buyer’s premium” and this will vary from auctioneer to auctioneer (and these can be substantial) but I’d say 10%-15% is about average (and if in doubt, ask)
  6. Bidding – rules can vary, but most of the time when a new bid is placed, some “extra time” is placed on the clock (so that others can increase their bids) – so no “sniping” of bids. Having said that, it really is imperative to be online as the bidding deadline approaches as bids will often increase (most times substantially) and if you’re really interested in an item you’ll need to monitor bidding activity at the close of the auction.
  7. Inspections – if you’re local, most auctioneers offer dates & times for in person inspections. If you’re bidding on an expensive item, it’s probably worth doing an in-person evaluation prior to bidding.
  8. Is it all worth it? In short, yes–there are some real bargains out there–BUT (especially for lower priced items) you may find the fees may total more than the item itself! Yet even then, if an item is rare, it’ll still be worth it.
 
To Top

Nate has some ideas to share

• CATEGORIES: Features, Idea Factory • TAGS: This site contains affiliate links for which I may be compensated.

As part of his CJ-3A restoration Nate left his unique mark on his build with a variety of creative solutions.  You’ll enjoy these.

1. “I mounted my body with hockey pucks and valve springs. I did this to my offroad beater too, and they seem to work quite well.”

2. “I made some doors on my harrison heater to get some more heat to the driver’s side.”

3. “I made a removable jerry can holder that bolts to the rear draw bar. This works really well. I carry about 3 gallons in it, and haven’t had any problems.”

4. “To put turn signals in the 3A grille, I made 8 of these spacers (4 per side) to space out the lens to fit the bigger bulb.”

5. “Instead of having a switch on the dash to turn the reverse light on, I made this bracket with a push switch (one that doesn’t click and locks in the “on” position) to turn it on. The plunger is what activates it. This is a really handy mod.”

 
To Top

Sam Rewires a Flattie

• CATEGORIES: Idea Factory, wiring • TAGS: This site contains affiliate links for which I may be compensated.

The last couple years I’ve made a major update to eWillys every September.  This September, based on the feedback I have received, I’ll be making a push to create a better how-to area and improve the ability to find content.  As a part of that effort, Sam, who operates Flat Fender Willys in Arvada, Co, has offered to share his knowledge and experience doing a variety of repairs and improvements.

In this example, Sam explains his approach to rewiring a customer’s 1960 CJ-3B.

Sam writes, “This first photo shows what I run into a lot.  Wiring that runs nowhere is a rat’s mess just looking for trouble.  Notice the quick-fix on the battery cable and length and the mess of wires next to the master cylinder.

On the dash side, we have a photo before taking the dash off. The customer wanted a brushed aluminum dash, so here it is……..nice, but reflected alot of sun and the E-Brake doesn’t work because of too much rust and fire damage.

Now we have two photos that show you what happens when you have a major short and your dash goes up in smoke.  I had to strip this 60 CJ3B of all the wiring and build a new harness.  Several different owners contributed to the dash being cut out like this, sharp edges and all.  Some of the burnt metal is from a torch and the rest is from the wiring harness burning.  This jeep had NO protection against shorts.  BTW:  ALWAYS CARRY A FIRE EXTENGUISHER.  You never know where or when or how but it is as important as a good roll cage and harness.  Cheap insurance for your (or someone elses) vehicle and piece of mind.

In this photo of the engine bay, you can see how NOT to plum your fuel lines unless you feel real brave.  The plastic fuel filter is laying on the hot manifold and rubber fuel hose runs all the way from the tank, dangerously close to the exhaust manifold on the drivers side.  Good place for a fire to start……  Also notice all the wires running everywhere on top of the engine and fenders.

In the next photo, of the jeep you’ll notice that this has real potential to be a real top-notch runner.  Body is pretty straight and sports new front and rear seats.  This is a 60CJ3B on a CJ5 chassis.

In the next photo, we see no.16 wire wrapped together and taped to no. 10 wire to the headlights and back to no.14 wire at the lights……..WRONG, WRONG, WRONG.  Also notice how close the battery cable is to the engine fan and the rubber fuel line running beside the exhaust manifold.  The fuel line is less than 1/2 inch away.

In the next photo of the engine bay, we can see how the firewall is a mess of wires running averywhere with NO rubber grommets protecting the wires coming through the firewall.  Also another good shot of the fuel line wrapped around the distributer.  Note, I moved the filter to the top of the heater hose for a moment for picture clarity. 

In the last photo, this is the fuel tank that runs the full width of the jeep.  Nice fuel capacity but very dangerous.  ALWAYS leave CRUSH space between the body and tank.  In a case of a roll over, the body WILL fold in at the dip in the body.  If you leave at least 2 inches of space between the body and the tank, you’ll have far less chance of rupturing the tank in a roll over.  You will also provide the fuel inlet to have room to bend, again less chance of rupture….DO IT RIGHT and LIVE…….SAFETY, SAFETY, SAFETY!!!!!!!!

AFTER WIRING:

In this first image is the finished wire harness.  Notice the battery cables are the right color, length, and size with correct ends.  I also separated the circuits and fused everything with the exception of the main power source which is on a 30 amp circuit breaker.  I have a steel fuel line running down inside the frame rail from the tank and steel from the pump to the carb with a steel filter.  ALL of the old wiring is gone and as you can see, everything is put away and secure.

In this photo, I’ve built another dash which won’t reflect light, stays cool to the touch, matches the new seats and does not look old school.  I put new guages and radio speakers (two this time) with a original JEEP radio.  To the left of the radio are two power sources (cig lighters) up and down to power cell phones etc.  I used cig lighters because they are closed and keep dust out and looks better than two holes in the dash.  Above the speedo there are two red lights for the turn signals and one for high beam.  You will also notice there is no E-Brake in the dash now.  I put it on the floor.  If the owner wants to work on anything behind the dash, the stainless bolts on top are removed and the dash folds down.  It is on a piano hinge along the bottom.

The new E-brake lowers to the floor and is easy to get to and work.  When set, this jeep won’t move……we tried grins here.  The cost?  How about one hour of work and $5.00 for the brake assembly and housing.

The owner of this jeep has asked Sam to do some additional work, so you’ll probably see this jeep pop up in additional posts.

 
To Top

My Build: Bending the Rollcage

• CATEGORIES: Biscuit, Idea Factory, Roll Cage This site contains affiliate links for which I may be compensated.

I spent much of the day doing the initial bending of my cage. I managed to complete the front loop and back loop. I was very pleased with the results and the bender. Thanks to Mitch for the front and back loop measurements. Those proved invaluable!

I will delay a discussion of my tube choice (size and type).  I spent A LOT of time researching various forums on the pros and cons of various sizes.  Then, there’s the whole DOM vs. HREW vs. CREW vs. Sched 40 vs. Chromoly … and more.  I’ve also been filing away various roll cage designs so that readers and builders can see all the different ideas.  In the end, my cage reflects the need to tie into my frame due to the fiberglass body, I also wanted it to look like my previous cage in my first jeep, and it includes a workaround for the mid loop attachment as I put the mid loop attachment closer to the seat then I wanted (oops). I also need to talk a little about the bender I built and the plans I used, but will save that for later too.

bender_first_bend

tube_cutterThe first thing I needed to do was calculate exactly how the bend of the tube changed the measurements and determine the inner and outer radius measurements so I could measure the loops correctly. I started by marking off a tube in 1 inch increments up to about 15″. Then I put the tube in the bender and bent the tube. I learned that my 2″ die created an outer radius of 7.5″ and the length of a 90 degree bend from start to finish was 10″.  You can see the inch markers and the tube cutter I was using in the pic to the right.

Another thing I learned was that I had to bend the tube about 3 degrees past the amount I wanted, as it would spring back 3 degrees when released from the bender (you can see it bent past 90 in the pic below).

Knowing that information, I measured and bent the front loop. The first two bends of 90 degrees went smoothly. Then, I cut down the bottom pieces so that, after I added the windshield contours, the front loop would measure 45″ from the loop to the floor boards. Next, I bent the loop with the windshield angle. My windshield sits at an angle of 15 degrees and the bend needed to start 20″ from the floor board. These also bent perfectly.

bender_back_loop_2ndbend

bender_front_loop

So far so good.

Next was the back loop. Based on Mitch’s measurements and the look I was after, I decided that 43″ from the loop to the back floor would be a perfect distance. I made the width the exact distance between the body sides, which is slightly narrow than a standard jeep due to the wider lip on the fiberglass body. Again, the 90 degree bends went perfectly. Then, I had to do 45 degree bends back towards the body. Unfortunately, after testing the loop on the jeep, 45 degrees wasn’t the angle I actually needed, so I had to bend both sides twice in order to increase the angles to the point where it would work correctly.

bender_midloop_beforebend

bender_back_loop_4thbend

Here’s a poor quality shot from my camera phone of both loops in their respective places.

bender_2loops

With the two toughest parts of the cage out of the way, the sun set and I moved inside. I also was getting a little tired, because when I attempted to bend the back supports, I managed to bend BOTH wrong — one was bent the wrong angle and one was bent in the wrong location. Fortunately, I can salvage the tube and use them in other places. At that point, I thought it best to head inside and cook dinner.

More pics tomorrow night.