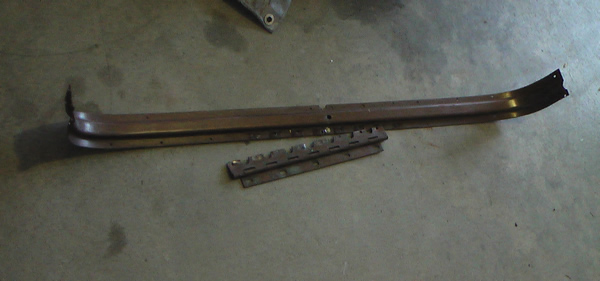
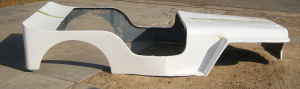
Features Research Archives

To Top

The Former Pittle Power

• CATEGORIES: Builds, Features, News This site contains affiliate links for which I may be compensated.

I just got some pics from the owner (who shall remain nameless until he sends me his name 🙂 ) of the jeep formerly known as Pittle Power (I remember it as Piddle Power though).   I don't remember the history of the Jeep prior to Jim and Patty Carter purchasing it, but I believe they purchased it so their growing boys, Tim and Steve, wouldn't have to squish themselves into the back of Otis.  They purchased a stock CJ-3A, installed a chev 4cyl and attached desert dogs.   Otherwise (I'm told) they left everything else stock.  Pittle might not have had much power (hence the name), but it could go 99% of the places the modified WWJC jeeps could go.

The Carter's had a habit of naming all their vehicles.  There was Otis (the jeep), tote-us (the jeep trailer), Brutus (their first motorhome) and more.

Our To-Be-Named contributor writes:

"The Jeep I bought was owned by Jim Carter(original member of the WWJC). The race name was Pittle Power. Skip Baird helped me with my first swap with a V-6 and a top loader. Al Hamilton and I became very close infact I still have one of his pups Mandy she is a very stubborn German Shorthair."

Editor's note:  To the right is the only picture I have of Pittle Power from 1983 (and it's only the hind quarter) hidden behind Danny's CJ-5.  While the Pittle Power was never actually raced, I do remember a club trip to Liberty Trail one weekend.  After we made camp, Tim Carter decided he wanted to head down to the store and asked me to ride shotgun (somehow he knew there was a remote store at the bottom of the hill we were camped on). So, he drove me down that hill in Pittle Power, a ride I remember vividly because we were travelling sideways down the constantly turning gravel road for a good portion of it.    Come to think of it, one time Tim took me for a ride in his late 60's camaro and we travelled sideways heading onto the cloverleaf on ramp to I-405.  Maybe Tim always travelled sideways or I just brought it out of him.

[fb_button]
 
To Top

Fiberglass Body and Grille

• CATEGORIES: Biscuit, Body Parts, Features • TAGS: This site contains affiliate links for which I may be compensated.

Here's a few pictures of the Body and Grille I grabbed while down in Springfield, Oregon a couple of days ago. I need to get a few better pics of it.  I've got it listed for $450 on Craigslist.  

The outside of the body is in excellent shape and would make a great racing shell for PNW4WDA racing. The interior of the body is well designed and strong and could make a good jeeping/street body, however the plywood attached to the bottom is bad in spots, but could be fixed pretty easily.  Also, the firewall has an extra large opening that needs to be closed.  Otherwise, the body looks straight and is pretty light.


Continue reading

[fb_button]
 
To Top

Willys Woodies

• CATEGORIES: Features, GPW (Ford MB), MB, Website, Willys Wagons This site contains affiliate links for which I may be compensated.

I wandered across this website in 2008 that showcases old woodies.  There’s a jeep section with a variety of woodies. The woodie at the bottom is made from an old MB/GPW.

“A French coachbuilder’s modification of the American Jeep into a wood-bodied fire fighting squad truck is similar to the work of Duriez.”

See some other old willys woodies here

[fb_button]
 
To Top

My Build — Transfercase Shifter

• CATEGORIES: Biscuit, Features This site contains affiliate links for which I may be compensated.

While you can purchase a dual shifting unit from Novak for your Dana 20, it's also possible to fashion one from scratch.  Note that I've never used the dual shifter on a Dana 20 transfercase without removing the center pins that move between the shift rods in the the shifting tower.  To remove the pins, you have to remove the shift levers, drill out the plugs on the sides (note where the red gasket sealant is on the side of the shift tower, and then slip out the oblong pins (they are elongated metal balls).  With these removed, you can push and pull the levers all you want (but don't try running high range in the front and low range in the back unless you feel the need to break something).

[fb_button]
 
To Top

How the transfercase shifting works

• CATEGORIES: Biscuit, Features This site contains affiliate links for which I may be compensated.

There was a question about how the shifting in my transfer case works.  (http://www.ewillys.com/?p=797)

The shifting might seem unusual, but it's not.  What's unusual is that I have removed the pins from the shifting tower that slide back and forth between the shift rods.  This allows for more shifting options.  To take advantage of those options, I installed two rather than one stick.   You can see that here in this video I made.

Here's an image the also demonstrates how the shifting works.  Please note if it doesn't make sense:-)

[fb_button]
 
To Top

Builds — Brian’s working furiously on his CJ-3B

• CATEGORIES: Builds, CJ-3B, Features This site contains affiliate links for which I may be compensated.

Brian sent me some updated pictures of his CJ-3B project.  He just finished reversing the springs in the front.  As a part of that reversal, he had to replace the front of the frame.  After conquering this task, he turned his attention to the rear differential, only to discover a big problem (which he'll update all of us about as he progresses through the issue).  

Brian explains more below about his spring reversal experience below …. 

"I wanted to do a spring reversal so I started by getting some universal after market parts to make things a little easier. Then I bought a early Cj5 frame for the front 8 inches then sold off a chrome bumper and ring and pinion at a small profit.

Here's what I did to lengthen the frame.

I cut a block to use as an template to cut off the front of the 3b frame. (Stan H. — from the Wandering Willys Jeep Club — always said to cut at a 45 degree angle though the frame.) I did the same with the pieces to be added. They lined up really nice.  

Continue reading

[fb_button]
 
To Top

My Build — A Custom Data Plate

• CATEGORIES: Biscuit, Features This site contains affiliate links for which I may be compensated.

Yesterday I made a first pass at a design for the gauges on the dashboard.  As a part of that exercise, I tried to find a space for the data plate I have.  The data plate is original to the CJ-3A I have and in good shape, except that it is faded, so it is hard to read.  In fact, I tried to scan it into my scanner and the scanner couldn't pick up the words or pictures at all.  After pondering the situation, I decided to recreate a data plate graphic and take it into a print shop to see if I can make a raise print or sticker of some kind.  As part of the customization, I've tried to recreate the fonts as closely as possible, however, much to my surprise, the data plate uses several different fonts, some of which are the same font but stretched or bolded or both.  Also, I've updated the data plate to better reflect the drive train I have installed.

Here's the current favorite mockup so far (note the font kerning and arrangement will be more precise on the final high resolution version).

[fb_button]
 
To Top

Old Jeep and Jeep attachment Brochures

• CATEGORIES: Advertising & Brochures, Features, Website This site contains affiliate links for which I may be compensated.

cj3b_brochure2UPDATE: It appears this site has changed — at least I don’t remember it quite like this …

The “Jeepsterman” Morris Ratner has a variety of old brochures for sale on his jeepsterman website.  You can see an example of one of those to the right, which is about the roper digger.   Did you know the roper digger can be used in multiple ways?  Now you do …  Another interest brochure compares the jeep to the scout.

See all the Jeepsterman brochures here

cj3b_brochure1

[fb_button]
 
To Top

My Build — Power Steering Hoses

• CATEGORIES: Biscuit, Features This site contains affiliate links for which I may be compensated.

I found a very helpful article from a toyota landcruiser owner at offroad.com about building custom power hoses.  In the article he provides pictures and a list of parts he used from Summit Racing.  Unfortunately, his part numbers don't correspond exactly to the numbers from the Summit Racing catalogue I have, but they are close enough to guide me correctly.  

To do my build the way I want (which is routing the power steering through the cross member) based on this article and the new summit racing catalogue, I believe I would need:

5 -6AN EAR-309106ERL 90 degree bend tube $16
2 -6AN EAR-300106ERL straight $7 each
2 -6AN EAR-983206ERL Straight Bulkhead $4 each
1 6AN to 11/16-18 Not sure on part number yet approx $7
1 –6an to 5/8-18 Not sure on part number yet approx $7
-6an power steering 6ft perform-o-flex hose EAR-406006ERL $45

That's a grand total of $161.  If I only do the power side, I can cut this amount in half.  I'm gonna talk to the folks at my local hydraulic store and see what they can do for me. 

[fb_button]
 
To Top

My first build — Old pix emerge

• CATEGORIES: Features, News This site contains affiliate links for which I may be compensated.

I assumed these pictures were lost, but they appeared in a trunk my ex-wife kindly gave back to me.  The first pic is a good shot of my first jeep’s roll cage.  The second pic is a pre-paint job pic of my first jeep stuck in the Rabbit Hole, a small mud pit at the Eastern edge of the Naches Trail.  The third pic should come with a caption “Oh does my nose hurt!”.  The fourth pic is a great shot of the jeep parked at Roche Harbor Resort on San Juan Island (Washington State) while working there in 1987.  The final pic shows the down side of oil pressure problems — broken rod, piston, and other parts.

[fb_button]