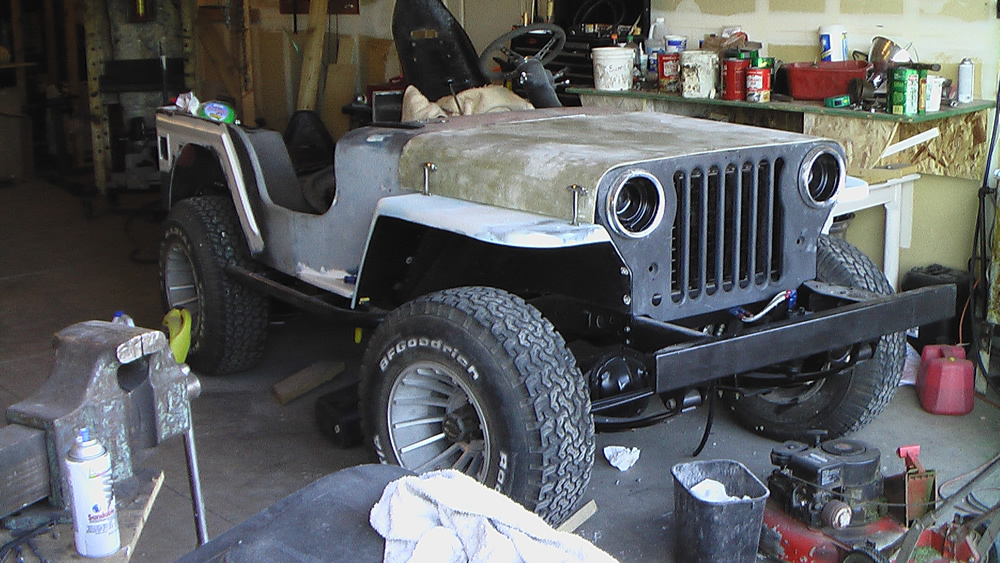
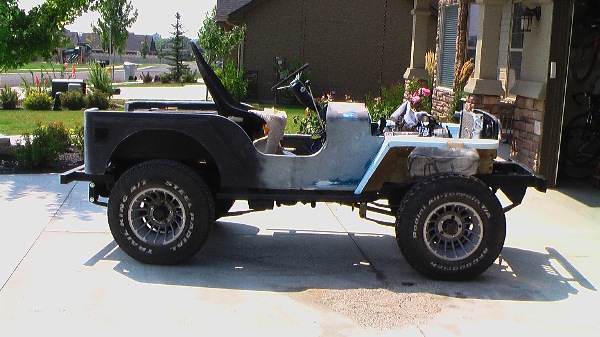
Last night i got the hood mounted, trimmed and latched. Once I determine where to mount the blocks (not sure what I'm going to make those out of yet), then it will be ready to patch, sand and paint.
emailNeed to contact me and don't have my email? Click on email button.

Welcome to eWillys.com, a website for vintage jeep enthusiasts. I update this website nearly every day with jeep deals, jeep history, interesting reader projects, jeep related info, and more.
These quick searches can help you find things on eBay. People list in the wrong categories all the time, so don't be surprised to see brochures in the parts area for example.
The links to posts below show jeeps grouped by models, condition, and other ways. Some of these jeeps are for sale and others have been sold. If you are unsure whether a vehicle is still for sale or not, email me at d [at] ewillys.com for more info.
There are plenty of interesting, unusual, historic and surprising stories related to Jeeps and their owners. In addition, some of these features have nothing to do with jeeps. This link will display all featured stories starting from the latest.
Looking for parts and not sure where to go? There are a variety of large and small new and used parts sellers both online and offline.
Importantly, the allure of buying a project jeep can be romantic. The reality of restoring a jeep can be quite different, expensive and overwhelming without the right tools and resources. So, tread carefully when purchasing a "project". If you have any concerns about buying a vintage jeep, or run across a scam, feel free to contact me for help, comments or concerns .
Last night i got the hood mounted, trimmed and latched. Once I determine where to mount the blocks (not sure what I'm going to make those out of yet), then it will be ready to patch, sand and paint.
Over the past week I completed the form for the hood, applying a second coat of drywall mud to smooth the curves. I had to create the hood because I lengthened the front clip about 4.5 inches. Following that, I rubbed some turtle wax onto the form as a release agent. Then, I laid 3 layers of fiberglass & resin. Finally, I laid the hat channel I pulled from a different hood I had (which will serve two purposes — to hold the curve of the hood and provide support for the hinge).
As you can see below, the turtle wax didn't completely release well, so there will be some sanding. Also, rather than apply the gelcoat to the surface of the form (which I figured would not release well at all), I have decided to apply it once I finish sand the hood. Finally, I have done an initial trim on the hood and it fits well, but not perfect. It will take some additional trimming, patching and sanding to finish this, but it should do fine for a first hood (much better than the first hood on my first jeep).
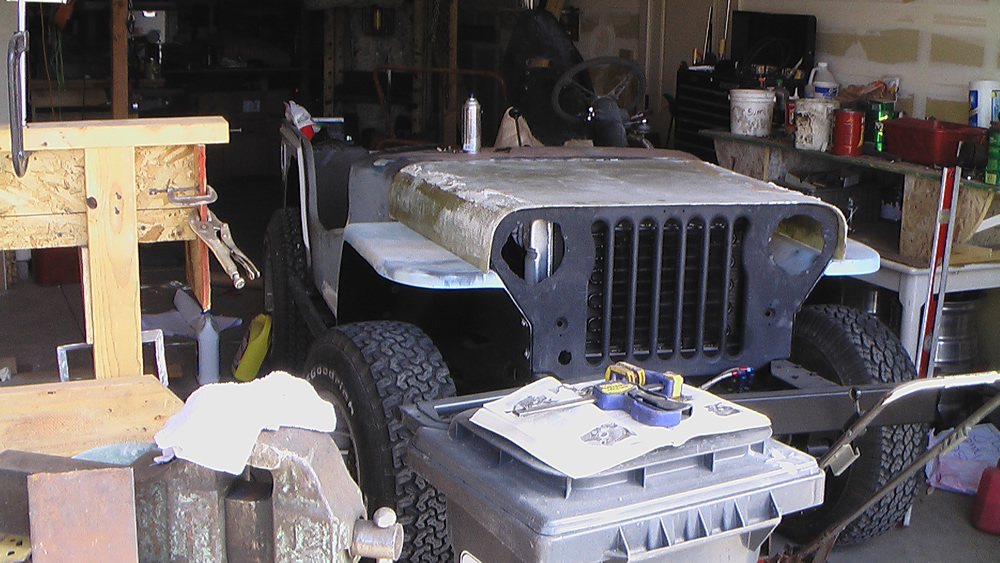
I've decided to tackle the hood. Because of the 4.5" extension to the front clip, I've had to decide what to do with the hood. As I documented in previous posts, I've lengthened the fenders. Now, instead of trying to lengthen an existing hood, I've decided to create my own fiberglass hood: Nothing fancy, just a straightforward simple hood. I'll save a more complex hood for a second form.
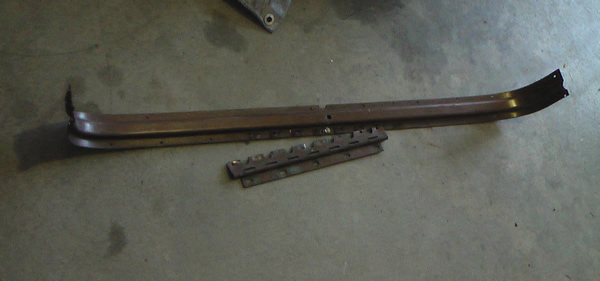
Since I had an existing hood that had a good hinge and a good rib, I decided to remove those from the hood and use them on the fiberglass hood. To do this, I had to drill out the rivets that attached the rib to the hood. Once drilled out, the rib came right off. You can see the rib and the hinge below.
 James found this cj-2a with a m38 body on Craigslist for $2,000. He pounced on it immediately. I'm not sure how I missed it during my searches! Just goes to show I can't find them all.
This is an excellent find, especially since the body is in excellent condition reports James. It's also one of the best California deals I've seen …
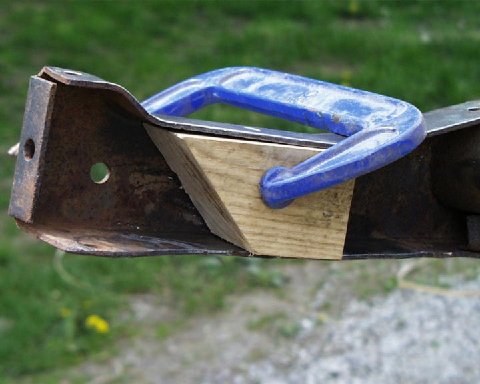
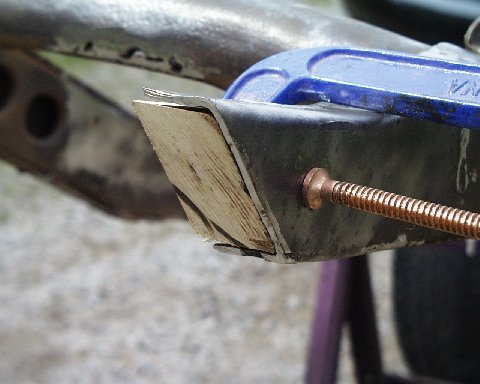
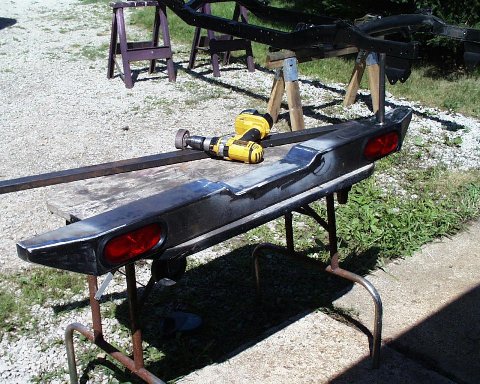 Brian's been busy creating a new bumper for his CJ-3B build. He's says it's nothing fancy, but I think it's pretty nice. Here's a start-to-finish explanation of the work it took to make his bumper. Thanks for sharing Brian!
"Because the springs are longer than stock, I had to come up with a way to lengthen the frame a little in the rear. So, I fabricated a new rear bumper and incorporated a swing out spare tire mount. In addition, rather than cut holes into the body, I decided to put the tail lights in the bumper. To make the bumper, I only need to use a grinder, drill press, and a Mig welder — it's nothing fancy."
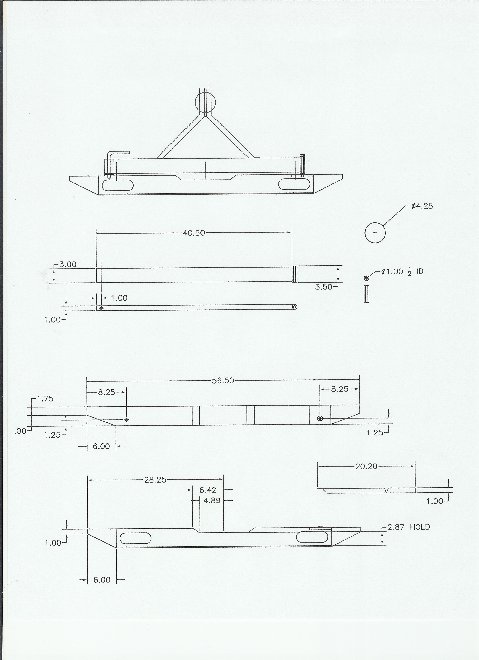
 One of the ewillys readers asked me about jeep trailers for sale in the northwest. A quick search yielded a particularly interesting trailer from ww2 — a signal corp trailer.
" WW2 Jeep K38 trailer used by the U.S. army signal corps. This one looks like the one shown in a U.S.M.C manual from 1945."
http://portland.craigslist.org/wsc/clt/793426125.html
Here's some links for some other bantam or bantam-like trailers that vary in price up to $1000:
Here's two in Boise:
http://boise.craigslist.org/rvs/759917596.html
http://boise.craigslist.org/for/746020714.html
Here's two in Seattle area:
http://seattle.craigslist.org/sno/for/786057441.html
http://seattle.craigslist.org/est/cto/787906671.html
Here's some from Colorado:
http://denver.craigslist.org/rvs/738018276.html
http://denver.craigslist.org/cto/793752045.html
http://denver.craigslist.org/cto/791160878.html (very heavy duty trailer)
http://denver.craigslist.org/rvs/781431779.html
And Utah:
http://saltlakecity.craigslist.org/rvs/763935116.html (modern, but probably looks nice behind a CJ-5)
 I’m not sure what the exact story is here (might be a vendor?), but these look brand new.
Flat Fender Style One piece fiberglass Jeep bodies. Call Matt for complete details. (909)239-8463
 Here's an interesting site I found. Blueprints.com claims to have over 24,000 automobile blueprints online (though they appear more like a single drawing rather than full blueprints), including a variety of jeeps. To the right is a jeep labeled CJ-4. The site manager states:
"I do not claim to have made, scanned or drawn all of the blueprints on this website. I did on the other collect, edit and host all of them, free of charge, in my spare time.
I made good progress over the weekend. As you can see, I was able to mount the fenders and take a few shots of the jeep with the fenders. It will look good.
In order to fit the fenders, I had to make cutouts in the wheel wells for the headers. But, as I mentioned in an earlier post, I wanted to fill around the headers. So, I bought a little bit of stove pipe and used that as a form to wrap fiberglass around the headers.
The last pic is the fenders with the new covers for the headers. To match the rest of the underside of the body, I'm going to paint herculiner on the wheelwell of the fenders (which saves a bunch of finish work) and fill in the gaps and paint the top and inside of the headers.
Here are some pics below.
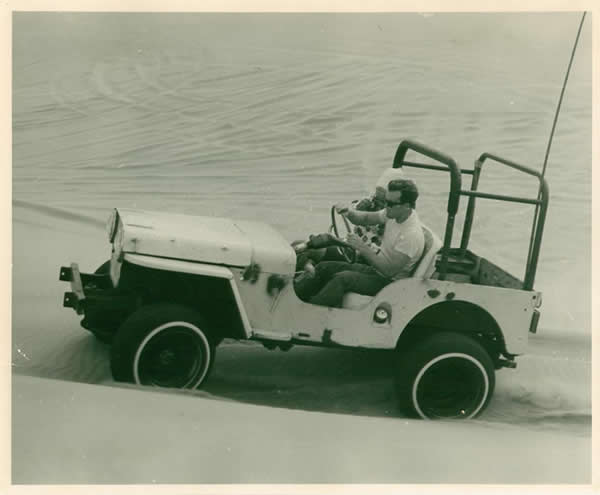
A reader named David has shared an old picture of his parents racing around the sand dunes in what looks to be a CJ-2A. This picture is a good reminder that you don't need a fancy jeep to go out and enjoy a day in the sand. David will be sending a few more pictures along with some background text soon. Thanks David!
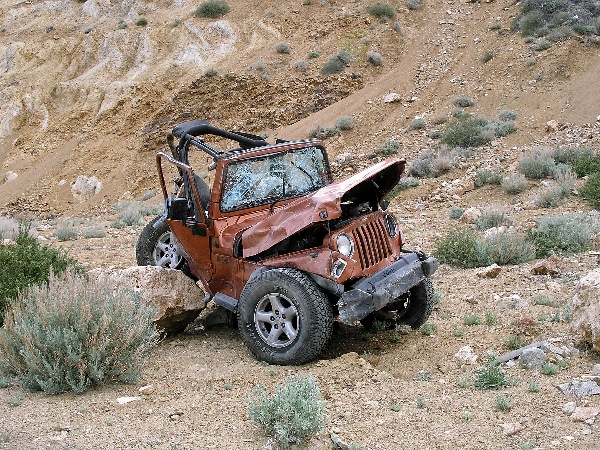
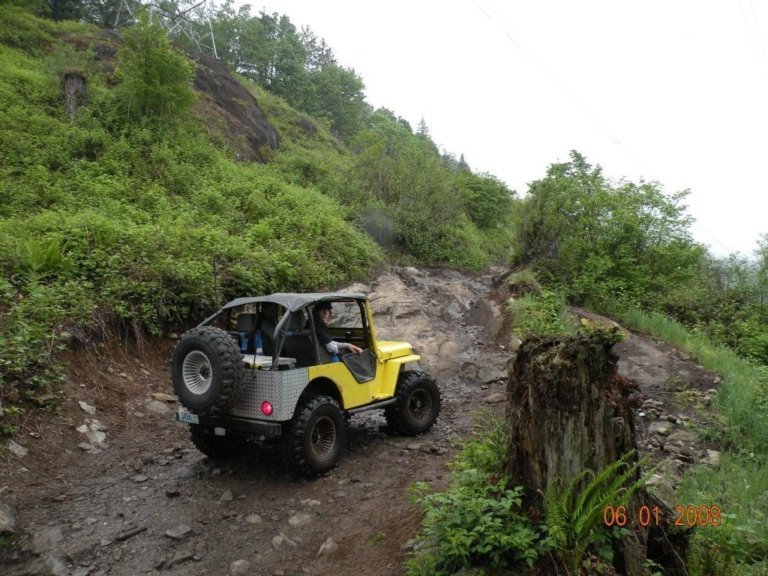
Take one look at this photo and you can see why having a good roll cage is smart. The driver of this jeep, 63 year old Alvin Baldwin, died in the rollover after being ejected. The link to the original article no longer exists. It occurred outside Virginia City.
Well, I learned something new today: Drive Cycles ….
A couple days ago my 1997 BMW 540i failed an emissions test (for the second year in a row). Last year I had shown enough money spent on the engine to get a waiver. This year, I was a little nervous because I didn't know whether they'd give me a second waiver or not. (This vehicle is a blast to drive and a PIA to take care of or work on!!)
Well, I just got done speaking with the head of the Air Quality Testing for ADA County, my new friend Roger (I have to say that it's nice to be able to talk to the head of the department — that's one nice thing about living in a small populated state). What happened was not that I failed, but that they couldn't read my car's computer. The reason was that I have not completed a drive cycle since the last time I reset my car's computer codes (Any time I work on it, I reset the codes to see if I have fixed the problem). I figured anytime I got into the car and drove it that the computer would be on and recording normally. However, until a drive cycle is complete, none of my monitors (which are really groups of codes) are actually capable of being read. So, Roger, who said he consulted with the EPA back in 1992, said he had a good deal of insight into what constituted a drive cycle.
 I made a good deal of progress with the fenders yesterday. I created a series of mini molds and fiberglassed several times in different sections to successfully capture the right angles. So, step 1 is complete.
Today I'll be drilling and mounting the fenders so that they fit correctly. One issue I have to surmount is that the slope on the fenders seems slightly different than the slope on the mount on the body, but I'm sure I can work around this issue.
Once fitted, then I'll have to create the cutouts for the headers and then create the new walls so that the headers are enclosed. Unlike metal fenders, which wouldn't lose too much strength when cutout for headers, the fiberglass will benefit from having that extra strength.
After the final modifications are made, I will be to run a second coat of resin and cloth along the entire underside of the fenders. This will create a smoother look and strengthen the fenders considerably.
The final step will be to use some filler and gel coat to smooth off the top surfaces — then I'll be ready for paint.
 Have a dented header you want to fix? While combing the internet for advice on making my headers work, I came across this interesting solution for fixing dented headers. It involves water, a freezer, and some time. Note: I have not tried this, so cannot speak for its effectiveness
 I've started the process of lengthening my fiberglass fenders. I've determined they need to be extended 4.5".
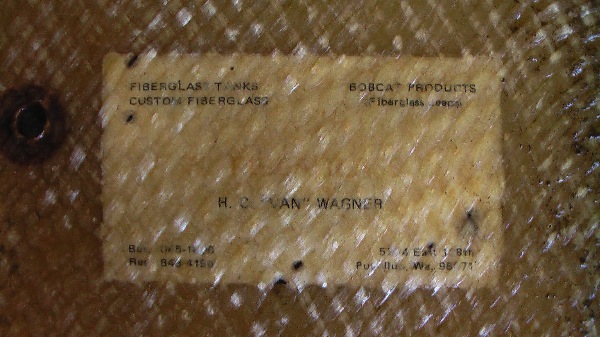
My first task was to clean the fenders. This yielded a surprise: Business cards from the builder of the body were embeded into both fenders. To the right a shot of one of them. The information suggests the seller was H.C. "Van" Wagner out of Puyallup, Washington. He sold Custom fiberglass products including Bobcat products. The name of the company has faded, but I have the address and phone info.
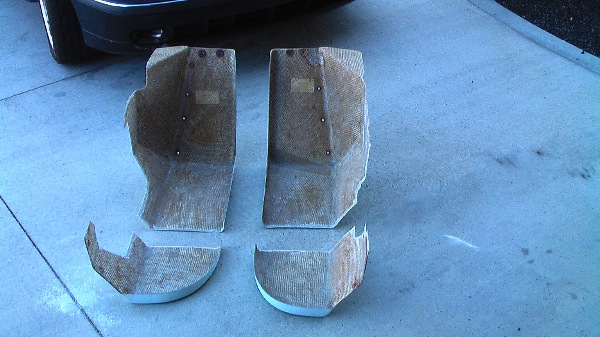 Once the fenders were cleaned, I cut them in half and I cut out the indent (traditionally for the battery) out of the passenger side. Once they were cut, I tapered down the cut pieces. To the left are the cut fenders.
The next step is to fiberglass them. I'm going to try laying down a layer of gelcoat and then lay the fiberglass over the top of it. I' haven't used gelcoat in my previous patching jobs, but am trying to gain experience so that I can use it when I do my custom hood project.
 As a number of readers can attest, I've done a variety of craigslist deals (probably close to 40). This time, I had a '73 CJ-5 radiator I wanted to sell, so naturally I listed it on Craiglist. A potential buyer contacted me and said he was very interested, but couldn't come look at the radiator until after I had left for Seattle. So, I told him I would put the radiator outside and if he wanted it, to put the money into an envelope I pinned to the house.
Sure enough, two days later the radiator was gone and the money was inside the envelope. I was happier about the honesty than about the money 🙂
In fact, I've only had one deal where I didn't get all my money. I swapped a dirty 350 Cadillac motor I really didn't want for some guages, competition coil and a few other parts. The kids I swapped with was maybe 18 and didn't have a way to pickup the engine, so I said I'd charge him gas money to deliver it. When I got there he said he didn't have the money yet, but would mail it. Unfortunately, despite a couple reminders, I still haven't gotten the money. I plan to stop by his house next time I'm driving by (he's over an hour away) and remind him in person again.
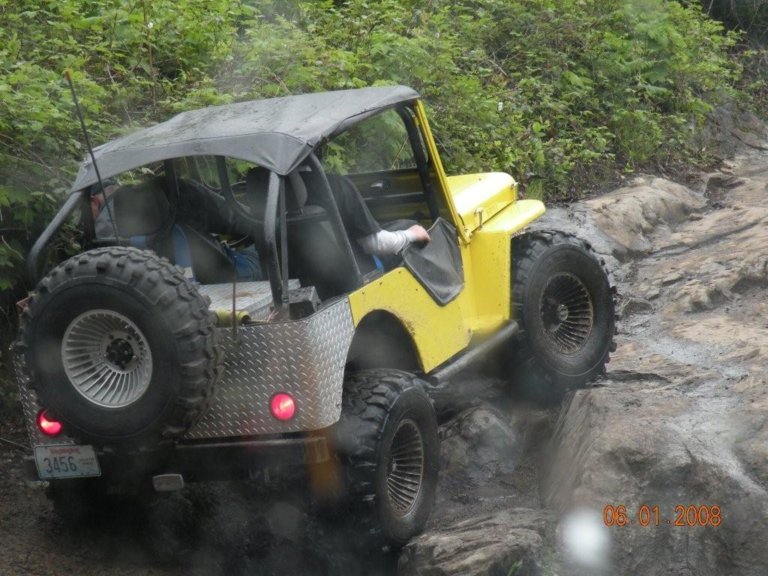 I just got some pics from the owner (who shall remain nameless until he sends me his name 🙂 ) of the jeep formerly known as Pittle Power (I remember it as Piddle Power though). I don't remember the history of the Jeep prior to Jim and Patty Carter purchasing it, but I believe they purchased it so their growing boys, Tim and Steve, wouldn't have to squish themselves into the back of Otis. They purchased a stock CJ-3A, installed a chev 4cyl and attached desert dogs. Otherwise (I'm told) they left everything else stock. Pittle might not have had much power (hence the name), but it could go 99% of the places the modified WWJC jeeps could go.
 The Carter's had a habit of naming all their vehicles. There was Otis (the jeep), tote-us (the jeep trailer), Brutus (their first motorhome) and more.
Our To-Be-Named contributor writes:
"The Jeep I bought was owned by Jim Carter(original member of the WWJC). The race name was Pittle Power. Skip Baird helped me with my first swap with a V-6 and a top loader. Al Hamilton and I became very close infact I still have one of his pups Mandy she is a very stubborn German Shorthair."
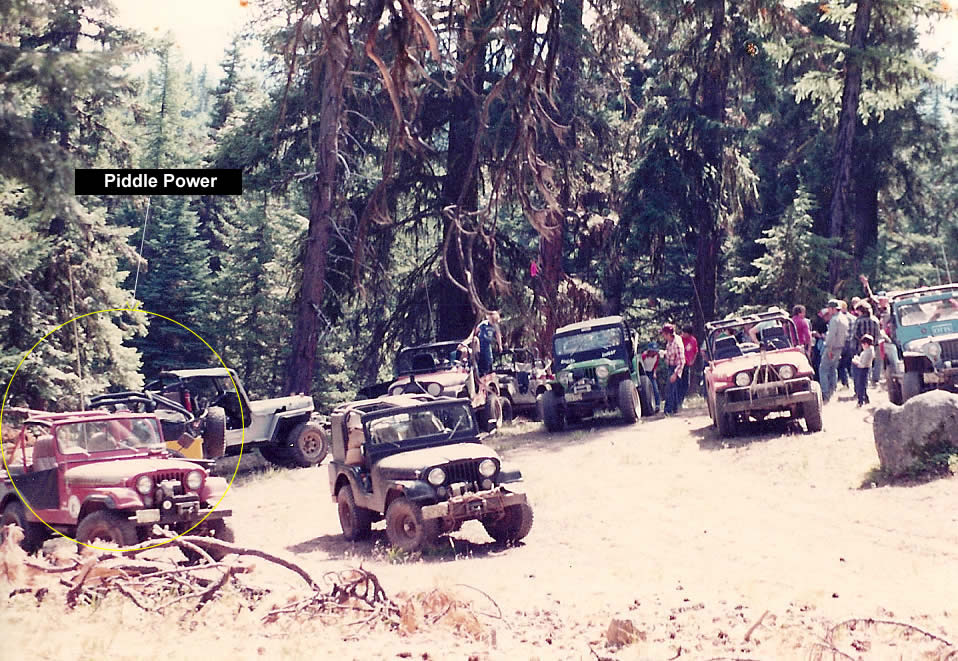 Editor's note: To the right is the only picture I have of Pittle Power from 1983 (and it's only the hind quarter) hidden behind Danny's CJ-5. While the Pittle Power was never actually raced, I do remember a club trip to Liberty Trail one weekend. After we made camp, Tim Carter decided he wanted to head down to the store and asked me to ride shotgun (somehow he knew there was a remote store at the bottom of the hill we were camped on). So, he drove me down that hill in Pittle Power, a ride I remember vividly because we were travelling sideways down the constantly turning gravel road for a good portion of it. Come to think of it, one time Tim took me for a ride in his late 60's camaro and we travelled sideways heading onto the cloverleaf on ramp to I-405. Maybe Tim always travelled sideways or I just brought it out of him.
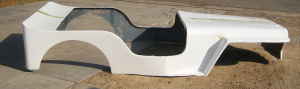
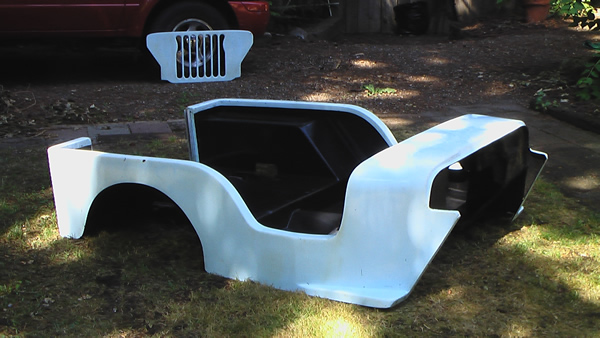
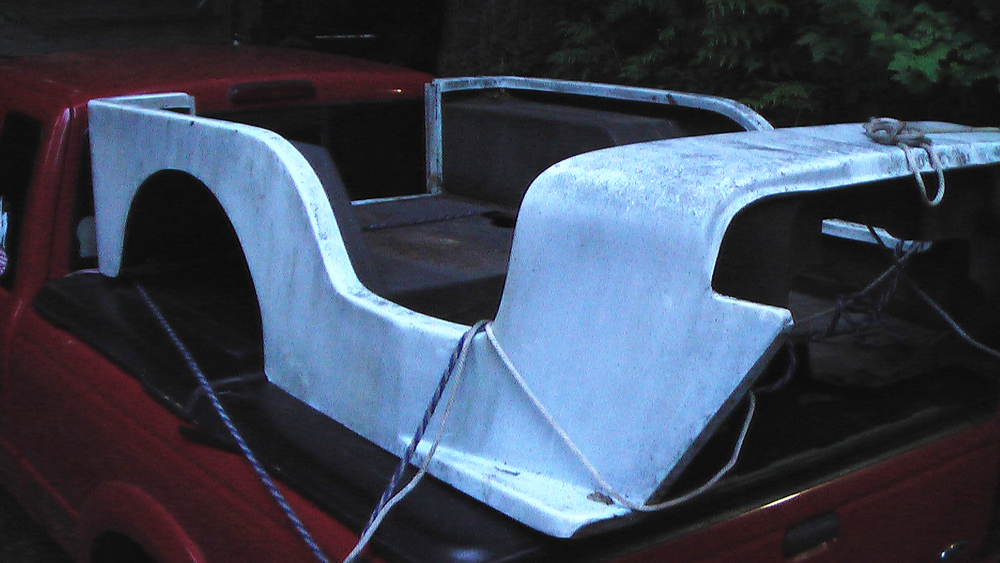
Here's a few pictures of the Body and Grille I grabbed while down in Springfield, Oregon a couple of days ago. I need to get a few better pics of it. I've got it listed for $450 on Craigslist.
The outside of the body is in excellent shape and would make a great racing shell for PNW4WDA racing. The interior of the body is well designed and strong and could make a good jeeping/street body, however the plywood attached to the bottom is bad in spots, but could be fixed pretty easily. Also, the firewall has an extra large opening that needs to be closed. Otherwise, the body looks straight and is pretty light.
I wandered across this website in 2008 that showcases old woodies. There’s a jeep section with a variety of woodies. The woodie at the bottom is made from an old MB/GPW.
“A French coachbuilder’s modification of the American Jeep into a wood-bodied fire fighting squad truck is similar to the work of Duriez.”
See some other old willys woodies here


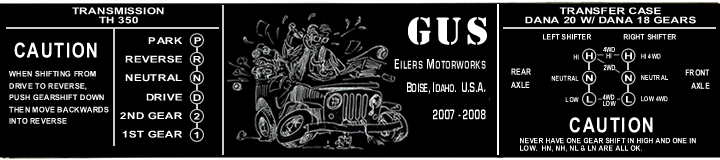
While you can purchase a dual shifting unit from Novak for your Dana 20, it's also possible to fashion one from scratch. Note that I've never used the dual shifter on a Dana 20 transfercase without removing the center pins that move between the shift rods in the the shifting tower. To remove the pins, you have to remove the shift levers, drill out the plugs on the sides (note where the red gasket sealant is on the side of the shift tower, and then slip out the oblong pins (they are elongated metal balls). With these removed, you can push and pull the levers all you want (but don't try running high range in the front and low range in the back unless you feel the need to break something).
![]()
There was a question about how the shifting in my transfer case works. (http://www.ewillys.com/?p=797)
The shifting might seem unusual, but it's not. What's unusual is that I have removed the pins from the shifting tower that slide back and forth between the shift rods. This allows for more shifting options. To take advantage of those options, I installed two rather than one stick. You can see that here in this video I made.
Here's an image the also demonstrates how the shifting works. Please note if it doesn't make sense:-)
![]()
Brian sent me some updated pictures of his CJ-3B project. He just finished reversing the springs in the front. As a part of that reversal, he had to replace the front of the frame. After conquering this task, he turned his attention to the rear differential, only to discover a big problem (which he'll update all of us about as he progresses through the issue).
Brian explains more below about his spring reversal experience below ….
"I wanted to do a spring reversal so I started by getting some universal after market parts to make things a little easier. Then I bought a early Cj5 frame for the front 8 inches then sold off a chrome bumper and ring and pinion at a small profit.
Here's what I did to lengthen the frame.
I cut a block to use as an template to cut off the front of the 3b frame. (Stan H. — from the Wandering Willys Jeep Club — always said to cut at a 45 degree angle though the frame.) I did the same with the pieces to be added. They lined up really nice.
Yesterday I made a first pass at a design for the gauges on the dashboard. As a part of that exercise, I tried to find a space for the data plate I have. The data plate is original to the CJ-3A I have and in good shape, except that it is faded, so it is hard to read. In fact, I tried to scan it into my scanner and the scanner couldn't pick up the words or pictures at all. After pondering the situation, I decided to recreate a data plate graphic and take it into a print shop to see if I can make a raise print or sticker of some kind. As part of the customization, I've tried to recreate the fonts as closely as possible, however, much to my surprise, the data plate uses several different fonts, some of which are the same font but stretched or bolded or both. Also, I've updated the data plate to better reflect the drive train I have installed.
Here's the current favorite mockup so far (note the font kerning and arrangement will be more precise on the final high resolution version).
 UPDATE: It appears this site has changed — at least I don’t remember it quite like this …
The “Jeepsterman” Morris Ratner has a variety of old brochures for sale on his jeepsterman website. You can see an example of one of those to the right, which is about the roper digger. Did you know the roper digger can be used in multiple ways? Now you do … Another interest brochure compares the jeep to the scout.
See all the Jeepsterman brochures here

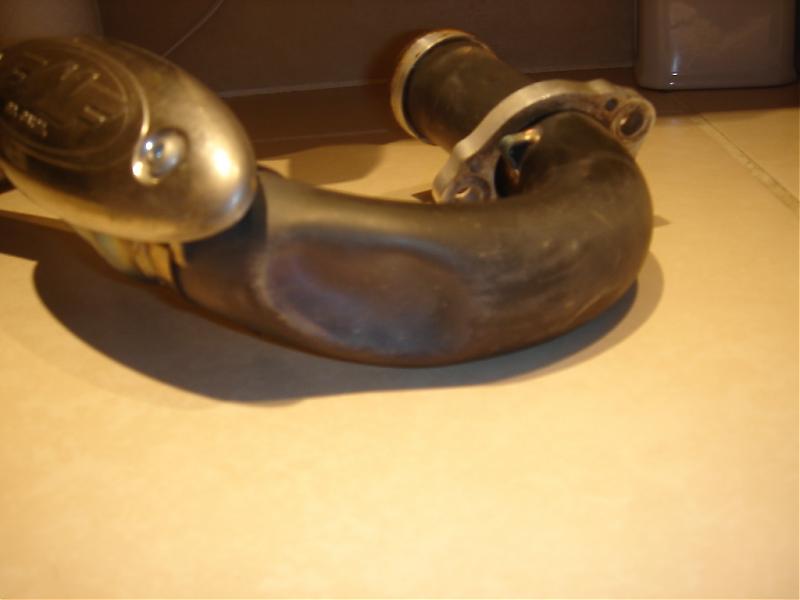
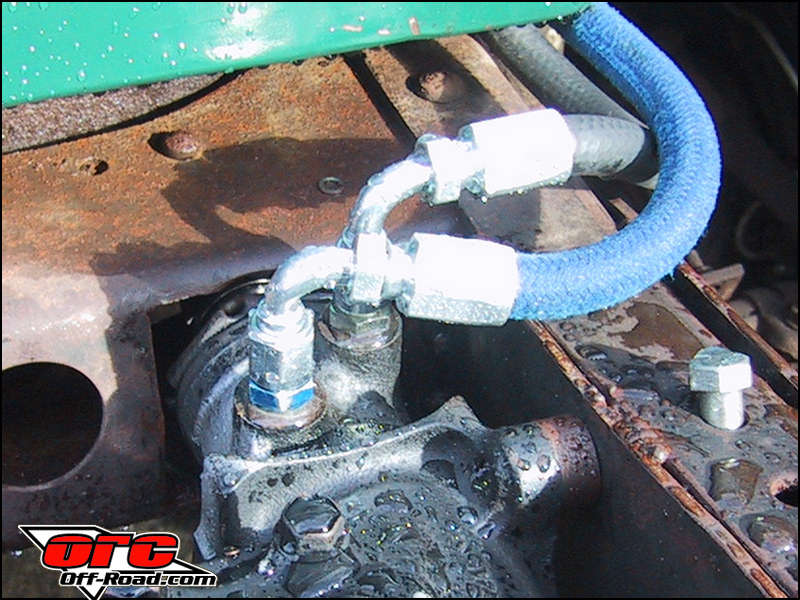 I found a very helpful article from a toyota landcruiser owner at offroad.com about building custom power hoses. In the article he provides pictures and a list of parts he used from Summit Racing. Unfortunately, his part numbers don't correspond exactly to the numbers from the Summit Racing catalogue I have, but they are close enough to guide me correctly.
To do my build the way I want (which is routing the power steering through the cross member) based on this article and the new summit racing catalogue, I believe I would need:
5 -6AN EAR-309106ERL 90 degree bend tube $16
2 -6AN EAR-300106ERL straight $7 each
2 -6AN EAR-983206ERL Straight Bulkhead $4 each
1 –6AN to 11/16-18 Not sure on part number yet approx $7
1 –6an to 5/8-18 Not sure on part number yet approx $7
-6an power steering 6ft perform-o-flex hose EAR-406006ERL $45
That's a grand total of $161. If I only do the power side, I can cut this amount in half. I'm gonna talk to the folks at my local hydraulic store and see what they can do for me.