emailNeed to contact me and don't have my email? Click on email button.
About eWillys
Welcome to eWillys.com, a website for vintage jeep enthusiasts. I update this website nearly every day with jeep deals, jeep history, interesting reader projects, jeep related info, and more.
These quick searches can help you find things on eBay. People list in the wrong categories all the time, so don't be surprised to see brochures in the parts area for example.
The links to posts below show jeeps grouped by models, condition, and other ways. Some of these jeeps are for sale and others have been sold. If you are unsure whether a vehicle is still for sale or not, email me at d [at] ewillys.com for more info.
Importantly, the allure of buying a project jeep can be romantic. The reality of restoring a jeep can be quite different, expensive and overwhelming without the right tools and resources. So, tread carefully when purchasing a "project". If you have any concerns about buying a vintage jeep, or run across a scam, feel free to contact me for help, comments or concerns .
UPDATE: A reader would like to have one of these built for their project. See the comment below if you think you know of someone who could do this for them.
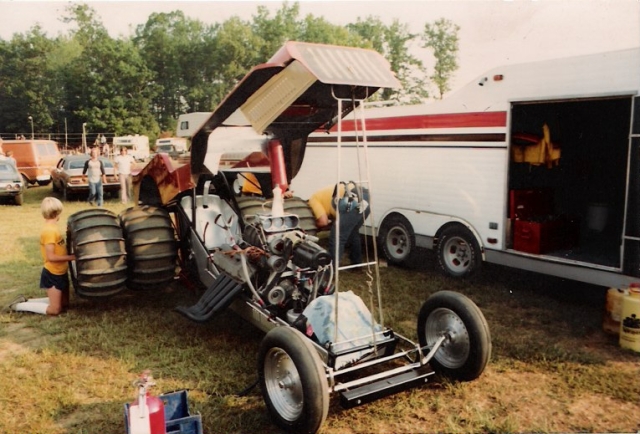
I was checking out Four Wheeler the other day and ran across this unusual spare tire carrier. Check out all the pics on this nice CJ-3A at Fourwheeler.com.
While it’s not a jeep in form, it certainly captures the spirit of a jeep in function. Two alternators, three batteries, and a host of features make this an unusual vehicle. The most recent cheap jeep was launched in 1974 for the purpose of desert and mountain travel, not unlike the way original mountain bikers back in 1976 utilized old tough schwinn bikes to tackle the mountains. It’s singular purpose –the next ghost town or bust — was a cheap, but dependable vehicle capable of on road and off road travel for thousands of miles over the period of a week. This vehicle is still used and images and video from 2009 can be found on the website along with links to all the places these intrepid adventurers have visited over the past years (scroll to the bottom of the homepage). View the video below to learn a little bit about the unusual features of this vehicle (or go to their video page).
Steve Ricketts writes on the westernghosts.com website, In 1974, I acquired a 1966 Pontiac convertible from another customer. This time the price was $75.00. Like the Chrysler Imperial, the Pontiac needed a lot of work. After extensive engine repair and a transmission rebuild and modification, it was able to be driven to my house where the first Cheap Jeep (Chrysler Imperial) was stored. The transformation from old cheap jeep to new cheap jeep began. The finished product is what you see today.
It is highly modified, and works better for our purposes than anything we could buy today. It is easy to repair on the road, and parts are readily available. It carries more than “regular” jeeps and is a lot cheaper to replace should it become necessary to abandon. I would really hate to take a $30,000+, four wheel drive (Blazer/Bronco, etc.) on one of these trips. At the very least, the paint and body would be badly damaged. It would also be next to impossible to repair in the field, and a very real possibility exists that I would someday have to abandon it. After all these years of use and modification, I still have less than $800.00 invested in the Cheap Jeep…and that includes the original purchase price.”
I found this dually earlier this week, but now can’t remember where. So, if anyone happens to know, send me the link and I’ll make sure the website (or jeep owner or both) gets the credit due them.
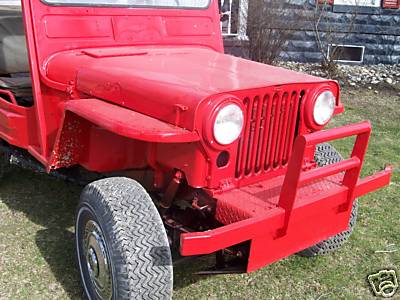
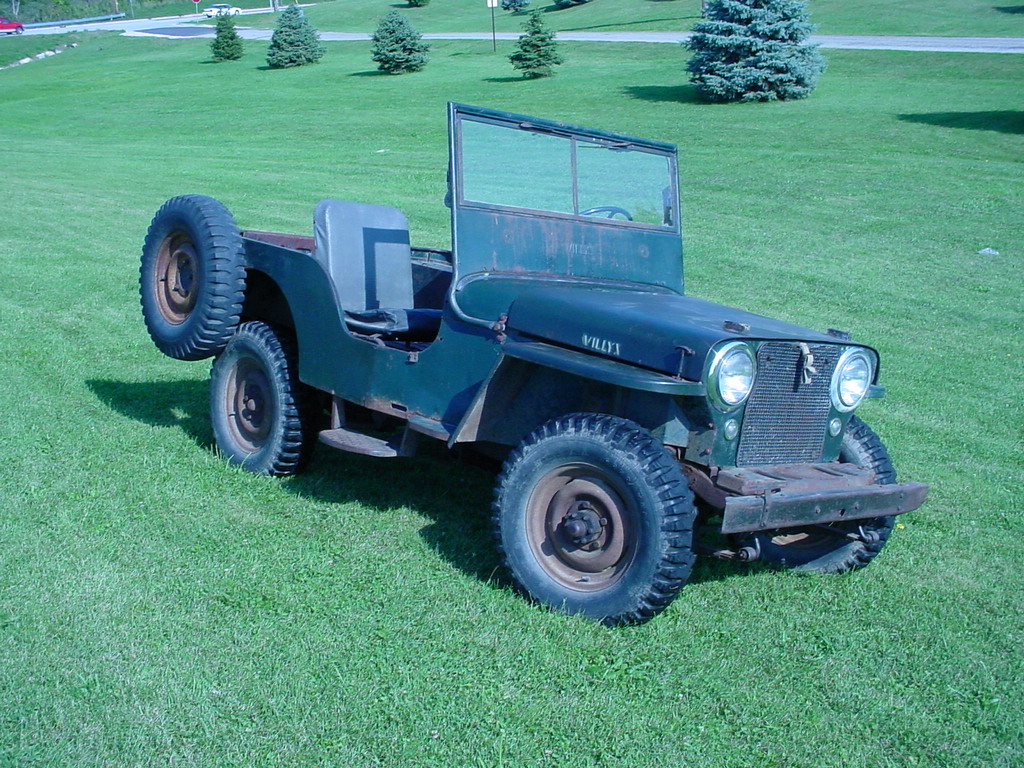
Steve tells me he spotted this M-38 on eWillys and decided to purchase it last July. On the right you can see the ‘before’ condition which is how Steve purchased it, but I think it pretty much tells the story. There was a bunch of metal welded onto the jeep in odd places and it was red, everywhere.
As you can see in the pics below, just taking off the metal and painting it green has done wonders for this old M-38.
I gotta say I like this jeep. There’s enough old school stuff to make me smile. Check out the battery, the roll cage, the art on the back, the dashboard, the gauges, the gas pedal … I could go on.
The owner of this jeep is 16 year old Trevor, who inherited it from his father. Trevor’s going to make some updates to this jeep, such as adding power steering. He asked for some advice regarding steering so naturally I asked for pictures.
Trevor wrote, “thanks so much for your time and advice! it really means a lot to me cause i wanna get this thing out on the trails like my dad did back in day.”
If you weren’t following it, Boomer, James and I were have a short conversation about Slat Grilles and how there are only a few Slat Grilles buit with a Glove Box. Apparently, early MBs (1941 dated slat grill) did not come with a glove box (maybe I was the only person who didn’t know that …). Glove boxes were not added till ser# 120680 (early to mid Feb. 1942). It made realize how little I actually know about Slat Grilles beyond the slat grille itself.
Boomer mentioned that he has a MB with the serial# 122723 born February 26, 1942. Glove boxes were added about a week before his was built. Of course, at that point I said ‘tell me more & send me pics’! Thanks for sharing!
Boomer not only sent some pics, but provided some nice history. My slat came from the original owner, who bought it 1946. It was originally bought from an Army Air station in Maine.
Total slat grill production was approximately 25,000 units or approximately 3 percent of total WW2 jeep production. Of those, only about 10 to 15 percent were equipped with a glove box. My research suggest there are barely 150 running/restored slat grills left in existance world wide.
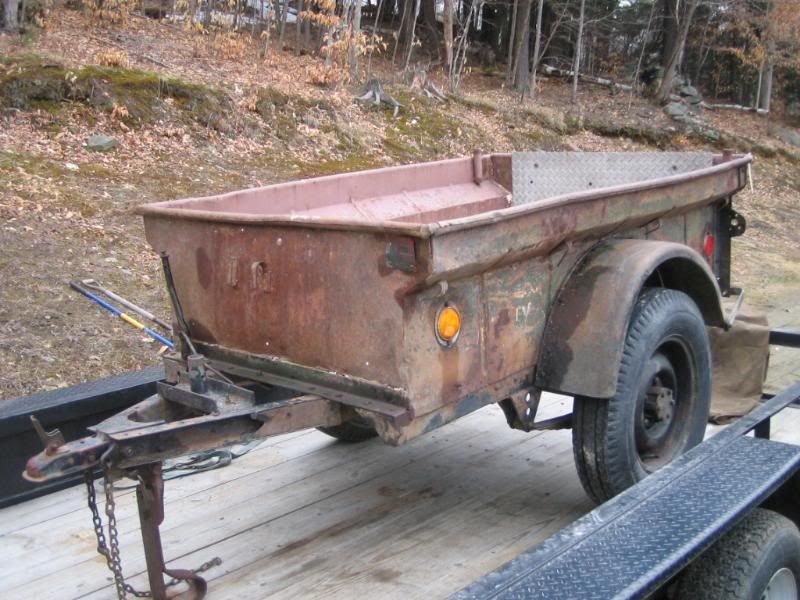
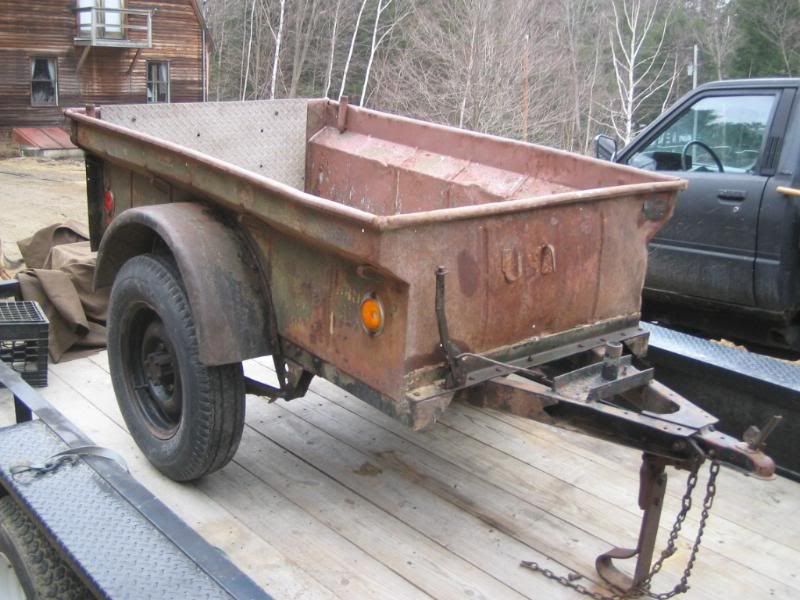
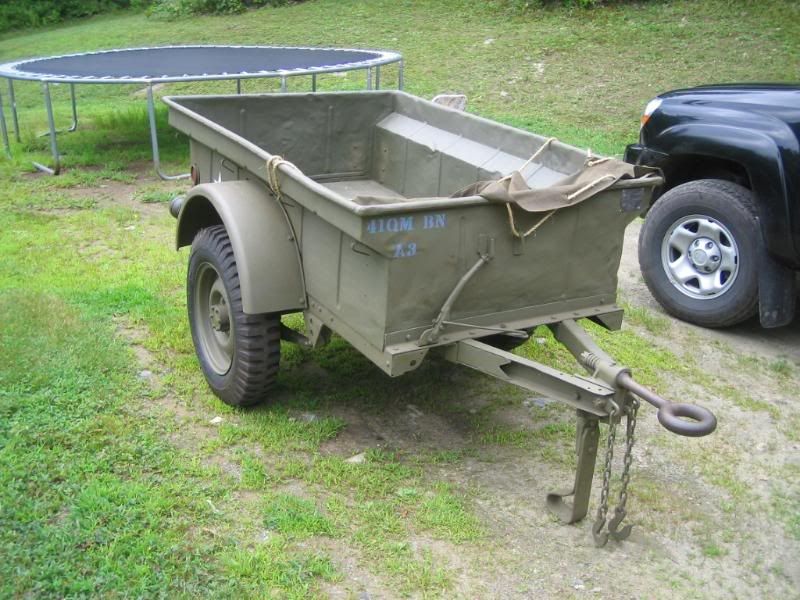
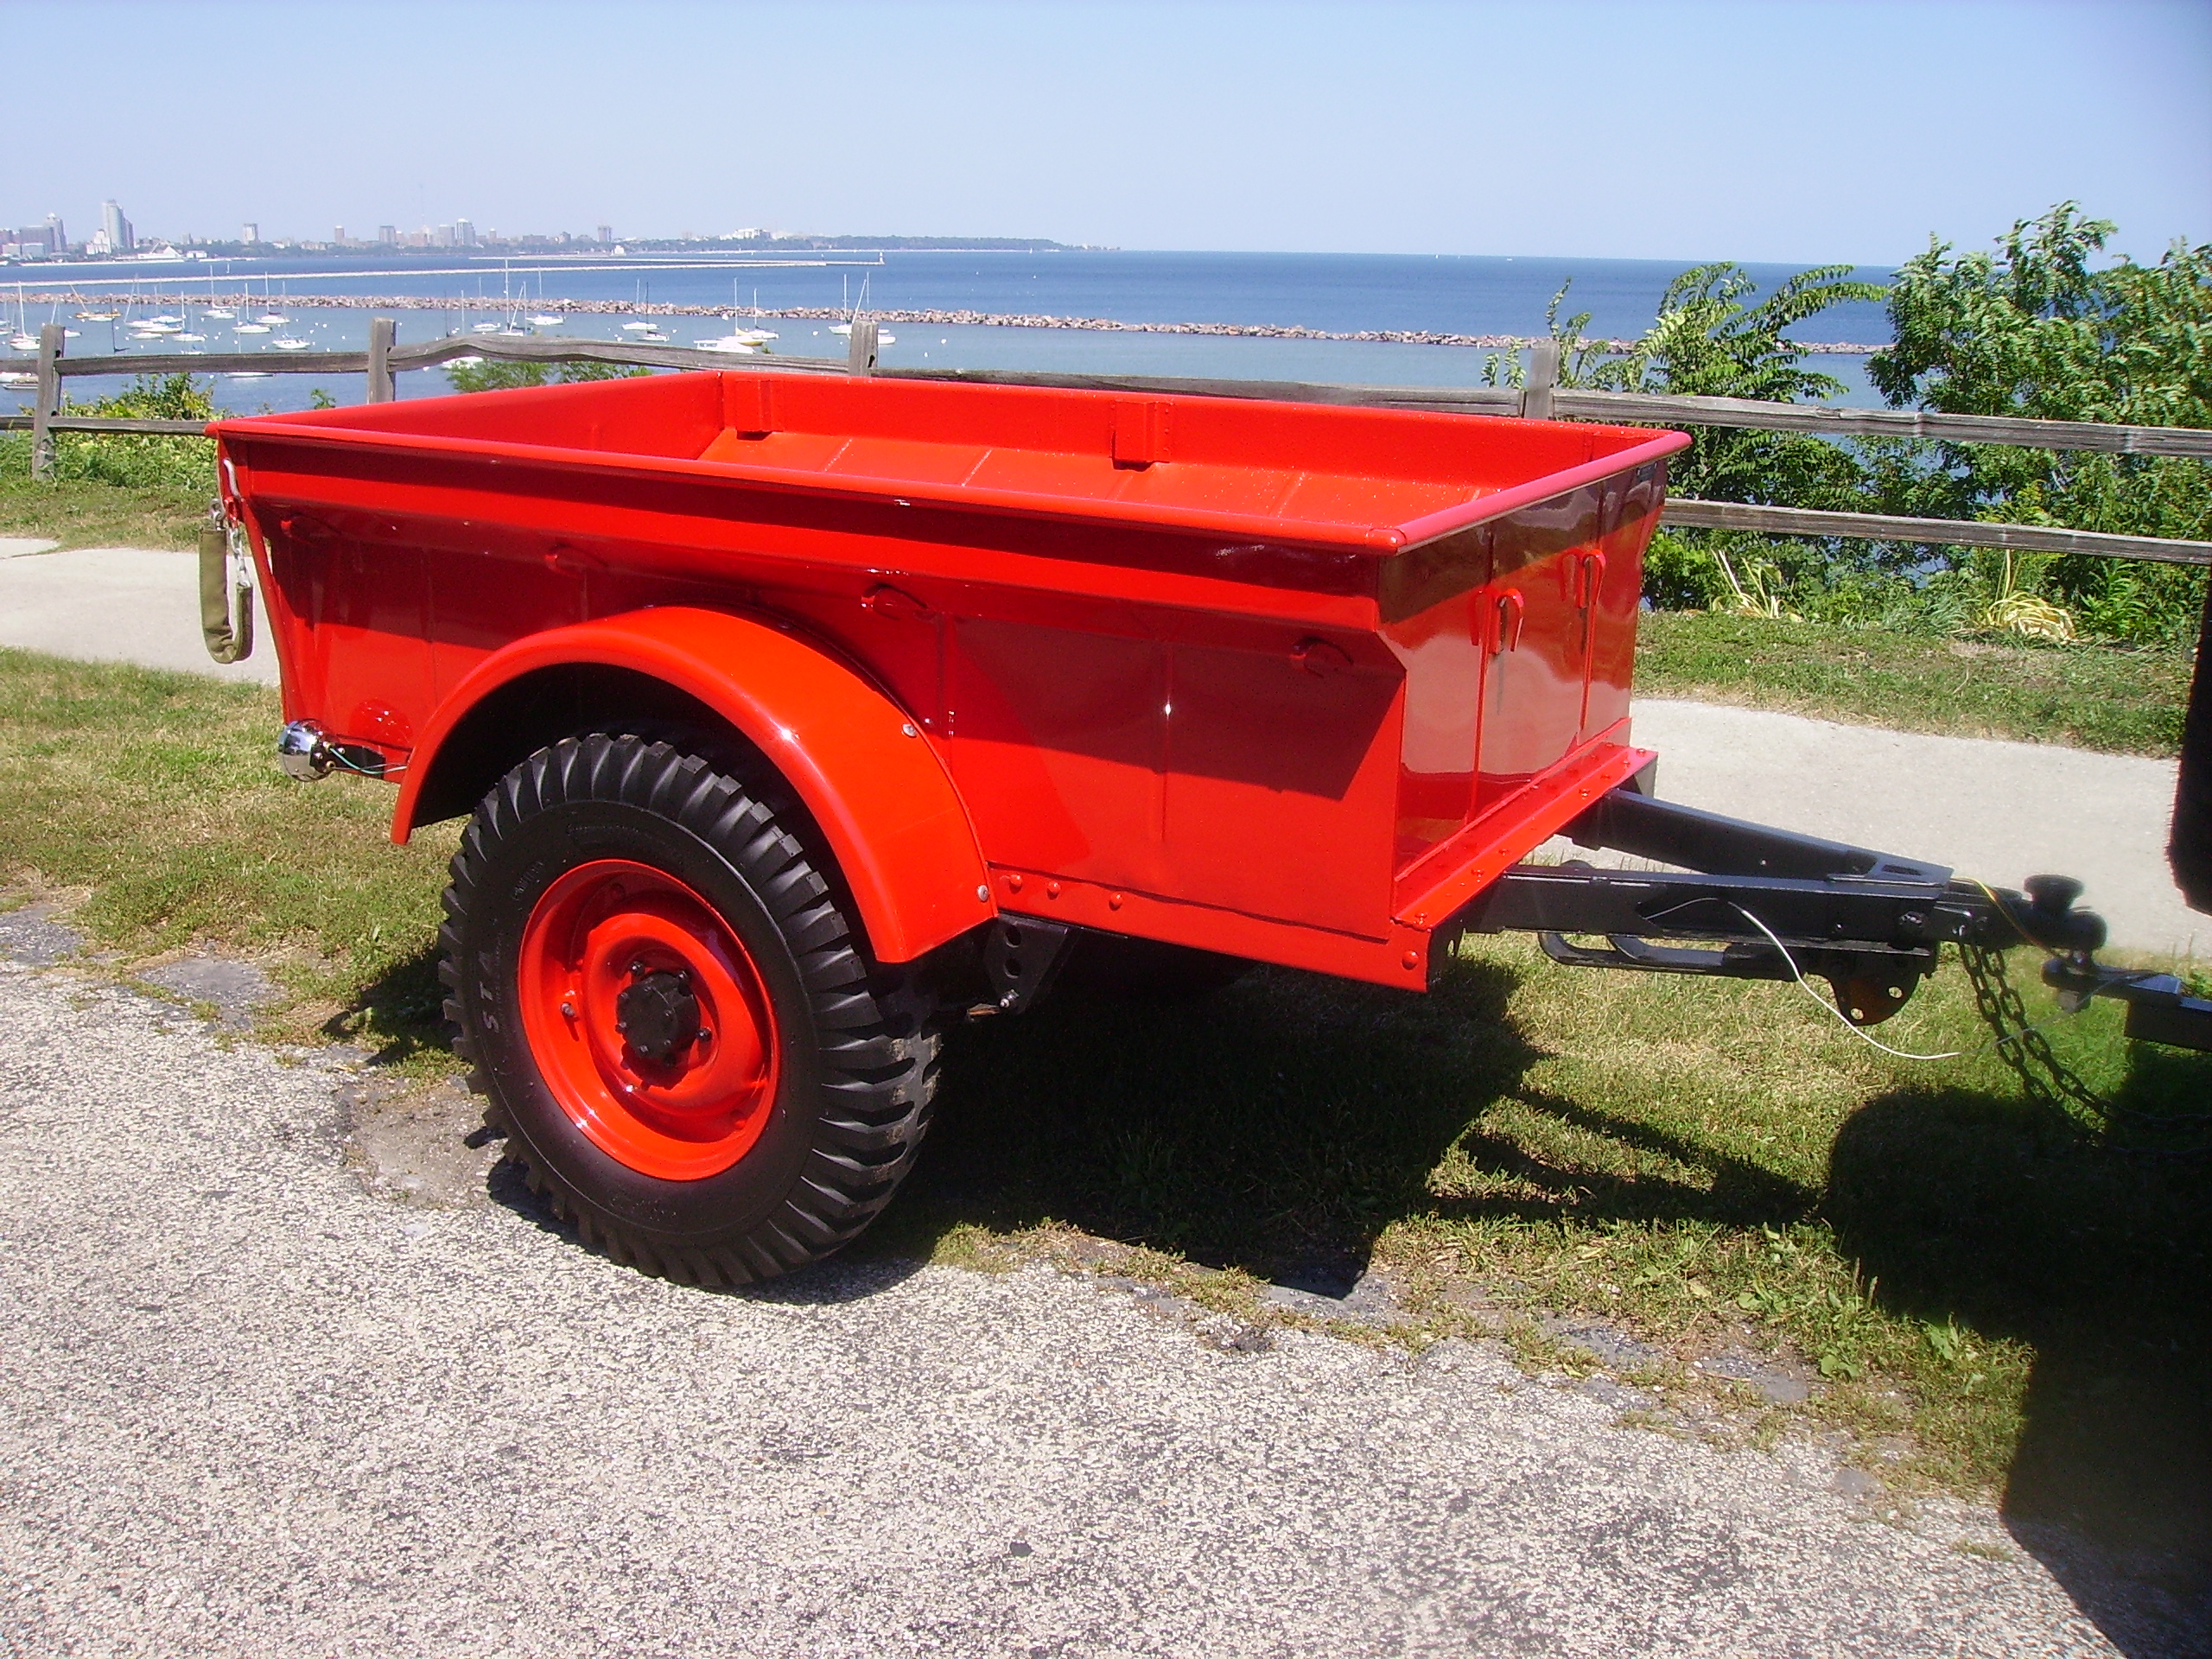
Regarding the trailer, it was saved by me from a local farm. It was being used as a horse trough. Date of delivery was June 1943. It was made by Willys, otherwise known as MBT.
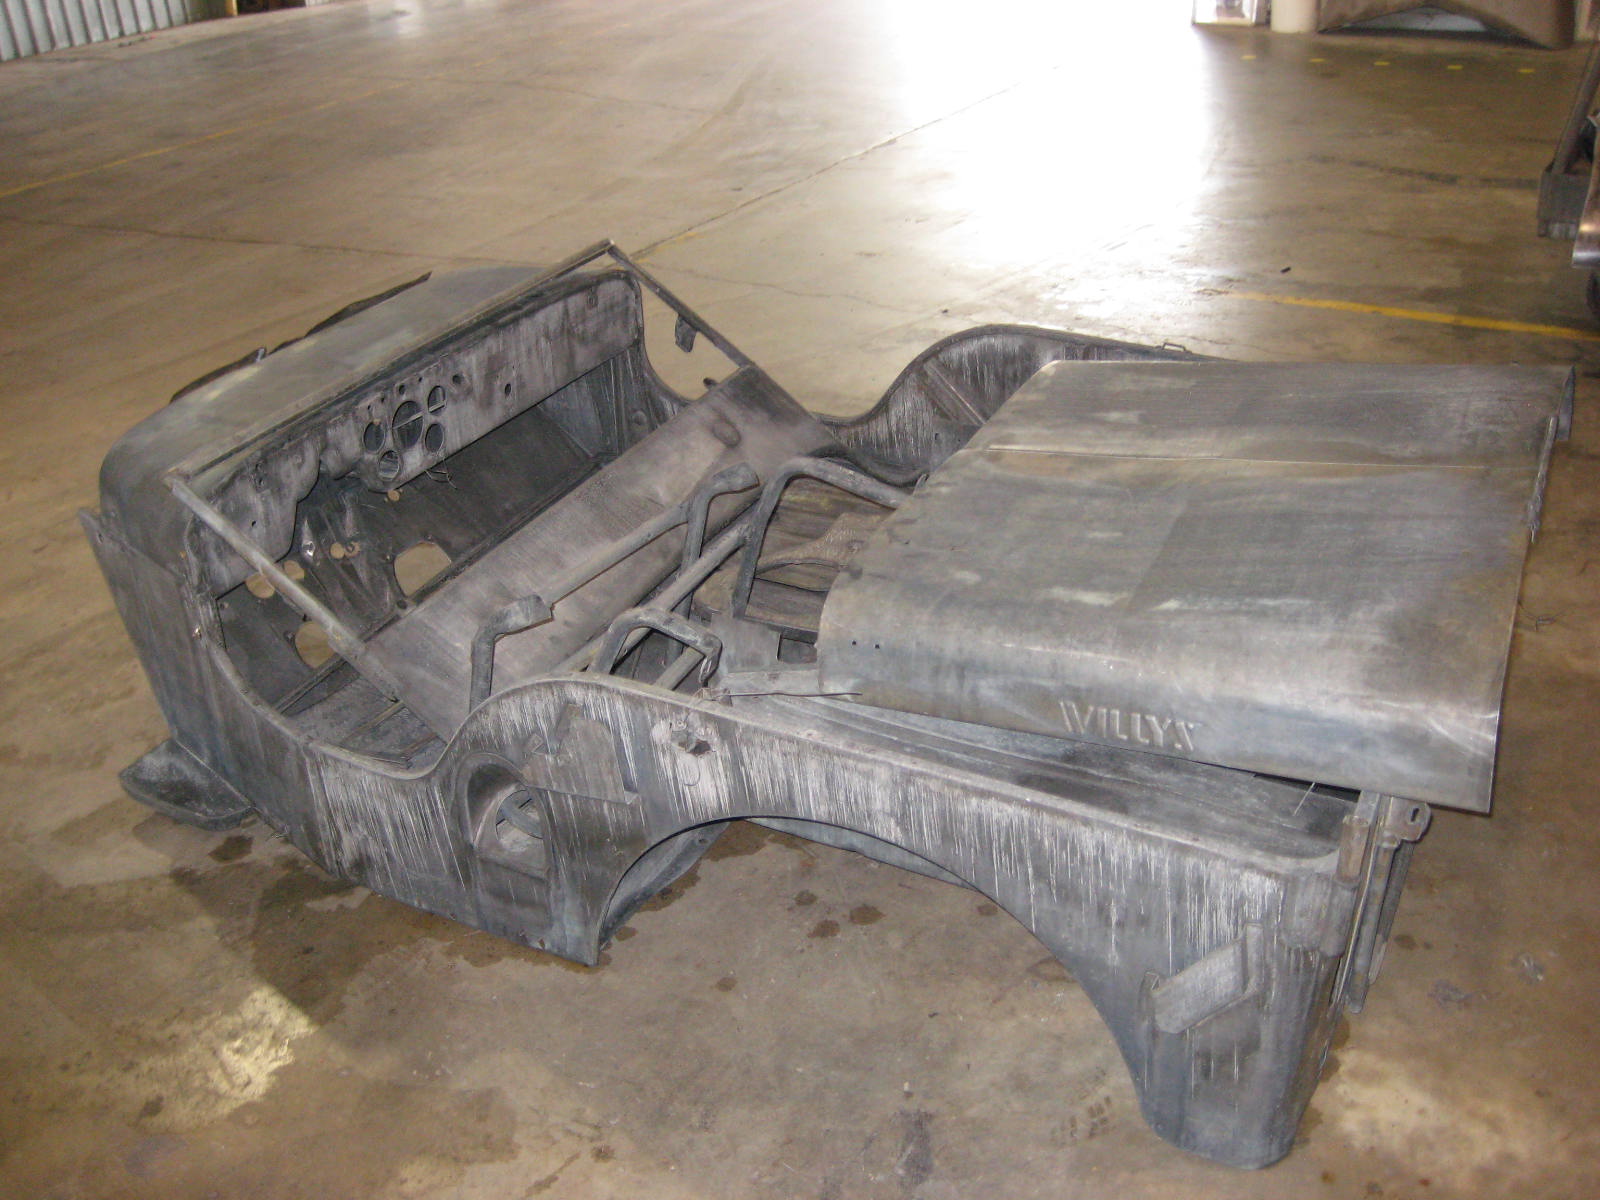
According to the blog, James has been working on this about 2 years now. In the picture below, MetalRehab had just finished cleaning all the body parts. Recently, the parts were dropped off at Everman Paint and Body to get some body work done and paint (I think I’m right about the paint part).
And below is the engine running after a great deal of work cleaning all the parts.
James, obviously a man of high taste (I can tell this as I found a link back to ewillys on his site 🙂 ), would make a grandpa proud with this rebuild.
Yesterday (and today) I have enjoyed some correspondence from Sebastian, who hails from Colombia and currently resides in Pittsburgh, Pennsylvania.
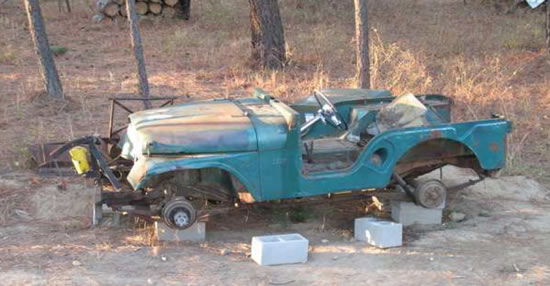
In 1994, Sebastian and his father (who owns a blue CJ-3A), rebuilt a red 1954 CJ-3B, which can be seen to the right and viewed at the CJ-3B Page (sixth down from the top).
He writes, “My Willys is still in Colombia, so I only ride a couple times a year. Last May I went there for a week and put more than 250 miles on the jeep in less than five days. A couple years ago I became aware, and joined, the “Flat Fender Club of Butler” which is close to Pittsburgh. Butler is the place where the “Bantam” factory was located (the building is still there) and, therefore, it is the place where everything related to the Jeep started. The club is formed by a very nice group of people who are crazy about old willys. You can see some of the recent events and history of the club at: http://flatfenderclubofbutler.wordpress.com/ This blog also shows some pictures of the owners and our new T-shirts and Caps!”
For all the customizations I’ve done, I have to say I was still surprised, delightfully so, to receive this update from Brian about his metamorphasis of a GM sending unit into a Willys tank. Maybe it is just me, but it simply never occurred to me to try something like this. Moreover, as I turned Brian’s work into a post, I learned a great deal about gas tank sending units. Thanks Brian!
A quick note. After doing some research, I discovered one of the most common reasons for the older gas gauges to stop working correctly is a bad ground. So, if you are having problems with your old gas gauge, check the ground at the gauge and/or sending unit.
Take it away Brian:
I have tackled a variety of planned tasks on my CJ-3B, but as with any project, I’ve run across some unexpected issues as well. My gas tank sending unit is a perfect example.
*** DISCLAIMER: Before I begin, please be advised that when doing modifications to a gas tank it would be prudent (understatement) to drain and dry the gas tank. I hear gasoline is very explosive!!! ***
Prior to installing my gas tank, I decided to use an ohmmeter to test my sending unit to make sure it was in good condition. Unfortunately, I connected my ohmmeter and discovered my unit was dead. So, I thought this was a perfect chance to install a modern sending unit.
Btw, you can visit the 1945gpw website to get a nice overview about how to use an ohm meter to trouble shoot your old Willys sending units.
The stock unit on my CJ-3B is 40-0 ohm’s (which means the ohm meter would read 40 ohms when full and 0 ohms when empty). As I am upgrading my gauges to auto meter gauges, I had to make sure I selected a gauge that would work. There were four different gauges to choose from: 90-0, 30-0, 8-73, and 33-240 ohms. Note that the last two gauges are backwards for our purposes — the gauges would have read full when empty, and empty when full (if they worked at all). Also with my new gauge, I felt I would run into a problem with the ground, so I decided to replace the sending unit and make it work right.
I had replaced a GM in-tank pump and sending unit on a friend’s truck and found a GM sending unit would fit though the tank opening of a Willys. So, with that in mind, I started by disassembling the old Willys unit. First, I removed the sending unit and the sending unit base from the gas tank. Next, I separated the sending unit from the base as I will be reusing this base (with some modifications) using my drill press.
With that apart, I turned my attention to the GM Assembly. I removed the sending unit off the GM assembly by cutting the tube up high. I went over to Mick C. and we machined a plug for the old unit (a machinist is a good friend to have!). This GM unit is 90-0 ohms, a perfect match to the Auto Meter 105-2641 gage. It is also internally grounded, note the two wires.
Here is the unit assembled. The new plug had a hole in the center so I could run the new gas line through it. Also, the plug had a hole for the wires as well. I drilled three holes around the radius of the sending unit base and welded the plug in place. You can see the welds in the image below.
Note the J-B Weld. There is about 1/8″-3/16″ between the top of the plug and top of the unit. I used J-B Weld to pot and seal the unit. J-B weld (http://www.jbweld.net/products/jbweld.php) claims to be resistant to gas (from the website: “It’s strong as steel and impervious to water, gasoline, chemicals, and acids.”). DO NOT USE SILICONE!!!
[Editor’s note: Mitch mentioned months ago that he had a problem using J-B Weld to seal an old gas tank. Given the claims by J-B, maybe Mitch’s problem was more an adherence to the old tank rather than J-B itself? Any thoughts Mitch? This should be a good test of J-B and gasoline. ]
Now, I had to adjust the float to work correctly with the new unit. I cut the arm at the first bend from the float then turned it 90 degrees. I also cut the float down an inch.
Note: there is a pattern to the bolt circle on the old unit. Index the sending unit on assembly so the float will clear the internal wall in the tank. The wall runs across side-to-side; the float will have to do the same.
Adjusting the float was easy. I just held it to the top of the tank and bent the arm as needed.
One good thing about this modern sending unit is the rheostat can be replaced by removing two screws. You would have to get another one from a junk yard but can easily be rebuilt.
This works really well … I love these types of projects.
As a part of Crystal Tours, Tinker Bell is one of the official tour jeeps. Restored a couple years ago, Smitty documented some of his efforts. Smitty has restored several jeeps and operates Smittys Willys Online, where he writes about his restorations, his trips and restoration advice. Below is some info about his CJ-5 rebuild, but he also has a 1954 CJ-3B and a 1964 CJ-6 he has or is rebuilding.
On his website about the CJ-5 he writes, “The restoration work was started in August 2005 and substantially completed nine-months later in May. During that period seven-months labor and about $4,500.00 in parts and material was devoted to this restoration. The job took longer than expected due to the deteriorated condition of the body, and me — relearning the restoration trade and techniques, and reading everything available dealing with old Jeeps and their restoration. This Jeep is a RESTO-MOD. It’s a stock chassis and drive-train with minor modifications in the electrical, brake system and body….”
This is a continuing series on Dan’s efforts to rebuild his Grandfather’s jeep. Here’s the previous post. [Editor’s note – that looks like a steal at $100. Running and complete!]
Dan writes, “Sometime in the 1960’s my grandfather’s friend purchased a new Jeep and immediately swapped out the little four banger for a V8. My grandfather bought the new (at the time) 134 F head from his friend and installed it in his own 1955 CJ5 replacing the tired original 134. Over the years this second engine was rebuilt three or four times.
At one point in time my grandfather had a V6 of some kind sitting in the garage that was supposed to go into the Jeep. Unfortunately when he made the move from Colorado to Washington State, the V6 was left behind.
Today I just came home with an engine for the old CJ5. It’s a Kaiser odd-fire Dauntless V6. I found it behind a barn in a Jeepster C101 sporting a Volkswagen Bug body. (It was the ugliest “Jeep” I have ever seen). But the engine was still in tact and was running when parked. I made the guy an offer for $100. He pulled the engine and had it sitting on a pallet for me the next week. I took home everything from the radiator to the bell housing. He wanted the transmission which is fine with me. Someone had painted the valve covers red but you can see the original paint underneath. There was a power steering pump scabbed on which I will remove since I have a manual Saginaw box. It will be nice to breath the life into the CJ5 that my grandfather had wanted.
Originally, I had responded to a Craigslist add for a set of fenders. As it turned out I came home with a set of front fenders, a nice Koenig steel hard top model 550, and a Dauntless V6. He still has a Koenig PTO winch that I’m drooling over, but they don’t fit too well next to a Saginaw box.
I have attached a few pictures of the V6. In one of them you can catch a glimpse of the old CJ5 in the garage.
Chris is a 15 year old who wrote to me last week about a wiring question. Since then, he and I have been working through some wiring and brake drum issues. Here’s a little bit about his jeep and some pics.
Chris writes, “It’s a 1947 cj2a mostly stock, with a few mods. It’s got the stock engine and 6 volt wiring (I want to update it to 12 volt). I got it last summer from my grandpa down in oregon. He had picked it up in a field in Idaho (I think Emmet). Thats supposedly where my great grandapa had parked it after he used it on his cattle ranch since it was new. It sat there for about 20 to 25 years. At some point somebody took all of the brake lines, the master cylinder, and the brake pedal (but my grandpa found me a new pedal). The picture of the engine is when i dropped the transmission to put in a new cluch fork (you can see the old one on the radiator).”
I was searching for more extended CJ-2As and came across Bennett’s CJ-2A Project pages. The Serial Number is 71781. It appears he’s owned the jeep for quite some time and over the last few years has been slowly working on it.
Jim and I had a few email exchanges about the extended flatties. After a little searching, he came up with these pics of a 1942 GPW that someone expanded and that Jim owned for a short time. It appears the builder was going to extend the front, though that looks pretty scary!
More discussion on extended jeeps tomorrow or friday.
Gerald recently purchased some tires. They are Goodyear casings P 235 /75/15 with V-Grip Hot Cap retreads from Import Export Tire in Latrobe, PA. This is a different seller than the Stone Tire Company I highlighted a few months ago.
Gerald writes, “The Rims are Appliance brand 13 spoke Manufactured by the W.R. Grace Co. in 1976, Max Wheel Load 1580 lbs. Model 1058V5 15 x 8.5 wide. The are 5 x 51/2 Bolt circe with a 3 1/2 inch offset. Lug nuts are a special washer and nut deal. Gorilla still makes them.”
Here’s a look at the casting
The Tires are Goodyear casings P 235 /75/15 with V-Grip Hot Cap retreads from Import Export Tire in Latrobe, PA. We always called the Mini Terra’s.
Here’s my 1963 3B Sporting the set-up.
We raced with these back in the 70’s and 80’s and finally found a place that would still do these.
“Here’s a picture of me with the same tires back in 83. Taking the turn hard in our 46 2A.”
I have several sets of wheels and tires. Guess they are kind of like shoes. 225 75 15 mud and snow on CJ steel rims on my 3B before green paint next to my brother’s M-38.
Here’s the CJ-3B with 700 16 Non Directional military tread on 4.5 x 16 rims
LT 245 75 16 All Terrain on black spoke wheel 16 x 7, good tires but heavy,
700 x 15 bias ply Good Year work horse on old split rims with tubes, great snow plow tire for chains and drag racing,
33 12 15 bias all terain tires on 8 1/2 x 15 steel wheels I love these rims but the tires are just too big.
Finally my new set of mini terras. I have a couple more combos I would like to try but they will have to wait.
Oh, I’m positive Brian is feeling good today! I can hear the relief a 1000 + miles away!
Brian reports: “At last, after 2 years of work, I powered up my CJ-3B project and drove it down the driveway, around the yard and over a rock, putting 4 miles on it. More than likely, I was also driving everyone in the neighborhood nuts with the 3b’s untamed exhaust manifolds pattering away.
The beginning of the powering up process began Sunday. I spent the day going over the jeep with wrenches, sockets and a torque wench, checking everything I thought vital. While it took most of my time on Sunday I had available, it turned out to be a smart move, because I found a few items I hadn’t tightened.
During my investigation, I found a small oil leak on the SM420 transmission from a bolt on the PTO cover. To fix it I will drop the oil level and use some RTV on it (OF ALL PLACES). About a week previously, I found the rear output shaft leaking. I ordered a new seal thinking I botched the seal job. However, after inspecting the situation more closely, I realized the oil was coming down the spines and leaking under the washer. I reviewed the rebuild procedure and found I did not RTV the washer when it was installed. Oil leaks drive me nuts! Fortunately, I have found my leak has slowed down to the point it might not exist.
Back to Sunday, after filling the radiator I found water on the floor. I thought it was coming from the upper hose connection on the block, but then determined it was coming from the intake manifold right behind the hose. Not good! With some effort, I was able to get a wrench on the two bolts that hold down the lifting bracket and re-torque them. It appears to have stopped. At worst, I will have to pull the intake and reinstall it this winter when the tub is off.
Yesterday, Monday, I sat the 3b on jack stands in the garage. I thought to do this because all of the parts and assembly’s are engineered well, but not necessarily designed to be used with each other.
With the Jeep on jack stands, I climbed in and started it up. Nothing. A quick review revealed a loose coil wire. I quickly reattached it. So, I climbed back in and tried again. Within seconds it fired off and ran cold. At that point, I let the clutch out and the tires spun with no gut wrenching crunching sounds.
Whew! What a relief ALL THE PARTS WORKED!
I let the jeep warm up, then started running though the gears. I tested HI-low and then the overdrive in all gears. The only problem I found is that it pops out of third gear. I did take the transmission apart and thought all the synchronizers were in good shape but maybe they weren’t. One thing I did do was instal a top cover from a much later transmission with the backup switch in it. Possibly, this could have some effect on it. I will call Novak to see if there could be an issue with doing the top cover swap. I hope the problem is simply that the tower isn’t letting the gear shift all the way to it’s proper position.
Next, I tested the Brakes on the stands. They stopped the tires, so I took that as a positive.
Now, it was time to head down the driveway.
During my first drive down the driveway, I reached 10 MPH and hit the brakes. “OH Crap!!” I never have stopped so fast in a jeep. With disks in the front and 11″ in the back I nearly bounced off the steering wheel. I might even consider removing the booster, because they are touchy.
Ergonomically, I am very happy with the seating/steering wheel. My leg angles feel good, though I am having a hard time keeping my heal on the floor when braking. This compounds the braking problem, because when the jeep stops, my size 14 foot slams into the pedal even more!
With a successful venture down the driveway and back, I decided to try playing on the garden boulders. The tires on it are a set of 20 year old 31’s from my Cj7 with little tread. My first object was a large rock and and I climbed right up on it. Next, I picked a rock 3/4 of my tire height. The front quadrant contacted the 90 degree rock face and began to climb. The motor hardly missed a beat. Wow! It really crawls! The tire had to climb 6″ of vertical face before going forward! [Editor’s note: I can imagine this — the last tranny dad had in his CJ-5 was a one of the granny T-18s. It was a great jeeping tranny]
While in the middle of my garden adventure, my wife appeared. I thought maybe I was in trouble for playing among the garden boulders; instead, she had the camera in her hand and shot some video and pic’s.
Overall, I am very happy with the progress. The 3rd gear skipping out is the biggest problem, but will not stop me from further testing into the late summer. My next step is to work on the exhaust and get it quiet enough so that I will better know when to shift. LOL. I also need some small parts like a windshield pivot bolt and the bottom latch/hook that mounts on the dash for the windshield. Then, I’ll be ready to drive it down the road!”
For the Beaufort, North Carolina, Fourth of July Parade, Tom decided to get out his green 1954 CJ-3B and join in the fun. Also pictured is Tom’s tan 1961 CJ-3B. Those are some great looking jeeps. Tom’s got two more CJ-3Bs, but not enough hands to drive all of them at once! Thanks for sharing!
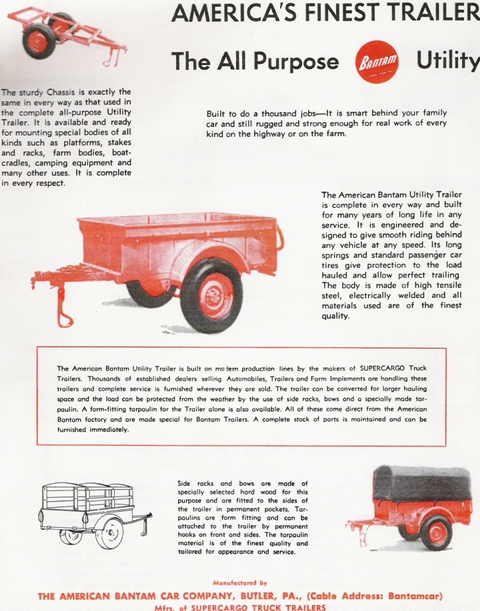
Art dropped me a note about his BantamTC3 website a couple days ago. He’s building a website to compile Bantam T3-C information to share with the community interested in these trailers.
Art writes that he has been interesting in military vehicles since he was a child and had Chevrolet/GMC 4x4s ever since getting his driver’s license. His interest in Willys Flat Fenders grew as a more affordable alternative to lift-kits, big tires and lots of u joints of the Chevys, especially after starting a family. He also wanted to have more comfortable, safer, reliable vehicles for his family as well.
His current pride and joy is the Emerald Green 48 you will see on Art’s other website, 48cj2a.com. The jeep (seen below) is about 99% original and driveable. He also currently has a 1947, another 1948, and a demiled 53 M38A1 project that he needs to make more road worthy and then plans to sell.
Following his interest in jeeps, came an interest in trailers. His Wife purchased him a M416 1/4 ton Military trailer one year for Christmas (hmmm .. does she have a sister?). That lead him to do some 1/4 ton trailer research where he learned about the Bantam trailer. Deciding the Bantam was more correct for the Civy Willys after the War in 45, he traded his 416 straight up a year ago for the Bantam T3-C he currently owns. He is also working toward obtaining a second T3-C trailer.
As he did more research on Bantam T3-C trailers, he got frustrated with the lack of information; and thus, the BantamTC3 website was born.
In memory to his Uncle Bill, a Brit named Simon, living in Colorado at the moment, has decided to paint his Willys 1943 MB in the marking of the unit his uncle commanded at the end of World War II.
His Uncle Bill, Lt. Colonel Charles William Arnot MC, OBE, TD, served in the Royal Army Medical Corps as a Field Surgeon in the British 50th (Tyne Tees) Division. Uncle Bill served through the dark days of 1939/1940 through to the liberation of Germany in 1945 eventually commanding 186th Field Ambulance.
His Uncle Bill died in the 1980’s when he was still young, and didn’t leave many mementos from his time in the War. So, Simon has pieced together the correct unit markings, together with history of the regiments progress through WWII from the internet, books, talking to family members and those items left by his Great Aunt.
As a result of this search, Simon has produced a PDF that documents his Uncle’s time during the war and decided to apply markings to his jeep which represent the unit his Great Uncle commanded in WWII, 186 Field Ambulance, part of the British 50th (Tyne Tees) Division.
Below is how Simon appllied the markings and below that an image of his jeep.
Brian had an unsavable passenger side fender, so he found a 2A fender that met his needs and shows us what he did to fix it. Thanks Brian!
Brian writes, ” The red fender, the original driver’s side 3b fender, was just more than I wanted to tackle. The yellow 2A fender had a useable top, but an inner wall that was gone. Since I planned to removed the battery box portion of the fender anyway, the 2A fender fit my needs perfectly.”
“After I cut away the bad metal, I used a spot weld removal bit (here’s an example bit) to separate the pieces. (See the Early Cj2a page) I used the removal bit with my hand drill when I was working on the tub, but this time I used the drill press — much easier. One tip I learned was to look for a puff of rusty dust coming off the work piece, which indicates you through the first layer of material.”
Here’s another great purchase adventure from Jim. Thanks Jim!
Jim writes, “Another flat fender adventure but this time with a happy ending (not that kind of happy ending).
The guy on the phone said, “its a WWII Willys MB, great shape, original, runs and drives etc $3000”. So, I drive 6 hours west to Flagstaff and pick up a buddy of mine, then turn around and head back the way I came to find this elusive rig.
We travel many miles east to Winslow, then the “fun” started as we began to follow what turned out to be a nightmare set of directions. Turn at the end of the pavement, follow the mining road, take the left side of the wagon trail over miles and miles of beat-your-truck-to-death-washboard, dust-covered, filthy, silty, rocky, brutal, teeth grinding, two-track trail for two straight hours! Good thing I had my truck washed and waxed the day before.
We get there, see the jeep and man am I unhappy in the middle of nowhere. It is bad, horrible, mismatched wheels, fat, flat, rotten tires, high back bucket seats, roll bar, filled with junk, a butchered windshield frame, and obviously not driven for years. Nowhere near a $3K MB.
I looked at the poor guy, surrounded by his huge collection of junk and said no offense pal but that’s a pile of parts shaped like a jeep worth maybe $500 and I’m not too happy you got me all the way out here for this mess.
He said well, I need the money and if that’s what its worth, hand me $500 and here’s the title. Um, well, that pretty much killed my next argument and shut me up.
After throwing away the seats and roll bar, filling a huge trash can with junk, garbage, pounds of dirt, alternators, a radiator, various parts of other cars and rat nests I started looking closer.
It has the right engine, though 12 volt, right trans, right axles, a super straight nose and dash, a decent tub, mmm…. I check my parts pile and find some correct seat frames, a gas tank, a perfect windshield frame (all from a Durango yard sale for $100) and even managed to come up with 4 civilian 16″ wheels with rollers so I could remove the fat, flat rubber and mismatched spoke wheels.
With a fresh battery we found it would turn over but not start, though it had good spark. Turns out a pack rat had been using the carb as a toilet! There was literally 2 inches of rat shit in the carb! We yanked a good carb off a CJ3A, bolted it up, hit the starter and what do you know, the motor not only ran but sounded great with 50+psi oil pressure. All of the sudden it looked like an MB, with the yard sale parts, skinny tires and wheels, you could start to see the past, faded olive drab ghost of its military history.
I think this is going to be fun, maybe build an SAS desert MB replica loaded with period correct gear and painted desert tan? What to do, what to do….
Dan has provided us with some additional coverage of the resurrection of his Grandfather’s jeep. This might just become a series :-). Besides, I’m a sucker for anyone will to take the time to breath life into the family jeep. There’s plenty of people who would have junked this CJ-5. Thanks for sharing Dan!
Dan writes, “One of the great things about a Jeep project is that you can work on all the little things while you save up for or look for those parts for the big jobs. Here is a brief look at some of my smaller repairs. First, here is the project Jeep. A 1955 CJ5. [editor’s note: the front shackles were reversed on this CJ-5 which produced some understandable discussions about whether this was actually a M-38A1. Clearly it’s not :-).]
Starting with the gas tank, after cleaning all the surface rust off of the gas tank, I discovered a series of little holes. Now you can easily find an after-market steel or plastic tank, but for about $5 I may be able to fix it.
Here is the gas tank all cleaned up and patched with epoxy (JB Weld). If it works than I saved about $100. If it doesn’t work, well then it didn’t cost me too much to give it a try.