Builds Research Archives

To Top

The DJ-3A “Wire Gauze” or “Dry Air” Filter

• CATEGORIES: Builds, Features • TAGS: This site contains affiliate links for which I may be compensated.
1954-kaiser-darrin-dry-airfilter

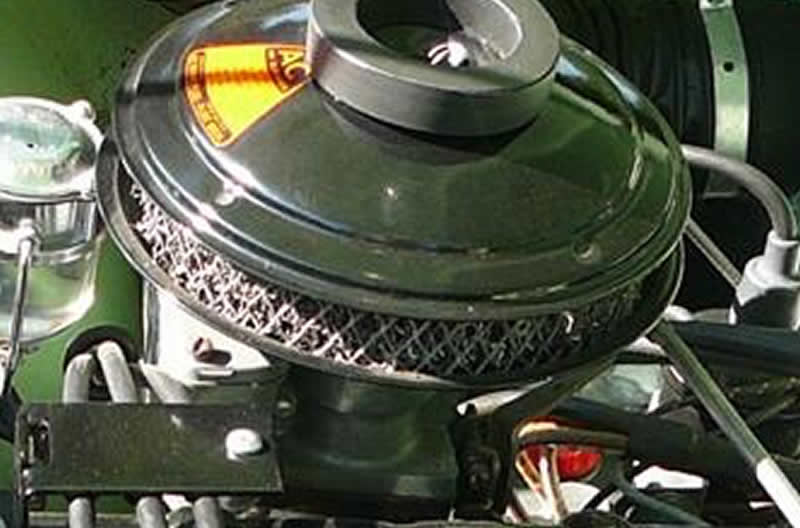
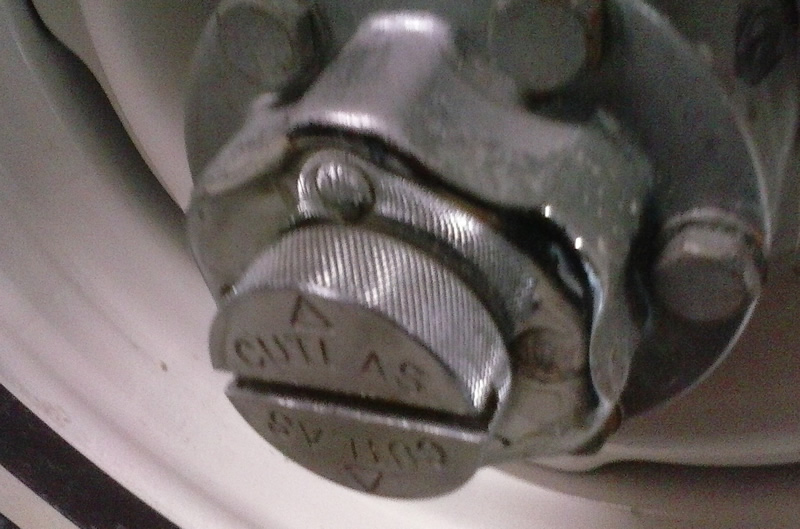
A pretty correct looking dry air or wire gauze filter from a 1954 Kaiser Darrin. Not the diagonal wire mesh on the exterior and the two prominent lips on the lid. The rubber piece on the top is unique to the Darrins. The DJ-3A did not use the rubber top piece.

UPDATE: This modification of the Oil Bath system into a dry air system by installing an air filter inside the oil bath canister might interest some readers: http://z4.invisionfree.com/CJ3B_Bulletin_Board/ar/t1267.htm

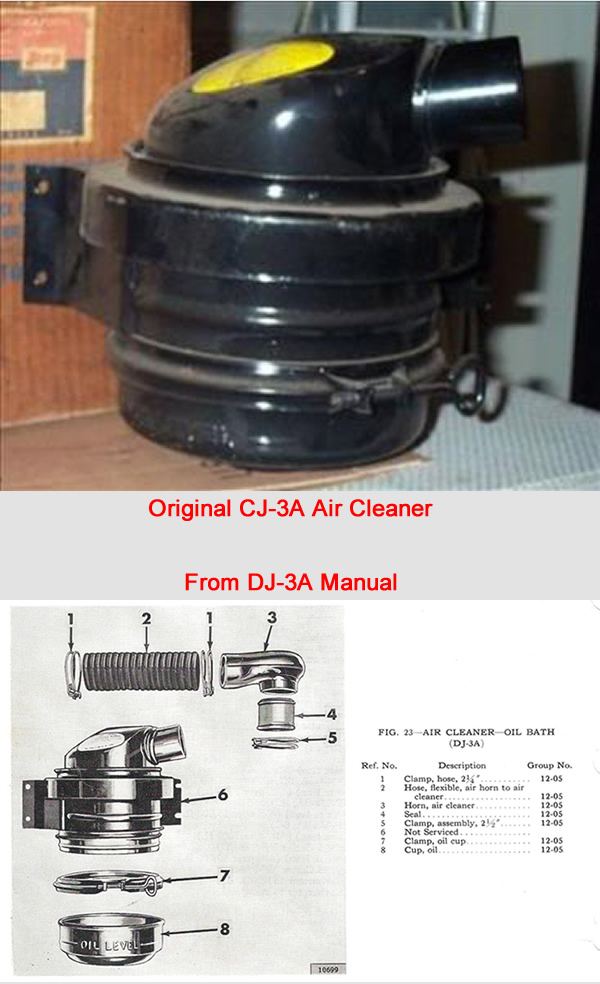
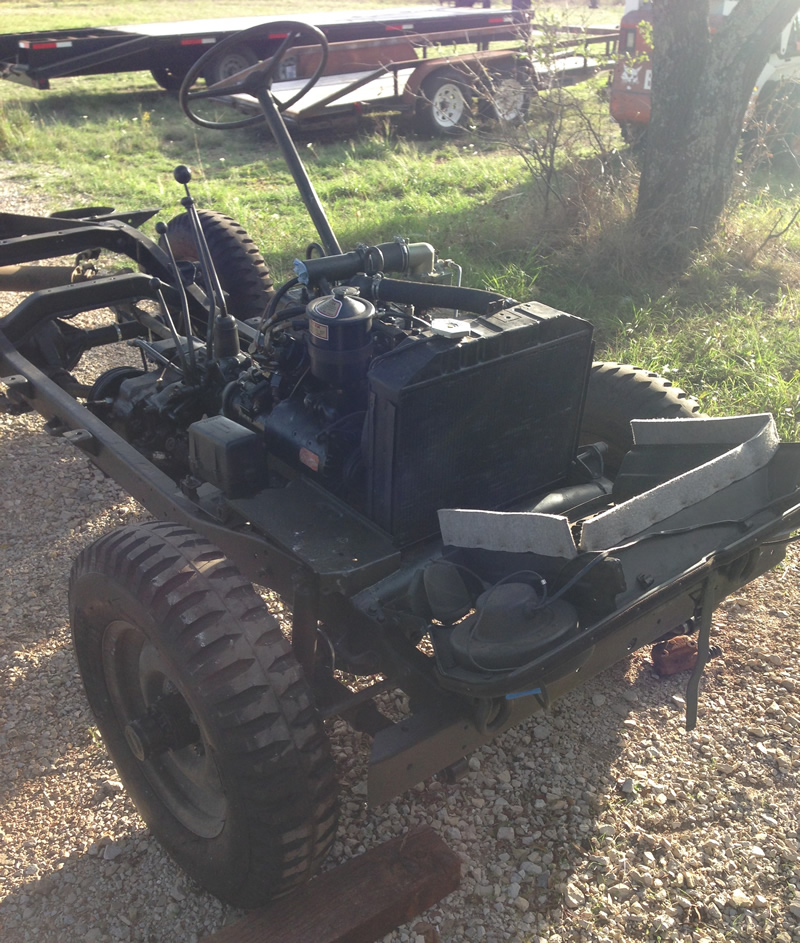
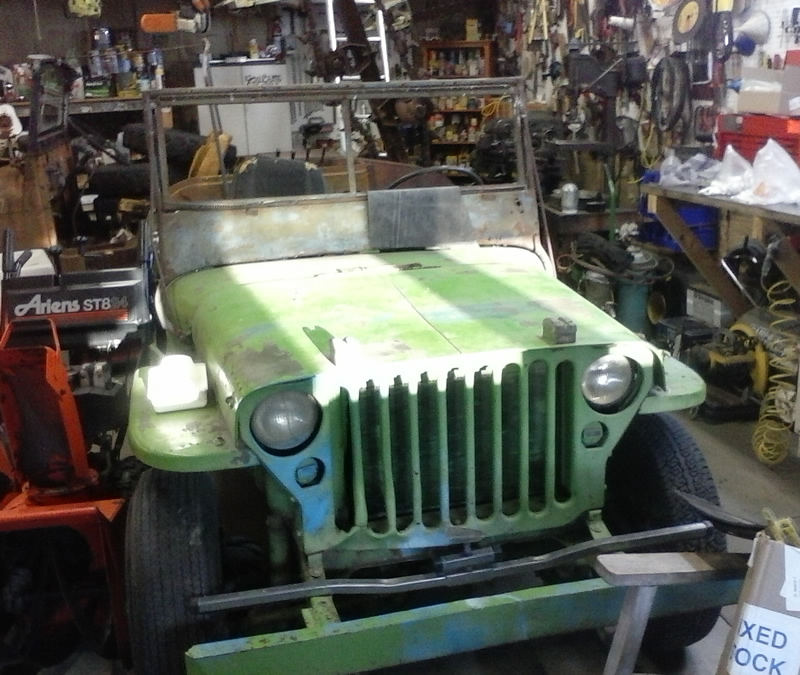
On DJ-3As, the stock air filter is a  “Wire Gauze” or “Dry Air” filter type. The oil bath filter commonly seen on earlier L-134 engines was an upgrade option on the DJ-3As. When I looked to see whether my firewall had the holes necessary to mount the oil bath filter, I found the firewall had not been drilled. So, Rusty must have been equipped with a dry air filter.

As far as we know, Willys Motors only installed the dry air filter on the DJ-3As. This same filter appeared chromed on some 1953 & 1954 Corvettes and some 1954 161 Darrins (perhaps other years, too). It’s likely that if someone has one of these lying around, they probably don’t know what it is. If you happen to have one, I’d be interested in it.

Below is one example of a filter about to be restored with a modern mesh in the middle. Charles explained how the NOS filter material can be reproduced: “A NOS corvette, Darrin, or DJ filter core is rare and expensive. Once in a couple of blue moons they show up on eBay. However, they can be made easily . The inner and outer ring are made of extremely thin expanded metal. Make the inner ring, wrap around some air filter grade copper mesh wrap (eBay) and then wrap the outer ring and secure. Unfortunately, the copper would deteriorate over the years and has been talked about badly. Even though they were called dry air filters they were supposed to be kept oiled.”

According to Bill Brown, there’s a K&N filter that can be used. He couldn’t remember the part number, but the “OD of it is 6 3/8″; the ID is 5 1/4″; and the height is 1 1/2”. This is a filter with an accordion fold all the way around with a molded “rubber” top an bottom. Molded into both the top and bottom are a pair of K & N marks the Identification AO62B4 and the words Oil Type.”

dry-filter-1964-surrey1

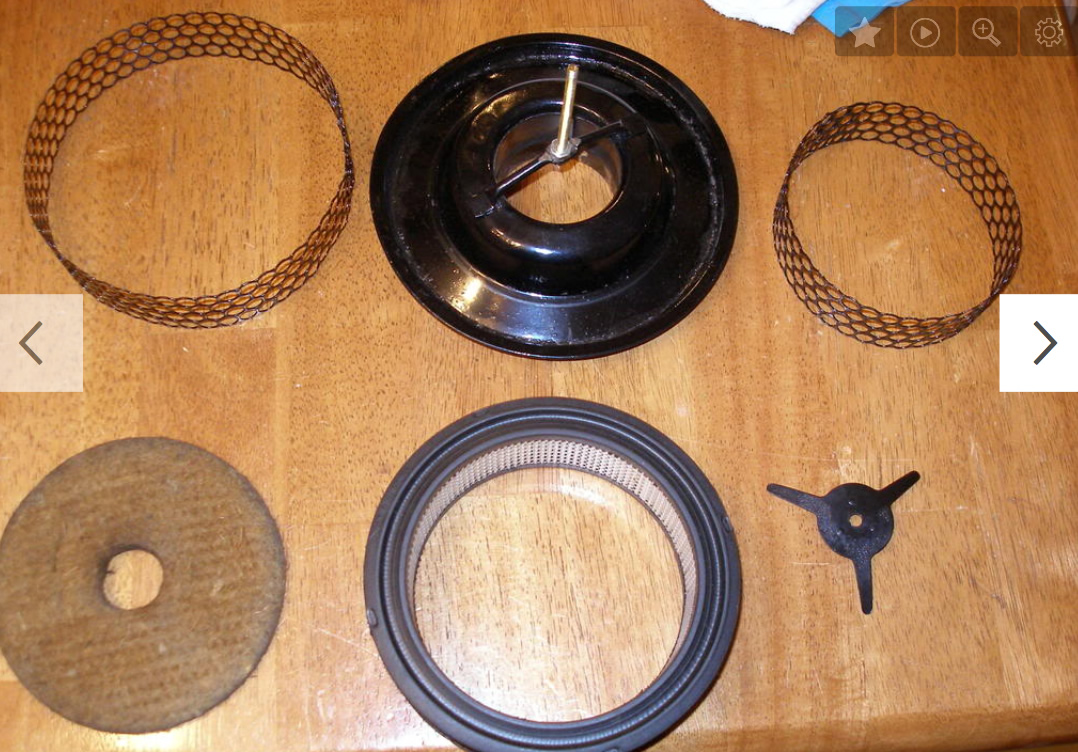
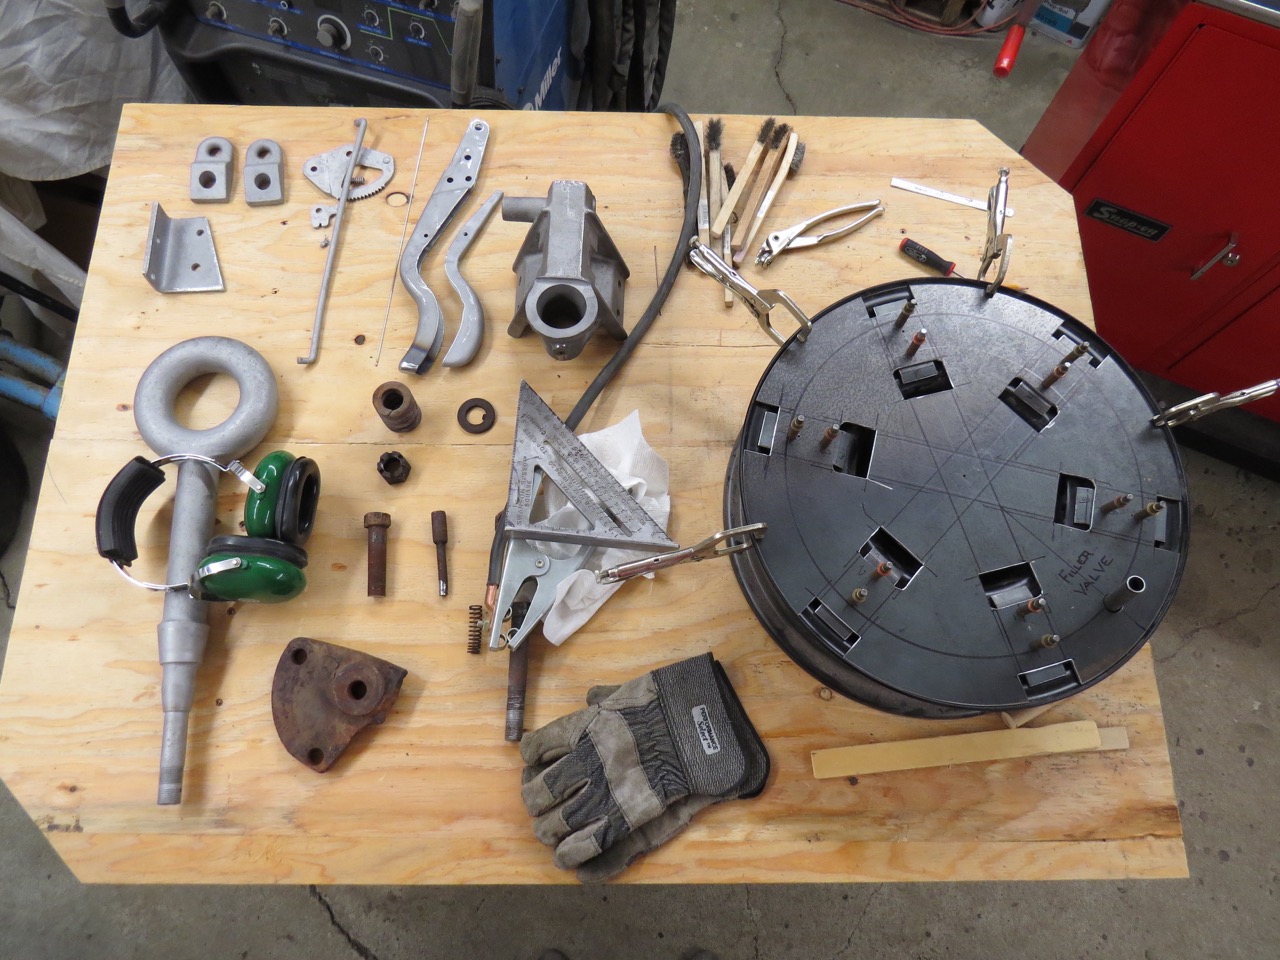
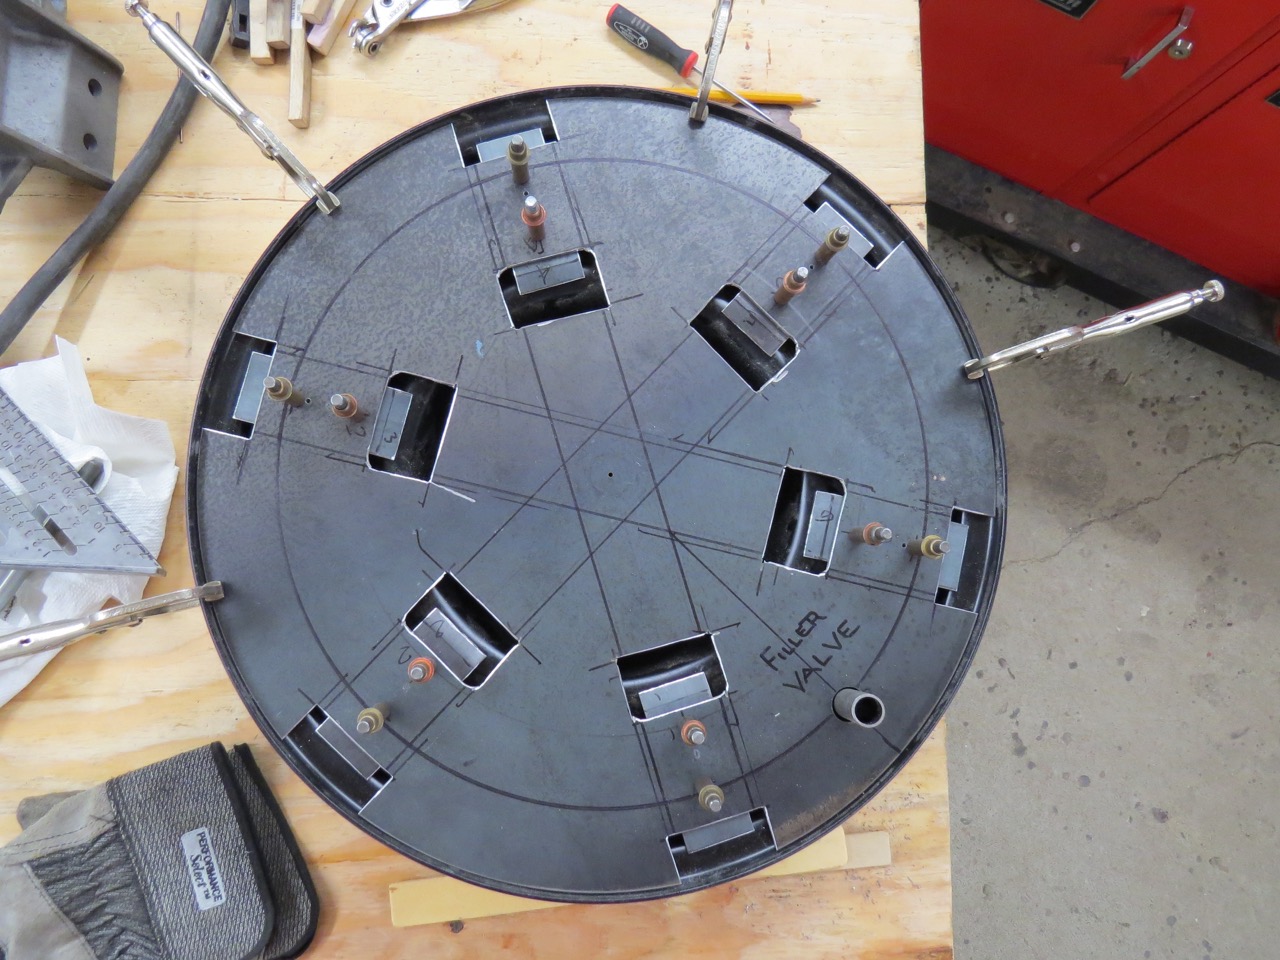
This photo shows some of the parts to build a custom dry air filter. The bottom is original. The mesh left and right should be criss cross in diamond shapes rather than circles. The air filter at the bottom is meant to replace the shredded copper originally between the circular mesh. The felt circle helps seal the top lid to the tops of the mesh. The item on the lower right compresses the felt onto the mesh.

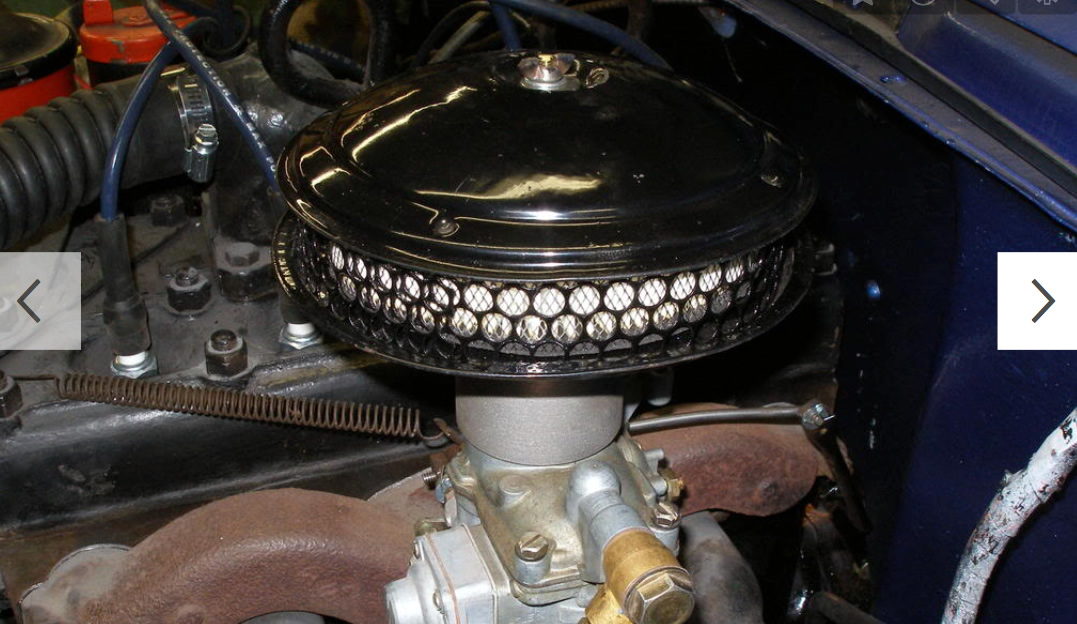
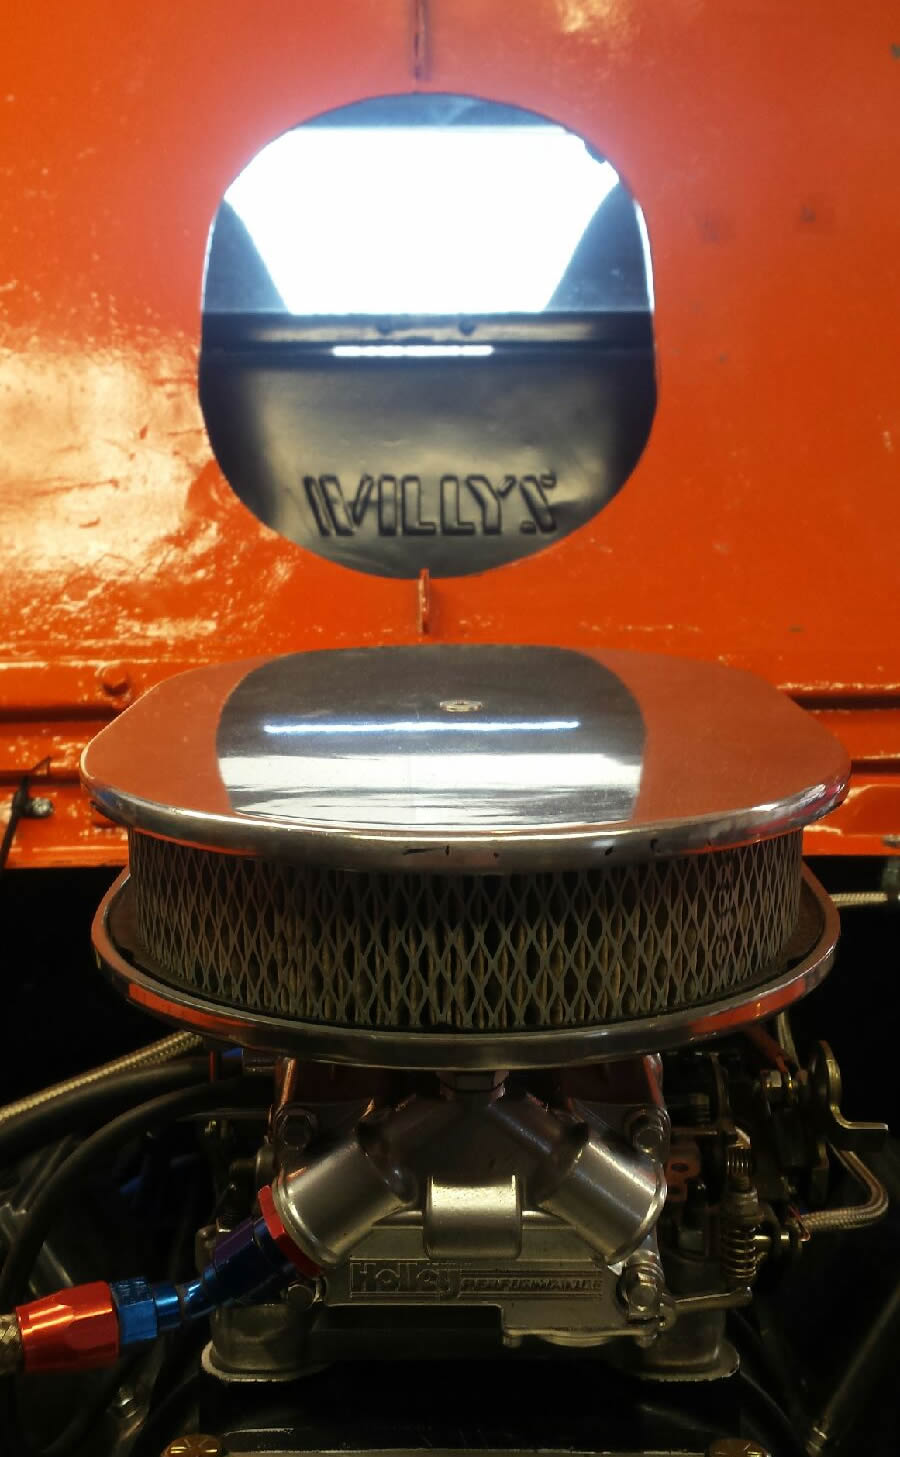
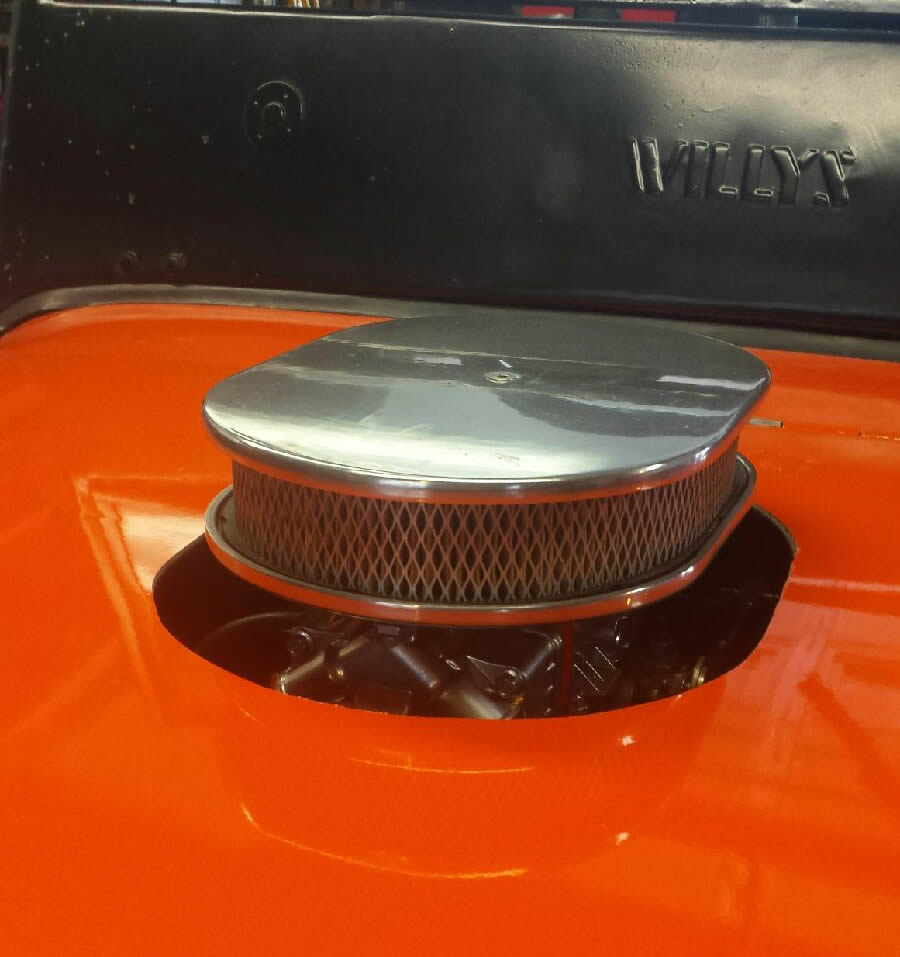
Here are examples of the filter installed. The diameter of the top lid is about 6 3/4 inches:

dry-filter-1964-surrey2

This rebuilt unit has the incorrect mesh and an aftermarket filter.

Jason64DJ35

This one could be original. I can’t tell what kind of mesh surrounds the shredded interior.

Continue reading

 
To Top

Rusty / DJ-3A Questions & Needs

• CATEGORIES: Builds, Features • TAGS: This site contains affiliate links for which I may be compensated.

I’ve spent some time over the last couple of days assembling information on what I have/needwant for Rusty.  I’m throwing this info up for questions/answers/comments:

1. AIR CLEANER: Bill has hooked me up with an air cleaner. I just need the horn, seal, and tube –  http://www.jeepsurreygala.com/wp-content/uploads/2012/06/oil-bath.jpg … cj3a looks the same to me? From 3A forum: http://www.cj3apage.com/cgi-bin/3Ayabb26/YaBB.pl?num=1303907998. Nice writeup on air cleaners here. Walcks has an air cleaner sticker, so that takes care of that.

air-cleaner-comparison

2. IGNITION SWITCH: Early ignition switch http://www.jeepsurreygala.com/wp-content/uploads/2012/04/KeychainEmilBruce.jpg. I don’t know if this style was used on any other jeeps? It dishes inward with the word “START”on it.

key-ignition-early-dj3a

3. PARKING BRAKE: I will need parking brake parts: http://www.jeepsurreygala.com/wp-content/uploads/2012/06/62-hand-brake.jpg. Are the later 3B T-handle parking brake setups the same as the DJ cables and parts? I have a handle that is salvageable, but lack the rest. The image below is from a 1962 book. I’ve seen nothing to indicate this changed from early DJ-3As.

1962-dj3a-handbrake

4. TRANNY CROSS MEMBER: I need a transmission cross member: http://www.jeepsurreygala.com/wp-content/uploads/2012/06/55-dj-frame.jpg (image http://s247.photobucket.com/user/64_Surrey/media/rearmount_zpsee48cf46.jpg.html) Should be the same as a 3A/3B/CJ-5? Note the cross member does have the transfercase mounting hole (far bottom) so it may be the same as the typical cross member.

1956-dj3a-transmission-crossmember

Continue reading

 
To Top

Rick’s 1962 Wagon

• CATEGORIES: Builds, Features, Willys Wagons This site contains affiliate links for which I may be compensated.

Rick built this nice looking wagon. I plan to see this in person the next time I’m in Spanaway, Washington.

rick-wagon-custom8 rick-wagon-custom1 rick-wagon-custom5 rick-wagon-custom6 rick-wagon-custom7 rick-wagon-custom2 rick-wagon-custom4 rick-wagon-custom3

 
To Top

Rebuilt CJ-5 Camper

• CATEGORIES: Builds, Camping, CJ-6, CJ5, videos This site contains affiliate links for which I may be compensated.

UPDATE: There’s another post on the CJ-5 camper and a CJ-5 dump trailer here.

Steve shared this video of Seth’s CJ-5 Camper that’s been updated with some modern, practical touches. You can see more pics of CJ-5 campers at Jeremy’s website: http://www.cj5camper.com/photos.php

This is what it looked like prior to its rebuild:

cj5-camper-before

And more pics from 2011: Continue reading

 
To Top

Alaska WWII Jeep Hardtops & the YL-15

• CATEGORIES: Builds, Features • TAGS: , This site contains affiliate links for which I may be compensated.

Paul from Alaska wrote, “Recently I was at the Alaska Aviation Museum helping a friend assemble his plane when I noticed a very large photo displayed on the wall of the hanger.  As you can see this photo was taken in 1947 at Adak but what really caught my attention were the numerous flat fender Jeeps with hardtops driving on the base.  I took a close up photo of a cluster of these Jeeps even though the image is rather grainy but I thought you’d like to see it anyway.”

alaska-aviation-museum2

Labeling these 1 – 5 starting from the left, jeeps #1 and #3 look to have the same top. #2’s top is extended in the rear. #4 has no side windows. #5 I can’t see as well.

alaska-aviation-museum3

There’s a jeep near the top, again with a hardtop.

alaska-aviation-museum1

The full photo is in the background above the rare Boeing YL-15, which Paul’s friend has restored. The plane was built to win a military contract. The wings, tail and flaps come off quickly so the plane can be carried by a 6 by or towed by a Jeep.

Here’s an mocked-up example of a jeep pulling the plane:

jeep-hauling-yl-15-lores

And this shows a truck carrying it:truck-hauling-yl-15-lores

 
To Top

Paul’s M-100 Trailer Teardown

• CATEGORIES: Builds, Features • TAGS: This site contains affiliate links for which I may be compensated.

On another note, Paul has begun his tear down of an M-100 trailer, something he’ll rebuild in stainless:

paul-trailer-teardown2 paul-trailer-teardown3 paul-trailer-teardown1 paul-trailer-teardown4

 
To Top

Steve’s Jeepney

• CATEGORIES: Builds, Features This site contains affiliate links for which I may be compensated.

UPDATE: Cody found this US Jeepney link.

Steve wrote me about a wagon that he transformed into a Jeepney. I wrote him for more info and am waiting for additional details. If you live near Port Angeles, Washington, you might have seen his Jeepney.

BEFORE:

jeepney-1

AFTER:jeepney-2 jeepney-3

 
To Top

Michael’s 1953 M-38A1

• CATEGORIES: Builds, Features, M-38A1 This site contains affiliate links for which I may be compensated.

parker-m38A1-finished-1

MIchael sent me an email about his 1953 M-38A1. He had it fully refurbed and it looks great! Thanks for sharing. Here is what Michael wrote:

The Willys is a 1953 M38A1. She was issued to the Marine Corps that year, according to the original data plates. I polished the data plates, had them clear-coated and riveted back into the dash.

My wife picked the paint color, she refused to let me use the OD green and white I had originally purchased.

I had the holes filled in the dash panel that would not be used for this build, refreshed the 12v conversion with an alternator, electric wipers, and converted the original front and rear blackout canisters for parking, turn signals and rear brake lights. I pulled the PTO and installed a Saturn overdrive, she now makes 55-60 mph on smooth roads on the flat.

I pulled the battery box and installed a marine hydronic heater/defroster. The switches for the heater fan, wipers, and the cell phone charger are tucked in the right side of the glove box.

I tried to keep most of her as original as I could while building her for my personal use..

I think she turned out well and she is quite usable and economical to maintain. For the purists, it is probably not right, but she is still mostly who and what she used to be, just a little more civilized and prettied up.

parker-m38A1-original

The jeep when he bought it.

parker-m38A1-finished-frame

Powder coating frame.

parker-m38A1-finished-partial

Beginning the reinstall.

Continue reading

 
To Top

Todd & Chris’ Excellent Jeep Adventures

• CATEGORIES: Builds, Features This site contains affiliate links for which I may be compensated.
todd-chris-cj3b-4

Chris’ all stock CJ-3B

(Idaho) Todd is visiting his brother (Minnesota) Chris this week. Apparently, they got talking about eWillys, which lead Todd to drop me a note with some pics of some their jeeps, which evolved into another email with more pics. If I weren’t so busy with the book, I might have kept sending emails until they ran out of photos to send me 🙂 Together they have owned over 70 jeeps, so they have plenty of photos to share, so check them out below. (I hope I got all the captions correct!)

todd-chris-antique-store3

While picking up a jeep, we literally stumbled upon the American Pickers shop in Iowa! Yup, we were lost…

todd-chris-antique-store2 todd-chris-antique-store1

todd-chris-tux-cj5-4

This is Todd’s Tuxedo Park IV. His son-in-law is driving, while Todd’s daughter’s enjoy the ride. He must REALLY like his son-in-law to let him behind the wheel!

Continue reading

 
To Top

The Tale of Paul’s Steering Column

• CATEGORIES: Builds, Features This site contains affiliate links for which I may be compensated.

Paul shared the story behind his one-of-a-kind stainless steel steering column.

steering-column-paul3

Paul writes, The steering column in my Willys has quite a story behind it, …….  About 10 years into the rebuild (1995) I began thinking about what kind of steering column and wheel I’d like to have for the Willys. I wanted a tilt column to make it easier for me to enter and exit the Willys, the steering column and steering wheel should be one of a kind and not some mass produced stuff that everyone has and if at all possible these components should be fabricated from stainless steel to match the rest of the vehicle. I wasn’t even aware of any aftermarket suppliers that made replacement steering columns for custom vehicles but if there was a company in America making replacement columns I figured they would be mentioned in the hot rod or custom car magazines. I began reading all the current car magazines I could get my hands on, searching for any mention of or advertisement from a company making replacement steering columns.

It wasn’t long before I saw an advertisement for a company called ididit and the primary focus of this company was to build replacement steering columns for custom vehicles. Their ad had their address listed along with their telephone number so I made a quick phone call to the state of Michigan and ordered a free catalog. About a week later their catalog arrived here at the house and it was full of information about the company, about how to correctly determine the angle of the steering column and the location of the steering wheel along with internal wiring specs and how to identify the correct column length for your vehicle. This catalog was full of step by step procedures to solve installation problems I hadn’t even thought of yet. According to the catalog, steering columns could be ordered in steel or aluminum (plain or polished) in either standard lengths or total custom units. I was happy.

steering-column-paul2

After mocking up a column in the Willys (a sawed off broom handle with a plastic plate screwed to the upper end) I was able to find the column angle which would give me the least interference during entry and exit while still providing a reasonable position for the steering wheel and this information allowed me to get the total length of the column from steering wheel to column end in the engine compartment. With my calculations in hand I made another call to ididit and attempted to order a column. This is where things got a bit weird. Continue reading

 
To Top

John’s “Woody” DJ-5A

• CATEGORIES: Builds, Features, Wood bodies This site contains affiliate links for which I may be compensated.

John shared his neat DJ-5. If you live on Long Island, keep a watch for him during the summer.

He wrote, It was turned into a ‘Woody’ about 35 years ago. This one is a 69 DJ5 A. I bought it about 1980/81 or so. It’s got the original 2.5 in it and I use it about 4 months every year…..June to September. I have not made any changes except for putting in a radio and a glove box and I recently had the Seats recovered. I never met the original owner (the guy who did all the nice woodwork, glass etching and paint job) but recently ran into someone who recognized the Jeep and told me about the very creative guy to built it back in the 70s. About twenty years ago I had to take the motor out and and replace the main bearings. Last year I had to find an exhaust manifold which was not easy. Otherwise, it gives me good reliable service every year. It’s really been a fun vehicle. Every where I go people want to buy it and on the hiway I am always being photographed while driving.

Jeep 004 Jeep 001 Jeep 002 Jeep 003

 
To Top

Another Update From Paul

• CATEGORIES: Builds, Features • TAGS: This site contains affiliate links for which I may be compensated.

If I ever step into Paul’s jeep, I’m going to bring some surgical scrub footies.

Paul wrote, I felt the gray marine carpet in the footwells was too dark so I installed some stainless steel scuff plates on top of the carpet. I put a brushed finish on the stainless plates before I screwed them to the carpet and I’m happy with the results. The carpet is still visible, the stainless makes the footwell area brighter and I think the cutout design goes well with the Willys.

Just another crazy thing I never imagined I’d want for this Willys rebuild.

left-side-scuff-plates right-side-scuff-plates

2016-01-31-alaska

Those are some clear, blue skies!

 
To Top

Leaks & Fenders

• CATEGORIES: Builds, Features • TAGS: This site contains affiliate links for which I may be compensated.

Two bits of good news from Paul. One, his jeep was NOT affected by Alaska’s recent earthquake. He had the sense to bolt things to the wall that could potentially fall onto his jeep. Two, he’s made some more updates to Knardly Rolls! So, read on . . .

alaska-january-20162

Looking towards Anchorage and the mountains beyond, January 2016. This was pre-earthquake, though it pretty much looks the same after the earthquake.

Paul writes, the progress so far this winter season on the Willys has been a little weird. Things started to get strange when I decided to fill the cooling system for the first time in 30 years. I’m an optimist but I like to think I’m based in reality so I told myself there’s always the possibility of leaks in the cooling system and having a couple of empty buckets ready to catch dripping antifreeze might be a good idea. With the empty buckets cleaned and placed nearby I poured the first gallon of antifreeze into the radiator.

After a short pause to inspect the hoses and connections for system integrity I began pouring the second gallon of coolant into the radiator and I quickly noticed my feet were getting quite wet. I managed to wedge the empty but rapidly filling buckets under the front axle where most of the escaping antifreeze could be captured since the leak appeared to be from the front of the engine by  the timing chain cover. Oh well, it looks like yet another unexpected repair or modification needs my attention.

After the leak slowed down to a slight drip I repositioned one of the buckets directly below the radiator drain and began transferring the antifreeze from the cooling system into the bucket and then back into the gallon containers which is where this green fluid came from about 15 minutes earlier. When no more fluid flowed from the radiator drain and the recaptured antifreeze was safely back into the gallon containers I decided to call it a day and leave the heavy thinking for the tomorrow.

After having strange dreams throughout the night concerning the coolant leaks on the Willys, by the next morning I ready to start pulling components off the front of the engine so the timing cover could be removed for troubleshooting. Since the engine has never been run after being rebuilt this was a fairly quick and easy task.

Once the timing cover was out of the way and the front of the cylinder block could be inspected I learned an interesting bit of information about the Buick V-6 engine. The front of the block has 4 bolt holes (2 on the left and 2 on the right) for the timing cover to attach, BUT the timing cover is manufactured as either a 2 or a 4 bolt type.

paul-engine-plug2

The plugged bolt hole is the one closest to the right edge of the photo, it was left unplugged and partially exposed by the timing cover so the antifreeze flowed out quickly.

The timing cover on my engine is a 2 bolt type (where the coolant passage flows into the water pump) so the two unnecessary threaded holes in the block should’ve been plugged to prevent antifreeze from leaking. The unused threaded hole on the block is drilled into the coolant passage but the unused hole to the right is a blind hole and not open to the cooling system.

To prevent anymore leaks and to make me feel better I installed internal wrenching hex plugs in the unused holes . These plugs were screwed into position after the threads were cleaned and dried and the threads on the plugs were coated with gasket compound, then it was time for reassembly. Things were going pretty well until I noticed the rubber on the crank pulley damper was cracked and bulging out along the seam so this project came to a halt until the damper made a trip south to the Damper Doctor for a rebuild. 

[editors note. I *think* it was in one of those holes that, during my very first engine rebuild, I put too long of bolt into one of the holes. I tightened it down, though it got difficult near the end. Imagine my surprise when the #1 cylinder piston kept hitting something while i tried spinning the crank. OOPS, I’d damaged the cylinder wall!!]

paul-clamps-fender

Two pieces of 3/4 inch plywood spread the clamping pressure and prevent damage to the metal when installing the abrasion panels to the underside of the fender.

Continue reading

 
To Top

Hugh’s Barn Find MB

• CATEGORIES: Builds, Features This site contains affiliate links for which I may be compensated.

Hugh wrote me a couple days ago. He was excited to share his barn find jeep, a 1943 MB that had sat for forty years.  Nick Oxender actually found the jeep and told Hugh about it. I wanted to share the jeep with everyone as evidence that barn finds still exist, even in the midwest!

hugh-mb13

Hugh wrote, The jeep is rust free and original and not too bubba-ed up. It has all three seat frames and four combat rims with almost new tires.  The switches and controls on the dash are present and it is only missing the parking brake handle.  

hugh-mb5

It runs and drives well, but has a post war engine. The original insulation is on the firewall and the filterette and it came with the original radiator with the horsehair insulation. The original crossover tube, air cleaner and fuel strainer are still there. It also has the original oilfilter and bracket. Someone just switched out the engine and left the T-84 trans and WW2 components alone.

hugh-mb4

I will be watching for an mb engine but it drives just fine right now.  i don’t plan on an extensive restoration, just paint markings, a canvas top and an engine swap. I plan to preserve it. There is a patch right over the transfer case that i believe covered a hole where it had a PTO operated generator.  Judging by the extra holes, ground straps and suppression devices, I believe it was a radio jeep. i am very pleased with this piece of history.  Oh yeah, it needs a front bumper and that crazy hitch on the back removed as well, but its a very original rust free example of a ww2 jeep.

hugh-mb1

Continue reading

 
To Top

Update on Tom’s CJ-3A APU

• CATEGORIES: Builds, Features • TAGS: This site contains affiliate links for which I may be compensated.

Tom’s been working on the restoration of this CJ-3A APU. He’s wondering if anyone knows anything about the three-wheeled APUs that were auctioned in California about five years ago. He’s hoping to find some of the hard-to-find APU equipment.

Here are a few photos of the APUs sold a few years ago:

power unit 1 power unit 2 power unit 3 power unit 4 power unit 6

Here’s  how he started, with a jeep he didn’t know was an APU. Since then he’s been learning more about them.

apu-cj3a-fhead-apu1

Continue reading

 
To Top

Update On Lee’s M-38

• CATEGORIES: Builds, Features This site contains affiliate links for which I may be compensated.

Lee’s shared some updated photos on his M-38. His goal has been to restore it back to stock. Though he’s got a great deal of stock jeep to use, as he disassembled it he discovered a few more problems than he’d planned. Despite some unexpected issues, he’s been working all summer since Ann and I visited he and his family last April in San Saba, Texas. He doesn’t have a great deal of time, between his job, farm, kids and wife, but he’s been making the most of it. He tells me he is almost done.

Here’s the jeep before disassembly:

2015-04-29-lee-m38-4

The body:

lee-m38-sansaba9

Some body work completed.


The Frame:

lee-m38-sansaba4

Plenty of scrubbing needed.

lee-m38-sansaba7

First coat of paint.

lee-m38-sansaba5

Partial assembly

Continue reading

 
To Top

UPDATE: Robert’s 1942 GPW

• CATEGORIES: Builds, Features This site contains affiliate links for which I may be compensated.

You may remember Robert’s 1942 GPW from this post last year. Since then his father and he have repowered their modified GPW.

robert-wilson-10

Robert writes, It has been about 18 months since I wrote you about the GPW project that my father and I found on your website in 2010. You were kind enough to feature the build of our Willys last time. Since then we have made some drastic changes that I think you may enjoy.

Things got out of hand last November when a simple craigslist browse lead to the purchase of a B&M 144 Supercharger from Ohio. Initially, we were not sure if the blower would find its way into the GPW, and decided to bore out a 350 that we had lying around. The plan was to build a supercharged 383 stroker for fun, and then decided what vehicle to install it in. As you may imagine the longer we had the blower in the garage the more inclined we were to see it tentatively installed in something, and the GPW was the easiest option. We pulled the 400 SBC and installed the 350 with no internals, but the blower on top to see how it looked. The result was amazing, and we decided that the Willys was going to get a new motor!

robert-wilson-1

Installing a small block chev​y with a blower in a Willys that came with a 4 cylinder comes with numerous obvious and unforeseen hurdles. For instance the blower is a bit taller than a traditional intake manifold, and consequently the hood would not close. Therefore, we moved the motor mounts down which actually helped the center of gravity! This alone did not clearance the blower, carburetor, and air cleaner though. However, we were undaunted, and decided that the only remaining option was to cut a hole in the hood and stuck the air cleaner out!

robert-wilson-2 robert-wilson-6

After we figured out how to fit the motor in up and down we decided to address the issue of front to back. The position of the motor already had the HEI distributor close to the firewall so there was no room to move the engine backwards, and the snout on the blower was too long for us to fit the single core radiator before the grill. Therefore, we completely removed the radiator from the engine compartment, and installed a new 3 core aluminum radiator on the roll bar behind the seats! We had to customize all of the plumbing for the cooling system, and my uncle assisted us with a very special bender borrowed from a former custom off-road shop. In addition to the bent aluminum portion we ran the same flexible lines along the frame rails that you can find on monster trucks. Continue reading

 
To Top

Colin’s Surrey’s Head Games

• CATEGORIES: Builds, Features This site contains affiliate links for which I may be compensated.

Colin bought a Hickey aluminum cylinder head to modify his 1960 Surrey, but ran into some problems with it. Below he describes the changes he made, the problems he encountered, and his current solution. Thanks for sharing Colin!

IMG_1029

I started a hop-up project on our Surrey that involved the installation of a 1950s Nick Hickey aluminum cylinder head for the L-134. That morphed into the fabrication of a dual carb setup using  two intake manifolds with a balance tube an F Head exhaust manifold that a very good friend, Steve Mason, and I fabricated out of an old manifold supplied by Jim Sullivan.

The first issue was the two new Weber carbs. They were supposed to be synchronized and jetted the sam, but weren’t. That led to the rear carb dumping extra fuel into #s 3&4, resulting in a blown head gasket which dumped coolant into those cylinders.

IMG_0788

Hickey head top and bottom.

IMG_0787

Took it all apart, rejetted the carbs and had the head resurfaced. I finished buttoning everything up and fired it up. adjusted the carbs slightly, running smooth, then noticed coolant in the #2 spark plug recess. Shut it off, pulled all plugs, could see coolant in #2, and steam coming from what must be a crack in the threads.

When I had the engine running previously I did not have water pooling in the plug basins. Upon looking at the plugs, the electrodes indicated the possibility of them coming in contact with the valves. Took a very hi intensity flashlight and looked into the cylinders and at least two of the valves I saw the imprint of the electrode on the valves.

IMG_0789

So my theory is this:
I had the head resurfaced and in that process, the machine shop used an epoxy to smooth the surface indentations( corrosion?), and then did the resurface. The plugs I had used were nearly new from the original head. Those electrodes did not extend into the combustion chamber. The machine shop( guys who do a lot of work on Ford V8s with aluminum heads told me to get plugs with a slightly longer shank for better combustion. So I did. Only a small imperceptible difference in length.

IMG_1046 Continue reading

 
To Top

Paul’s Stainless Wheel Covers

• CATEGORIES: Builds, Features • TAGS: This site contains affiliate links for which I may be compensated.

With winter settling into Alaska, Paul has returned to continue work on his Stainless M-38 (and a matching stainless trailer). I believe this is the 28th year of the project? Thanks for sharing Paul!

paul-wheels8

Knarley Rolls, Paul’s M-38. The spare with its cover is attached to the back of the jeep.

The black steel wheel in the photo below is one of 8 new wheels I purchased for the Willys (4 and a spare) and the M100 trailer (2 and a spare) so I need to modify these wheels to accept the stainless wheel discs I previously made. Each wheel will have 6 metal tabs (evenly spaced) welded to the outer face of the wheel with the tabs running from the outer bead flange to the raised inner ring around the lug nut area and each tab will have two nuts welded to the inner surface. These nuts will line up with holes drilled thru the stainless wheel discs to accept the wheel disc attach hardware and the tabs will provide additional support to hold the wheel discs while driving.

paul-wheels1

The black rim is to the right covered by a template. The other parts are trailer pieces from the disassembly of his trailer.

My original plan was to have only one nut per tab (so the wheel disc would be held on with six machine screws) but it’s much easier to weld two nuts to each tab while I’m making the parts than to have to add additional nuts and attach screws after the wheels have been powder coated just in case the discs wobble during rotation. I’ll try the 6 attach screws per wheel first and if the wheel discs stay smooth during driving I’ll leave the extra 6 nuts empty. If the disc shows any sign of instability while driving I’ll use all 12 screws to attach the disc for extra support.

paul-wheels2 paul-wheels3

Continue reading

 
To Top

Cor’s Restored Ambulance Jeep

• CATEGORIES: Builds, Features This site contains affiliate links for which I may be compensated.

For just finished restoring this Holden Ambulance jeep. For more pic’s go to: www.yankreenactment.nl then choose “jeep”, there you find the amb jeep and the finnished project under “canvas top”. Looks great!

Before:
gpw-holden-rebuild-netherlands

After:

usmc-amb-jeep-canvas-top-5-2

 
To Top

Unique Front Clip for M-38A1 — A Slat Grille

• CATEGORIES: Builds, Features, M-38A1 • TAGS: This site contains affiliate links for which I may be compensated.

Paul spotted this unique slat grille M-38A1 at an Alaska outdoor car show. I think it is pretty well done.

m38a1-slatgrille3 m38a1-slatgrille2 m38a1-slatgrille1


To Top

Craig’s 1943 GPW Rebuild

• CATEGORIES: Builds, Features This site contains affiliate links for which I may be compensated.

IMG_0115

Craig recently inherited this 1943 GPW from his deceased father. His Honda Racing shop will be rebuilding this. The goal will be to keep it’s original look. He plans to have it completed in two months and share some photos when completed.

IMG_0119

Here is a list of items to be done:

Body (tub) removed and sandblasted
Rust locations repaired and sealed
Repair rear bumperettes
Underbody and frame powder coat black color
Body to be painted in either original OD green enamel or we may color match that and paint with acrylic
The problem is we are not allowed to use enamel in our spray booth legally
We will not have any decals except for a small one on the back which says “1943 Ford GPW”.

Continue reading

 
To Top

1948 Wagon Undergoing Restoration in Australia

• CATEGORIES: Builds, Features This site contains affiliate links for which I may be compensated.

Leigh found this 2WD 1948 wagon that had been sitting in a shed in Australia since 1994. He plans on restoring while retaining the current look as much as possible. From what he has been told only about 400 Wagons of any description came to Australia so parts are a bit difficult, however he reports Kaiser Willys has been a big help.

1948-wagon-leigh-shields-australia-lores

 
To Top

Paul’s Shielding the Heat

• CATEGORIES: Builds, Features • TAGS: This site contains affiliate links for which I may be compensated.

Paul built a heat shield to protect his steering assembly. I believe it’s his last project of the winter. Paul’s putting ‘Knardly Rolls’ to rest until Fall. It’s now time for him and the Goddess to drop the top on the Miata and explore the melting tundra.

He writes, Here’s the heat shield I made to protect the steering assembly from the heat given off by the left exhaust manifold and exhaust tubing. As you might have noticed there’s very little clearance between the heat shield and the steering shaft.  A penny will not fit between the heat shield and the steering shaft. The heat shield is .020” stainless and the attach bracket which clamps to the exhaust pipe is .050” stainless.

paul-heatshield2

The decreasing diameter holes drilled thru the attach bracket will allow cooling air to pass behind the heat shield which will help keep the steering linkage from getting too hot. I hope. The brown coating on the brake light switch ground wire attach bolt is a gasket shellac that should prevent water from seeping between the ground wire connection to the bare frame so corrosion is prevented. The exhaust is held to the manifold by silver plated high temperature steel self locking nuts.

paul-heatshield1


To Top

Eric Jarvis’ Jeeps

• CATEGORIES: Builds, Features • TAGS: This site contains affiliate links for which I may be compensated.

UPDATE: Eric shared some additional photos. They are located at the end of the post.

eric-jeep-collection1Eric Jarvis is learning that it is difficult to own just one jeep! He started with a 1964 CJ-5 like his grandfather used to own. Eric spent many years working on the red jeep until he got it just the way he wanted it. You can see the dedication on the glove box to his grandfather, Harlan.

The green next to it is a 1967 CJ-5 with a Buick V-6 Eric uses around the shop. It sports a Koenig PTO winch on the front. He also just picked up a Monroe 3 Point Hitch from Ted Jordan he will install in the rear.

eric-jeep-collection11 eric-jeep-collection2

The 1943 GPW shown below was a jeep Eric purchased from Don Prine three years ago. He even got a chance to fly to the northwest and see Don’s jeep collection, a memory I’m sure he’ll cherish.

eric-jeep-collection3

Finally, Eric recently purchased this CJ-5 with a trencher. It’s a retirement project that I suspect will keep him busy for a few years.

eric-jeep-collection4


Additional Photos:

don-prine-eric-jarvis2

Here’s one of Eric and Don Prine

Below are additional photos of the CJ-5’s engine:

eric-jeep-collection221 eric-jeep-collection222 eric-jeep-collection24


This is a close up of the Cutlas Hub:eric-jeep-collection23