Dan forgot to forward these pics of his progress on the rear of his grandpa’s CJ-5. Once again, Dan’s done some nice work! View more installments of Dan’s build here.


emailNeed to contact me and don't have my email? Click on email button.

Welcome to eWillys.com, a website for vintage jeep enthusiasts. I update this website nearly every day with jeep deals, jeep history, interesting reader projects, jeep related info, and more.
These quick searches can help you find things on eBay. People list in the wrong categories all the time, so don't be surprised to see brochures in the parts area for example.
The links to posts below show jeeps grouped by models, condition, and other ways. Some of these jeeps are for sale and others have been sold. If you are unsure whether a vehicle is still for sale or not, email me at d [at] ewillys.com for more info.
There are plenty of interesting, unusual, historic and surprising stories related to Jeeps and their owners. In addition, some of these features have nothing to do with jeeps. This link will display all featured stories starting from the latest.
Looking for parts and not sure where to go? There are a variety of large and small new and used parts sellers both online and offline.
Importantly, the allure of buying a project jeep can be romantic. The reality of restoring a jeep can be quite different, expensive and overwhelming without the right tools and resources. So, tread carefully when purchasing a "project". If you have any concerns about buying a vintage jeep, or run across a scam, feel free to contact me for help, comments or concerns .
Dan forgot to forward these pics of his progress on the rear of his grandpa’s CJ-5. Once again, Dan’s done some nice work! View more installments of Dan’s build here.
Gerald and his brother have completed his brother’s low budget build. It just demonstrates that with some creativity, a low budget build can look great! Nice work guys. To see more, go here.

Gary has completed his build just in time for some warm weather. It looks great! Thanks for sharing. You can learn more about his build here: http://www.ewillys.com/?p=29757


UPDATE: This slattie was bought in early 2010 and resold a few months later. It demonstrates how a little work can go a long way. Dexter found a variety of deals using craigslist and managed to improve this inexpensively.
Below are the before pics. Here are some after pics.


\
When we last checked in with Gary, he’d just bought this CJ-5 off of Craigslist. Well, Gary’s been busy this winter getting his Jeep ready for fun this year. He’s got some work left, but his progress looks great. Thanks for sharing!


One vehicle I wanted to highlight from the Wonderful World of Willys Wagons was Charley Crossley’s Wild Willys. I tried to located additional images of it, but the only ones I found were on the WWWW website. I liked Charley’s creativity, so I wanted to make sure readers saw it as well. You can read about Charley’s approach to building this Wagon here. Note the rumble seat in the back!


Paul made good progress recently with the radiator installation. I’ll let him explain …
Paul writes, “During the past few days I’ve been busy scrounging metal, making parts and playing with the welder but the end result is the Willys has an M 151 radiator installed along with a V type firewall to radiator brace and a hood hold open rod. I also picked up my new radiator from the local military surplus yard in addition to a used shroud and the necessary lower mounts. The new radiator will reside safely in the house until it’s time to be installed after I quit taking things apart for modifications and redesigns but the size of this radiator is just about perfect for the room available under the hood. I’ll have to spend some time at the local autoparts store mixing and matching coolant hoses before the engine is plumbed to the radiator and I also have to go shopping for a low profile electric fan (a puller is what I’m hunting for) but both of these tasks can be solved with reasonable amounts of money so I’m feeling pretty good with my progress so far. ”


 A trip to the local Military show turned out to be just what Paul needed. BTW Paul, you don’t owe us anything. You are putting on a show for us up there in “The Last Frontier (which is the official state nickname)”. No doubt there’s a few readers who might benefit from this mod.
Paul, take it away! “This past weekend the local military vehicle collectors had a show at a car dealership near my house for the general public and it was free so I went. Before leaving the house I grabbed my camera and a steel tape just incase I ran across a shining gem of a radiator nestled among the antique olive drab metal. In addition to the WWII Willys and Ford Jeeps on display, the Dodge command cars, M 38’s and M 38 A1’s there were a couple of M 151’s and one of them had it’s hood up. Naturally I began checking out the radiator, first by eye and then measuring the height, width and thickness and ending up on my back under this Mutt where I noticed the radiator was a bottom mount. Most interesting!
The original M 38 radiator is a bottom mount with a top mount brace rod, it’s 21 1/4 inches wide by 19 inches high and 5 inches thick. These dimensions are overall and they include the radiator cap. The core dimensions are 13 inches high by 20 inches wide and 3 inches thick.
The M 151 radiator is a bottom mount with a top mount brace rod, it’s 20 1/2 inches wide by 19 inches high and about 4 inches thick (I didn’t measure the metal shroud so I’m guessing here) and once again these measurements are overall. The core is 13 1/2 inches high by 19 1/4 inches wide by 2 inches thick.
Both radiators have a drivers side inlet (top) and a passenger side outlet (bottom).
Gentlemen, we have a winner !!!!!!
For the past 55 years E. A. Patson Parts and Equipment has been dealing in new and used surplus military vehicles and parts here in Anchorage but Elmer Patson is 86 years old (his son, Rod, is only 63 but he’s been working at the business since he was 12) and would like to retire so everything’s for sale. I asked about M 151 radiators and they have both new and used radiators. I was able to borrow a used radiator so I could do a bit of metal massaging and fabricate a lower mount and the top brace rod and when the snow melts some and they can get into one of their outbuildings where the new radiators are stored I’ll buy one of those. For now this used radiator will allow me to continue my progress with the Willys resurrection until the end of March when I’ll officially declare the winter to be over and it will be time to do outside (summer) projects.
Thanks again to all the Willys fans for their much appreciated suggestions, ideas and help. I look forward to the day when I can return the favor, but until then I owe you. “
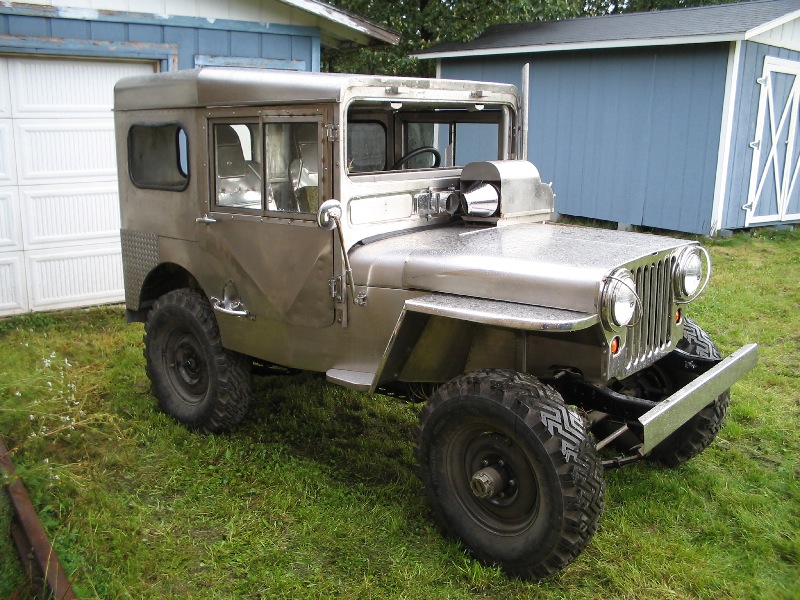 Paul continues to make progress on his Stainless M-38. However, he recently ran into a problem getting the radiator he needs.
He needs some ideas or suggestions.
I’ll let him explain:
Paul writes, “I’ve run into a bit of a problem with my perpetual Willys project and I need information and ideas. I ordered a brand, spanking new radiator from KaiserWillys for the Buick odd fire engine I installed in my M38 thinking this was the best way to prevent overheating and additional problems down the road. Boy, was I wrong!
The KaiserWillys catalog lists the Buick 225 radiator as being 17 inches high, 21 and 7/8 inches wide and 1 and 1/2 inches thick which is just about the perfect size for the space available under the hood. Just to make sure I checked their online site and discovered a cautionary note mentioning this radiator could be either 17 inches or 22 inches wide and I was to let them know which width I needed. To avoid any misunderstandings I called KaiserWillys and, after confirming the 17″h X 21 7/8″ w X 1 1/2” t, I placed an order for a radiator. I even called back after I ordered it just to confirm the dimensions. As I mentioned in a previous email I was told the radiator wouldn’t be done until the end of Feb. (I ordered the radiator the 15th of Feb.) and I was very surprised and pleased when the UPS guy delivered the radiator the afternoon of Feb. 19th. The next day I carefully removed the radiator from the box and placed it into position. Not only didn’t the radiator fit but the radiator cap was about 5 inches above the level of the hood. Not good at all.
How’d they mess that up?
The radiator was 21″ high, not the needed 17″ so I called KaiserWillys again and it turns out the dimensions listed in their catalog, the dimensions listed on their web site and the dimensions they gave me over the phone are all wrong. Not only did the radiator have to be sent back but Mike told me they won’t deal with radiators for the Buick 225 engine and he was sorry but he knows of no source for this radiator. I’m not trying to pin the blame on anyone, I just want to find a this radiator which will fit my Jeep and allow me to attach an electric fan on the engine side without hitting the waterpump pulley.
My questions to you are
1. do you know the original size of the CJ5 radiator with the Buick V6 and did the Jeepster (Commando actually I guess) use the same size radiator?
2. Do you know where I might be able to purchase a used radiator (new would be better but I don’t think that will happen) even if it needs to be recored?
I realize I could notch the front crossmember and move the radiator forward (after trimming the shroud) but I’ll save this as a last resort. The chances of me finding an original V6 powered Jeep here in the Great White North are pretty slim but I’m going to look anyway.”
My ideas
I told Paul that I ran a Pinto radiator with a buick 225 in my first Jeep. I’ve also found some new radiators for sale for various 1980s buick cars. Here’s what I wrote Paul, “I found some other options using thefind.com. I searched for ‘buick v6 radiators’. Here’s a radiator for a buick regal that is $89. It is an aluminum 20-3/4 x 16-7/8 x 1-1/4, 1 ROW (and I’m assuming that is 20-3/4 wide, which isn’t safe to assume as you well know). http://www.shepherdautoparts.com/autoparts/all_aluminum_radiator/buick/regal/w5HDm8OWw5TDl8K7w5rDksORw5HCosKi.htm.”
Anyone else have ideas?
While you think about it, you can marvel at more of Paul’s handiwork – A table made with stainless legs and Ancient Kauri wood, along with a wall hanging from the same wood. About it he writes, “Naturally the table legs are fabricated from stainless in a truss pattern. Each leg is made up of 30 individual parts (not counting the attaching hardware) and by the time I was all done fitting and filing these parts I’d spent 78 hours just making the legs. The wood took many more hours because ultrafine sanding is necessary to get the best grain activity> After sanding the wood to 1500 grit I applied numerous coats of clear marine varnish (Interlux 95), wet sanded the varnish to 3000 grit and then finished it off by hand polishing the varnish.”


UPDATE: John informed that he successfully adopted a 1959 CJ-5 that will complete his ‘family’. It looks like it’s a great, straight CJ with a good foundation for a rebuild. Congrats John!
John writes, “Dave, Our new family arrival, a 59 cj5. This unit came without eng. & trans & fer. It will get a Dauntles & org. trans & fer, & O/D. I’ll replace all floor pans , the rest of the tub is very good. It will get a four point cage. Disc front brakes, 11″ rear. Painted to match its stable mates.”
Here’s a few pics:


John shared this ‘family’ photo with me. He noted that he’s hoping to adopt a 1959 CJ-5 to complete the family. You can see pics of ‘Brownie’ (CJ-3A) here. And, some closeups of Brownie here.

Quinn dropped me a note today. He just finished a new project and wanted to share it with us. Does this mean your you and your wife can write off the jeep? Thanks for sharing!
Quinn writes, “I finally finished my mobile billboard advertising trailer (see attached pictures). I use my M38 to pull it around town when running errands …… it generates leads for my wife’s real estate business.
NOTE: The base utility trailer was purchased from Harbor Freight [ed note: maybe this one?] for $150 and the vertical box and rear door were made using 90 degree angled steel strips. It’s fairly light weight and due to the short length of the Jeep, the entire rig fits into house garages, parking structures and street parking spaces. The trailer also has an 875lb load capacity which makes it convenient for carrying camping gear or the occasional BBQ equipment/supplies.”


Born in Normandy (near Saint-Lo), France, Eric says he always wanted to have a Jeep. While serving in the French Marines, he got the opportunity to drive Jeeps — In Africa and other places — which only only served to worsen his desire for a Jeep (yes, became a victim of the ‘Willys Sickness’).
Finally, in 1997, he found a 1942 GPW in the town of Carentan that needed restoration. If Eric is like the rest of us, he probably felt it would only take a year or two to restore it (I don’t have any pre-restoration pics); instead, the restoration took 7 years. However, the results speak for themselves — it’s a beautiful Jeep he named the Belly Flopper and in which he travels the countryside whenever he gets the chance.
While Eric’s family still lives in the Normandy area, Eric has moved to the central area of France, which is a bit cooler, especially in the winter. The reason Eric and I exchanged emails initially was because he was searching for a heater. I gave him some links on some newer heater options, but had no luck with any early heaters. If you know of any for sale, he still might be interested in purchase them. Just add a comment below and I’ll contact you.
Thanks for sharing Eric!


Recently, Egon, from Lichtenstein, and I had been having a conversation about a Jeep project he’s trying to determine how to tackle. Once again, the google online translation software has been effective enough to allow a conversation to occur.
Egon recently sent me some photos of his projects. He’s done some very nice restorations. Danke Egon!
Here’s a 1955 Steyr 15hp Tractor Restoration:


And a family of tractors:

Here is a 1968 Puch Haflinger he rebuilt (haflingers):


And here are a couple of great images of his Russian UAZ 469, which he says he took on a successful Elk hunting expedition in the Kirov region of Russia. It sports a 2500 cc engine and has a max speed of 75KM/H


John spent this past fall and winter doing some cosmetic restoration to this great looking GPW. John says he’s keeping this GPW for a while, so please don’t send him any sales inquiries. Thanks for sharing!
See all of the images of his GPW here


Quinn asked if I knew of any 3 lever boots for a tc & overdrive. I said I didn’t, so he approached his local upolster to have him build something. If you have the same problem, it’s a good solution. He also had his guy tuck the corners of a CJ-5 bikini top to fit nicely. Good ideas and thanks for sharing! You can see more pics of Quinn’s Jeep here.


Searching for something else, I discovered Chris Kelley’s blog and his new Willys: a 1956 DJ-3A with 4wd. I’ve seen enough DJ-3As with 4wd that I asked Bruce if he knew whether any DJ-3As came with a 4wd package, but to the best of his knowledge (which is the best I know of) he said there was no 4wd option of which he was aware.
Chris writes on his website about new purchase (sept 7 09) “Yep, you’re looking at a 1956 (sort of) CJ3a (sort of) Willy’s Overland Jeep (completely!). Its sort of a 56 since that’s what the tub plate says. Its also only sort of a CJ3A since the tub plate also says its a DJ3a, which was a 2 wheel drive version made for the postal service and other delivery trucks. However, my best guess is that someone replaced the original tub with the one it has now, since this does have 4WD.”
It’s a good looking jeep, though there’s a small ding in the passenger rear, and here some pics from his site:


One item I often see on older jeeps are cracks, patches and general ugliness along the front 2 feet of the frame rails. Sometimes, patching simply isn’t enough and an amputation/replacement is in order.
Over at Pirate 4×4, there’s some great pics of a rebuild that were posted during 2009. Below are just a few of the many pics posted regarding this surgery. If you want/need to do this to your build, I suggest you visit the site and check it out.
View all the pics and information here. Here are some excerpts:
The Surgeon reports, “The front frame section was kinked I think from an incident with the tow bar hitting the ground at speed. It was like that when John bought it. The frame pointed at the ground and the front shackle lay flat against the front bumper meaning no suspension. I cut the fubared frame off and built a new section and front bumper out of 2×3 box tubing.”
The patient prior to Surgery, a 1947 CJ-2A:

Here’s a closer look at the problem. Note how the frame still trends downward rather than traveling horizontal.

And, a closer look:

The front of the frame has been removed:

In this photo, you can see the new sections, build out of 2″ x 3″ square tubing that I would guess is 1/4″ thick.

And here’s another view:

Dan continues to make steady progress on restoring his grandfather’s CJ-5. You can see previous reports here.
He reports, “The Jeep is down to the frame and axles. I have a new rear cross member on order. The old one was all bent and rusted. The rear hitch was all bent as well. I found a vintage hitch that is actually straight that I will be using. Once the new rear cross member is on I’ll get all the frame welding completed and then coat it with some Interstate One Step Rust Killer. It is less expensive than POR15 and easier to use but still has impressive results. My goal was to get all the frame work done this winter and I just might get there.”
Here’s a couple pics:


Here’s the front of the jeep:

Any of you Pirate 4×4 readers might have seen this thread about a 1947 CJ-2A rebuild (and I should probably spend more time on Pirate as I really haven’t spent any time at all on the site), but this is a nice detailed review of an L-head rebuild, frame restoration, disk brake installation on the original running gear, and more. Lots of pics and thoughtful, intelligent discussions.
Click here to see the entire build process
Here’s a few pics: The beginning, a $2800 jeep from Port Angeles, Wa. It’s in good condition, but will benefit from a rebuild.

Here it is partially dissassembled:

Here the engine is going back together. BTW, did you know you can ‘borrow’ those pistron compressors through Schucks/Autozone as part of their lend a tool program:

The engine is more put together:

Here’s an updated master cylinder:

This is part of the brake discussion:

And here the jeep is back together:

The Israeli bureau (Or Shahar) found this interesting project. I think this build works better than I might have expected. The builder blended the truck fenders with the front clip of the YJ rather nicely. There’s still plenty left to be done; I look forward to seeing the final product.
“Ed started with a 1991 YJ with 4” lift, 15×10 alloys and 31×11.50 Thornbirds. While using the YJ’s hood, grill, tub and inner fenders he gained access to a 1954 Willys pickup and was able to blend the old Willys front and rear fenders to the YJ body giving the Jeep that retro “flattie” look. He said “you won’t believe how well the 2 meld together. I was going to build flat fenders (myself), but after a friend of mine who has a Willys Pickup, Wagon, and a Jeepster said he had some extra fenders (that cinched it).”
See the rest of the pics at http://www.4-the-love-of-jeeps.com/jeep-project.html


Sometimes you have the luxury of 25 years to work on your M-38. Other times, you only have the weekend. Jim and his brothers show how much work can be done in only a weekend — and what a difference another body can make.
You can read all about this weekend adventure on Jim’s brother’s blog: By the Numbers. It’s a funny bit of writing, including the addition of aliases to protect the innocent from thesungoddess perhaps? :-). You can also catch Jim on his blog, Bus-Plunge (he’s got a cool bus & hat). Finally, you can see all three brothers at the bottom of this list of Jeeps, courtesy of the jeepjunkie himself.
Here’s the before — a very cheaply purchased, rolling pile of rust:

And an after shot — all the body parts changed in another low budget purchase of parts … all except for the driver’s side fender. I’d say that’s a 1000 percent improvement. Not bad for a weekend.

Mike emailed me pics of his beautiful custom build this morning. He’s taken his time over the past few decades to build something nice. I especially like the heated seats :-). But, this build isn’t just pretty; Mike takes it out on some ‘severe’ trails in the Northwest with his friend Phil, whose CJ-3A you can see here.
“Here are some photos of a CJ3B that I have worked on over the years. I have had this jeep for over 20 years. The frame started life as a 1950 CJ3A but the body was shot and I really like the 3B style. I purchased a new steel body kit from 4 wheel parts wholesalers and at the time it was on sale and cost $900 complete.
The way it is now is the final version. The color is Impact orange, The motor is an all aluminum 5.3 L33 engine that only had 6 miles on it. The transmission is a turbo 350 mated to a Dana 300. The rear end is a 1975 CJ5 Dana 44 with full floating axles and disc brakes with 4:56 gears. The front end is a dana 30 with the same gears and disc brakes. It has power steering and an aluminum radiator .
The interior is 2008 Corvette buckets with power and they are heated (great in colder weather) Lokar shifter, autometer gauges, Flaming river column plus a lot of other things.”


Paul wanted to wish everyone a happy ‘stainless’ new year and to tell you to remember to play with your Willys!
Paul writes, “By 7:30 this morning (Jan 1st) I was back in the garage working on the Willys (fitting the door seal upper attach flanges) and starting my twentyfifth year on this rebuild. I hope to have the stainless Willys fully finished and on the road within the next two years where folks seeing it for the first time and unaware of the time I spent on this project will deem it an overnight success! We do have long winter nights and the winter’s are kind of long but not THAT long. Anyway, after the Jeep is done I have a 1951 military 1/4 ton trailer I plan on rebuilding out of stainless steel to match the Jeep. This will be an easy job and shouldn’t take all that much time.
After all I’ve learned while fabricating the various stainless parts over the years I figure I could crank out another stainless Willys in fifteen years or so but I have other projects waiting for attention so I believe I’ll stop after completing this one.”
If you haven’t seen Paul’s project, click here.
And a pic of the Alaskan Wilderness:

On New Year’s weekend last year, Gerald and his brother towed home a Craigslist find. One year later, they are almost done with a great looking budget build. Gerald tooks some pics and tells the story. Thanks guys — and I agree with you on those tires. They look great!
Gerald writes, This started as a Craigslist ad for a 1948 Willys CJ-2A basket case. He wanted alot more, but after a month of trades and low balls he took the 1000 dollars offer for the lot. Much of the dirty work was done and lots of parts were included. The jeep finally arrived home over new years weekend, January 2009.


Because we didn’t trust any of the work done thus far, our first task was to take it apart the rest of the way. Once apart, we first focused on fitting the body correctly, which was a 10 + year old MD Juan generic (m-38 / mb) body, along with the stock hood and grill. We also fabbed up a rear crossmember and hitch.
As we examined some of the running gear parts, we discovered the rear axle was shot (which we replaced from a spare beater jeep out back) and decided to add new 11 inch brakes for the front (from craigslist). The springs were new, so that saved time and money. We tore down the motor, transmission and transfer case to make sure they were in good shape, and then refit them properly to the frame, including fabbing up some motor mounts.
Then, we went to work on the roll cage, which was partially built out of some bar from our old family jeep along with some new tube. After we got everything mocked up, we tore it back apart to get ready for painting.


There was stripping and sanding, more stripping and sanding, and then, finally, we sprayed it a deep blue. We took the time to paint the underside of the body first, along with many of the parts. Then, we assembles the body to the frame and gave it a final coat.


Next came the small stuff such as gauges, wiring, linkages, fuel system, windshield and exhaust. BTW, I have never seen a head with a fixed rear outlet. Does anyone know if this could be from a truck?

One of the most critical steps occurred this week, almost one year from the start date of the project: The Jeep gets the right set of wheels and tires. As you could see in the earlier pics, the jeep came with some new tires, but we felt they weren’t right (700 15), so my brother sold them on Craigslist.
Instead, he went with these Interco Super Swamper Radials 265 80 16. They are mounted on 8 inch wide alum wheels, which was another Craigslist find. I think these are perfect tires for a Willys in my estimate. He picked them up today in Wheeling, West Virginia, at National tire.


Here’s a wonderful build, an experiment by a reader named Chad. He wanted to know what a Ford Model A Roadster would look like if Willys built it. So, naturally, he built one himself!
He writes, “Did all of it myself except the upholstery, in my home garage. It’s got a flathead V8 for power and took between 6 and 8 years start to finish. The dDrivetrain is flathead V8 adapted to a C-4 automatic adapted to Dana 18. Front axle is Dana 27 w/Corvette discs….rear is Dana 44 with one piece axles and Lock-rite geared 4.27. I thought maybe it would be a four year job, but stuff happens and there was a whole lot of headscratching to make things look ‘somewhat factory’. I used as many factory parts as I could but not necessarily the way they were used ‘by the factory’…..(those are Jeepster tailights, but they aren’t mounted that way on a Jeepster, just as an example).”
Great work and thanks for sharing!


