Features Research Archives

To Top

Wooden Bodies at Cherrybronco.com

• CATEGORIES: Features, Wood bodies • TAGS: This site contains affiliate links for which I may be compensated.

These wooden Jeeps and Broncos were built by a craftsman named Jack who posted these photos to a website called Cherry Bronco.com (site was live in 2010, but has been down for years). He made wooden vehicles and furniture as a hobby in his spare time.

In the case of the 1977 Cherry Ford Bronco below, as you can see in the before and after pics, the body was pretty trashed and in need of something new.  The pieces are all 7/8″ to 1″ pieces glued and screwed together.  The bumpers and trim are done in Oak and Ash.  A single coat of linseed Oil and three coats of Marine Varnish protect the finish and the owners clean it with furniture polish.  Surprisingly, the new  wooden body is actually 300lbs lighter than the original metal.

bronco_cherry_wood_prewood

bronco_cherry_wood1

Here’s a 1956 CJ-5

1956_cj5_wood_jeep

1956_cj5_wood_jeep2

wood_jeeps5_hubcap

Here’s a 1966 CJ-5

1966_cj5_wood_jeeps

Here’s a 1969 CJ-5

1969_cj5_wood_jeeps

And a 1977 CJ-5

1977_cj5_wood_jeep

 
To Top

Builds – Gerald’s Brother’s 1 Year Build

• CATEGORIES: Builds, CJ-3A, Features This site contains affiliate links for which I may be compensated.

On New Year’s weekend last year, Gerald and his brother towed home a Craigslist find.  One year later, they are almost done with a great looking budget build.  Gerald tooks some pics and tells the story.  Thanks guys — and I agree with you on those tires.  They look great!

Gerald writes, This started as a Craigslist ad for a 1948 Willys CJ-2A basket case.   He wanted alot more, but after a month of trades and low balls he took the 1000 dollars offer for the lot. Much of the dirty work was done and lots of parts were included.  The jeep finally arrived home over new years weekend, January 2009.

Gerald_Brother1jpg

Gerald_Brother2

Because we didn’t trust any of the work done thus far, our first task was to take it apart the rest of the way.  Once apart, we first focused on fitting the body correctly, which was a 10 + year old MD Juan generic (m-38 / mb) body, along with the stock hood and grill.   We also fabbed up a rear crossmember and hitch.

As we examined some of the running gear parts, we discovered the rear axle was shot (which we replaced from a spare beater jeep out back) and decided to add new 11 inch brakes for the front (from craigslist). The springs were new, so that saved time and money. We tore down the motor, transmission and transfer case to make sure they were in good shape, and then refit them properly to the frame, including fabbing up some motor mounts.

Then, we went to work on the roll cage, which was partially built out of some bar from our old family jeep along with some new tube. After we got everything mocked up, we tore it back apart to get ready for painting.

Gerald_Brother3

Gerald_Brother4

There was stripping and sanding, more stripping and sanding, and then, finally, we sprayed it a deep blue.  We took the time to paint the underside of the body first, along with many of the parts. Then, we assembles the body to the frame and gave it a final coat.

Gerald_Brother5

Gerald_Brother6

Gerald_Brother7

Next came the small stuff such as gauges, wiring, linkages, fuel system, windshield and exhaust.  BTW, I have never seen a head with a fixed rear outlet.  Does anyone know if this could be from a truck?

Gerald_Brother8

One of the most critical steps occurred this week, almost one year from the start date of the project:  The Jeep gets the right set of wheels and tires.  As you could see in the earlier pics, the jeep came with some new tires, but we felt they weren’t right (700 15), so my brother sold them on Craigslist.

Instead, he went with these Interco Super Swamper Radials 265 80 16.  They are mounted on 8 inch wide alum wheels, which was another Craigslist find.  I think these are perfect tires for a Willys in my estimate.  He picked them up today in Wheeling, West Virginia, at National tire.

Gerald_Brother9

Gerald_Brother10

 
To Top

The Swamp Rat

• CATEGORIES: Features, Last Ride This site contains affiliate links for which I may be compensated.

After seeing Chad’s build yesterday, Gerald sent me pics of the ‘Swamp Rat’, which also sports a flathead V8.  Of course, it’s got a bit more wear and tear on it than Chad’s, but i have to say I really like the way that fits in the engine compartment. This sure has an old school feel to it.

Gerald notes, “Check out Johnny’s wood cab and side pipes.  The paint chipped off the windshield, but it used to say RAT.  It’s a star attraction at one of our local yards.”

Swamp_Rat_1

Swamp_Rat_2

Swamp_Rat_3

Swamp_Rat_4

 
To Top

Willys/Jeep Slogans

• CATEGORIES: Features This site contains affiliate links for which I may be compensated.

One day as I was going through some old brochures, I started recording some of the slogans.  Here’s just a few of them:

Jeep:  The world’s most useful vehicle
The sun never sets on a jeep
Ten Billion Miles of Proof
Willys puts the F in Farm Power
Keep America on the Move
Do it quicker; do it better with 4wd
A revolutionary vehicle for a thousand jobs
There’s a Jeep vehicle for your toughest job
Willys Builds the Universal Jeep
The Worlds Hardest Workers
The Worlds’ most willing workers
Sign of the times, Willys Jeep Vehicles
You’ll be ‘busy as a bee’ in your new vehicle from Jeep
Two things Willys is known for, Beauty & Stamina (which referred to the Aero and the Jeep)

 
To Top

Builds: Chad’s Ford Model A Roadster PU Willys

• CATEGORIES: Builds, CJ-2A, CJ-3A, Features, Unusual, Willys Wagons • TAGS: This site contains affiliate links for which I may be compensated.

Here’s a wonderful build, an experiment by a reader named Chad.  He wanted to know what a Ford Model A Roadster would look like if Willys built it. So, naturally, he built one himself!

He writes, “Did all of it myself except the upholstery, in my home garage. It’s got a flathead V8 for power and took between 6 and 8 years start to finish. The dDrivetrain is flathead V8 adapted to a C-4 automatic adapted to Dana 18. Front axle is Dana 27 w/Corvette discs….rear is Dana 44 with one piece axles and Lock-rite geared 4.27.  I thought maybe it would be a four year job, but stuff happens  and there was a whole lot of headscratching to make things look ‘somewhat factory’. I used as many factory parts as I could but not necessarily the way they were used ‘by the factory’…..(those are Jeepster tailights, but they aren’t mounted that way on a Jeepster, just as an example).”

Great work and thanks for sharing!

frankie

frankierear

interior

engine

 
To Top

Hadley Engineering — The Veep

• CATEGORIES: Advertising & Brochures, Features, Unusual, VEEP (VW Jeep), Scamp, Others This site contains affiliate links for which I may be compensated.

UPDATE: Additional links — The Hadley Engineering Brochure and VEEPS vs. SCAMPS and other model.

Based on a reader’s inquiry, I decided to do some research regarding the Veep.  I’ve seen a few of these for sale over the past couple of years, but it doesn’t happen often and I really knew nothing about them. So, here’s the little bit I learned.

According to the Dune Buggy Archives, the Veep was sold as both a completed jeep and as a kit by Hadley Engineering, which was based at 1778 Monrovia, Costa Mesa, CA 92627 (maybe they are still there).  The company claimed that any Beetle or Karman Ghia could be used to build a Veep in about 40 hours.

I’ve only seen two engine sizes so far, a 1600 cc or a 1800 cc VW motor.  The suspension, frame, and running gear is all VW.  Most of the veeps appear to use a replacement M-38 body, though one ad below claims a ’42 body (mb or gpw) was used.   The gas tank is mounted in the front, which simply looks odd when you open the hood.  Below is a couple brochures and some misc Veeps.  In the posts below are some additional Veeps.

I’m still hardly an expert on these, so if you have additional information, I’d love to learn more.

brochure_veep

veep_kit

blue_veep_bob_garrard

gray_veep

race_veep

veep_brown

 
To Top

Pics from the past

• CATEGORIES: Features, Old Images, Women & Jeeps This site contains affiliate links for which I may be compensated.

Gerald found these pics.  If anyone has or runs across any similar pics, I’d like to see them.

1. Here’s an ad for the older Armstrong tires:

armstrong_tires_ad

2. A vintage 1946  stamped envelope top from Willys Overland:

willys_overland_postagestamp

3. During a search for the 1960 auto show pics, Gerald found this image from the 1965 auto show.  He immediately thought of the show Mad Men.  The girls may be as lovely as the ones on the show, but the men are much older (compare the photos below and you decide!

1965_autoshow

 
To Top

Builds: Phil’s former 1953 CJ-3A

• CATEGORIES: Builds, Features This site contains affiliate links for which I may be compensated.

I ran across this website, which shows pictures of Phil’s former 1953 CJ-3A.  According to his website, he has sold this jeep. It’s solid looking, nice jeep.

What I liked about some of these pics is that they show a solution for installing a taller engine into a flattie.  I figured there might be some readers out there who would find this interesting.

Here’s some pics of the transfer case/tranny undercarriage.  Note how it has been dropped with some square tubing.

1953_cj3a_shelvin1

Now look at how the engine has been dropped.  Solid plates and arms reach out from the engine to the frame and mount on top of something welded to the side of the frame.  It I were doing this, I’d probably beef up the metal that spans the gap from the engine to the frame.  What I can see is if there is rubber underneath the point where the engine mount meets the frame.

1953_cj3a_shelvin_engine1

1953_cj3a_shelvin_engine2

1953_cj3a_shelvin_engine3

Note the back of the frame has been lifted by inserting a block between the shackle and the frame.  Strangely, this wasn’t done in the front.

1953_cj3a_shelvin3

Note the hood on this CJ-3A.  It appears to be a trimmed down CJ-3B Hood.

1953_cj3a_shelvin5

Here’s are some more pics of this build ….

Continue reading

 
To Top

Builds: Mac and Jason’s CJ-2A Project

• CATEGORIES: Builds, Features, Website This site contains affiliate links for which I may be compensated.

Titled, the “CJ-2A 1948 Willys Overland Jeep Restoration Project“, this blog follows the rebuilding of a 1948 Willys by Mac and Jason in Houston, Tx.  It’s clear they don’t know a great deal about jeeps (neither did I when I started on my jeep many years ago), but are jumping in with both feet none-the-less.  Kudos to them; it looks like they are learning already.

1948_cj2a_houston_website

 
To Top

Photos – From “03Jeepgirl”

• CATEGORIES: Features, Women & Jeeps This site contains affiliate links for which I may be compensated.

I was doing some research and found some pics from a female photographer on flickr who calls herself 03Jeepgirl.  She owns two jeeps, though she didn’t get specific about what she owns.  She’s posted a large number of old vehicle pics, including these flattie shots.

You can see all her pics here

jeepgirl_photo2

jeepgirl_photo1

jeepgirl_photo3

 
To Top

Builds: Josh’s WW2 US Navy Converto T6 Trailer

• CATEGORIES: Builds, Features, trailer This site contains affiliate links for which I may be compensated.

Josh sent over some pics of a very rare WW2 US Navy Converto T6 Trailer.  Josh is curious to know if any other readers have or know of these trailers.  I’ll be happy to set aside some space for Converto trailer owners to gather and share information.

Also, he’s got another trailer for sale on eBay (Converto Airborne Dump Trailer — see post below this one).

Josh writes, “Here are some pictures of my WW2 US Navy Converto T6 trailer I mentioned to you a while back. I found it here in Boise, though it was never advertised for sale. It is almost identical to a more well known Bantam t3 or a Willys MBT.  During the war there were a number of companies producing nearly identical trailers for the military.  The only notable difference between my MBT or T3  and the Converto T6 are a different brake hand set up, dataplate, and, in the case of my trailer, a ball hitch that is stamped USN 1944. (My hitch is different from the two other Converto T6s I’ve heard about — They both have the standard military lunettes)   The data plate was originally riveted to my trailer but the past owner removed it to paint it grey again with spray paint. The under side of my trailer has what I believe to be the original paint and some yellow stenciling that has shipping info/load info. I plan to fully restore and hold onto this T6.

Converto also produced a T7 (same 1/4 ton trailer as the MBT/T3/T6 but with a tailgate) and a Converto Airborne Dump Trailer which is a 1/2 ton but used with the jeep. There is really little info I can find out on either the T6 orT7, but the Dump trailers do have a lot of info available including a military TM.  I have had a few Converto Airborne Dump Trailers.  They are very hard to find as it is estimated only about 6500 where produced. I’m unsure how many T6/T7 were produced. Not very many based on how few are still around. Maybe we can find a few more with your readers??”

converto_trailer4

converto_trailer9

converto_trailer3

Continue reading

 
To Top

Club Run: Flatties on the Slick Rock in Utah

• CATEGORIES: Club Runs, Features This site contains affiliate links for which I may be compensated.

I’ve seen lots of pics of modified vehicles that crawl the slickrock of Southern Utah; so. it’s a nice change to see these two classic jeeps cover the trails without issue.

Randall writes, I thought maybe some other old school jeepers might like to see a few photos of a recent club outing to Moab.  The jeeps did great and the scenery was absolutely awesome. The “slickrock” on “Fins&Things” and “Hell’s Revenge” trails was amazing.

The M38 is a 1952, all stock with four banger, T-90, and Dana 44 with 5:38’s.  The other is a ’52 3A.  Also bone stock with Dana 41.  The only upgrade on it is 11″ brakes and 12v.  This was our first trip, but probably won’t be our last.  We went the first week of Nov. and hit great weather by luck.  We’d hoped to have more jeeps make it but too many conflicts for everyone.  Had a blast with just four of us in the two jeeps.  They climbed just about anything a sane, middle aged man would need to climb and the gears made descents very doable with little need for much braking.  HOWEVER, I was glad the brakes were in very good condition when we first went down some of the trails.

Randall_adams_m38_1

Randall_Adams_m38_2

Randall_Adams_m38_3

 
To Top

Duke Edwards == Hot Rod Artist

• CATEGORIES: Artists/Drawings, Features, Unusual This site contains affiliate links for which I may be compensated.

I found the image below on eBay. The bidding has ended, but I”m sure it will return. I thought it looked very similar to Brian’s CJ-3B (or former CJ-3B — did you ever sell it?). After located a pic of the CJ-3B, I concluded it must have been used as the model of the drawing.

One image below is the drawing and one is a shot of the CJ-3B from the CJ-3B page (See more pics of it there — It’s a beauty!).

According to an old ebay listing, this particularly drawing is a run of 250 prints of a drawing by artist Duke Edwards.  I didn’t know who Duke Edwards was, so I did a google search and found the information below from the ‘Automotive Art Gallery‘.

“Duke has been “doodling” for almost 40 years but had limited his clientele to friends and local car clubs. Since making his work available to the public, he has received international recognition and has pieces on museum display as well as in private collections. For just “doodling” Duke is amazingly talented.”

brian_leetch_cj3b_drawing

brian_leetch_cj3b

 
To Top

Old Pics: Phil Nelson’s Place

• CATEGORIES: Features, Old Images This site contains affiliate links for which I may be compensated.

UPDATE: Bob also snapped a picture at Phil Nelson’s Place in Columbiana. You can see it below.

1946_Willys

I’ve never been there, but these are some great pics of the place from Gerald.

“A small display outside of Phil Nelson’s place in Columbiana Ohio.  It is truely a treasure.”

phils_yard1

phils_yard2

phils_yard3

 
To Top

L-head and F-head performance

• CATEGORIES: Engine, Features, Website This site contains affiliate links for which I may be compensated.

I found this article on Automotive.com, though it’s really an article from JP Magazine.  The article highlights improving performance on a variety of Jeep engines.  Here’s two excerpts and a great pic.

Dual carburetor manifolds in the ’50s were available for just about any engine you could imagine and an old-time company, Burns, made a log-type manifold that utilized two Stromberg Ford V-8 carburetors for the Jeep four-cylinder. I’m sure these helped the four-cylinder flathead’s performance, but, still, the long-stroke 134.2ci engine needed a lot more than this…”

And a little on the F-head

The next step was to swap in a later model F-head engine. It wasn’t technically an engine swap because it was a direct bolt in. Still the same basic engine, but a new cylinder head design with the intake valves upstairs in the head instead of the block. Depending on the compression ratio, which ranged from 6.9 to 7.8 (depending on year and usage), it was rated at 72 to 75 horsepower at around 4,000 rpm and torque was up to 114lb-ft. This one got a balance job, some performance pistons from Speed-O-Motive, and a Holley carb from a Falcon six. My new performance motor maybe made 100 horsepower on a good, damp day.

Harry Buschert, who owned a farm implement repair shop in Hemet, California, was a real innovator in design. He built up a very-modified, four-cylinder F-head that even had a Paxton Blower that he had salvaged off a Packard….”

built_lhead

 
To Top

Jim Boswell’s Seat Cushions

• CATEGORIES: Features, Parts This site contains affiliate links for which I may be compensated.

UPDATE:  Jim used to make these seat cushions, but no longer does.  I’ve decided to keep these here just in case someone is looking for ideas for Seat Cushions.


rear_seat_cushions3

rear_seat_cushions1

rear_seat_cushions2

 
To Top

Builds: More on Paul’s Stainless M-38

• CATEGORIES: Builds, Features • TAGS: This site contains affiliate links for which I may be compensated.

If you haven’t yet read about Pauls M-38 project, go to installment 1 and installment 2.

Paul, take it away …

Paul Bierman again with a few more pictures of the never ending Willys project.  I didn’t want a rear seat (Who can fit back there anyway?) so I fabricated a storage box which spans between the rear wheel wells and is divided into two sections.  The half behind the passengers seat is the new battery location along with the circuit breaker panel, the master relay and circuit breaker and most of the switch relays.  The half behind the driver’s side is the home of a now vintage (but it’s still brand new, I bought it quite a while ago) ten disc cd changer with some room left over for an out of view storage compartment.  I’ve replaced just about all of the wiring with new (there’s some original wiring on the gas heater still but I’ll get to that sometime) with some fancy pants, super flexible cold weather wiring which stays flexible down to 55 below zero F.  Boy, doesn’t that just make you feel dandy.  If it’s that cold I’ll wait till spring, besides I try to draw the line on outside work when the temperature drops past 40 below zero F, nothing’s worse than having to take a leak when you’re wearing multiple layers of clothing eight inches thick and Little Mr. Wizzard shrunk up to an inch and a half.  No matter what you do you know at least one of your boots is going to get wet.

Moving the instrument panel above the windshield caused still more problems but the most annoying one was how I could get all the wires from the gauges down to the main body without my work looking like crap.  I was at work thinking this over (Ok, I was in the bathroom but I do my deepest thinking sitting down) when I happened to glance over at the wall and saw a beautiful stainless steel handle just the right size with curved ends, satin finished and everything!   Problem solved, until I mentioned this great solution to my boss and his exact response was, “Touch it and die.”  Geeze, guess I’ll have to spend my own money and purchase some handicap grab handles.  The local home supply store had quite a selection of stainless handles but I ran into a problem with an over enthusiastic clerk wanting to help me with my bathroom remodel.  He’d never heard of a 52 Willys bathroom renovation.  The handles worked out great, you can see them on the pictures of the windshield/instrument panel photos by the door posts.

Winter was late getting here (I love global warming!) but I have lots of cold dark days ahead of me so the Willys will get a great deal of attention before this latest batch of snow melts.  Next week I’ll have the side and rear window glass cut and then I’ll have to make patterns for the door window glass and they’ll be ordered when my wallet says it’s ok.

PS …  I’ve really enjoyed the comments left by fellow Willys wackos, the concern about welding above the jerry can was nice but the can had never been used and I threw it out after I’d made the gas can mount.  If I was to worry about welding safety I should have thought about the beef and bean burrito (with cheese and onions on top) I’d eaten for lunch, not so much for the flamability aspect (the poor garage just isn’t that tightly sealed) but the thrust developed after lunch could have blown me off those fancy bucket workstands!

Nov 09 008

Nov 09 010

Nov 09 012_3

Nov 09 024


To Top

Some Registered Trademarks of Daimler Chrysler

• CATEGORIES: Features This site contains affiliate links for which I may be compensated.

I was doing some research on which Registered Trademarks relating to Willys or Jeep were related to Daimler, Chrysler (D/C) or their subsidiaries (and I was surprised at how many of these are owned by different subsidiaries within the D/C organizations).

A short primer on Trademarks.  Registered Trademarks are applied for with the United States Patent and Trademark Office. If the Office thinks you have a good case, they’ll grant you a trademark.  Sometimes you apply for a trademark with just words OR sometimes you apply with the words in a particular design.

When you apply for a Trademark, you apply for 1 or more different classes, with each class costing currently between $275 – $325.  As you see below, over the years, D/C has applied for additional Trademarks over additional types of goods and services (and in fact has applied for and then abandon some other categories also which I don’t list).

So, if you aren’t bored yet, keep on reading.  Below, I’ve listed all the valid Willys, Jeep and some other interesting Trademarks.  First, you’ll see the Trademarked Name, followed by the Registration number of the Trademark, and finally, notes about the particular Class for which the Trademark was granted.  In most cases, you’ll also see the year when it was first used in commerce, which is important for protecting your rights of ownership.

1) I was surprised to see that D/C only has registered trademarks for WILLYS in two classes, which is good for me because it leaves a large number of Willys names open should I want to Trademark some additional names.

A) Willys 2722568 IC 028 TOYS, NAMELY, MODEL REPLICAS OF LAND VEHICLES.

B) Willys 3387789 IC 012 G & S: Automobiles.

MUCH MUCH MORE ON THE NEXT PAGE

Continue reading

 
To Top

Gerald found these great pictures to share

• CATEGORIES: Builds, Features, Old Images • TAGS: This site contains affiliate links for which I may be compensated.

Here’s a variety of pics from Gerald.  Thanks for sharing!

Here’s Gerald’s trailer and his jeep with Military Tires.  The tires make a world of difference.  You can see the jeep with the mini terras here.

gerald_cj3b_trailer_skinnytires

Here’s some old dealership photos:

dealership2

donham-willys

Damn, what a lucky kid this guy was … I’m gonna have to talk to mom and dad about this! I had to wait until I was 18 for my first ‘real’ jeep!

boy_toyjeep_xmas

I can’t tell how young/old this photo is:

jeepster_junkyard

And this is just for fun.  If you didn’t catch it, there was a fascinating documentary on the 2006 auction of Star Trek Memorabilia.

startrekship

 
To Top

Builds: More pics from Paul

• CATEGORIES: Builds, Features • TAGS: This site contains affiliate links for which I may be compensated.

If you didn’t see the first round of pics, go here.  These are a second round of pics that Paul generously provided. Thanks again Paul and great work!

No stories with these pics, just eye candy 🙂

Here’s the steering:

steering_plate

steering

steering2

steering3

steering_column

steering_column2

steering_column3

Click on the link below to see more pics …..

Continue reading

 
To Top

Reader Builds: Paul’s Stainless M-38 Project

• CATEGORIES: Builds, Features • TAGS: This site contains affiliate links for which I may be compensated.

highway_signUPDATE: See the second round of pics here

A reader named Paul contacted me today.  He mentioned he was working on a stainless jeep.  Would I like to see some pictures?

By now you know my response … of course I would!  Well,  was I in for a treat.  Paul has got that unique combination of patience, welding talents, and ingenuity (check out his shifter knobs made from $5 stainless cups from a chinese restaurant).  He also seems to be a victim of the dreaded Willys sickness, which seems to coincide and peak with the dark Alaskan Winters.  So, for the last 23 years, Paul has been treating his Willys sickness by following the beat of his own drum as he rebuilds his (and his father’s) 1952 M-38.  Here’s his story and pics (Thanks for sharing Paul!):

lemonade

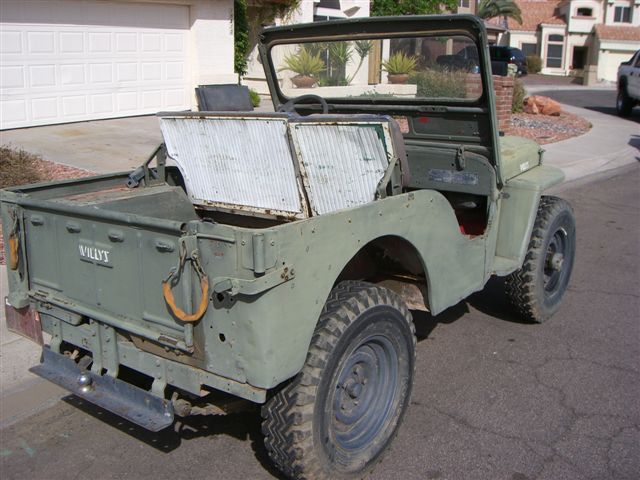
My father bought an all original 1952 Willys M 38 in 1964 from a local guy here in Anchorage who purchased three Jeeps as military surplus.  The M 38 my father bought came with a full aluminum top and doors (commonly but incorrectly called an Arctic Top), a 20,000 btu Southwind heater with all the heating ducts, a built in gas fired engine and battery heater, and a 24 volt waterproof electrical system all coated with numerous layers of olive drab paint.  This was my dads everyday driver for eight years until it was finally replaced by a new pickup truck in 1972 and the Willys passed into my ownership for the sum of ONE dollar.  I got screwed on this deal, here it is 37 years later and I’m still dumping money into this never ending project.  Boy, if you want to really mess with a kid give him a Jeep and he’ll be twisted for the rest of his life!

frame

I drove the Jeep off and on (it broke alot and money was tight) until fall of 1985 when just about everything broke, quit working or caught fire but it did get me home one last time.  It was decision time, should I scrap it or perform a rebuild to end all rebuilds?   January 1st, 1986 was the day I decided to rebuild the Willys and make some much needed modifications so I could keep up with traffic and even have brakes that worked.  Geeze, this thing was so slow (5.38 axle gears and an anemic flathead engine) bus loads of Nuns were giving me the finger.  Everywhere I went it looked like I was leading a parade and I couldn’t take back roads because there aren’t any.  We’re lucky to have the limited road system right now and there are no extra roads planned in the future.

I’d been drooling over Acme Truck Parts advertisements showing Stainless Steel Jeep bodies (I still have the magazine) so I ordered the complete body (tub, windshield, front fenders, grille, tailgate and floorboards) for the gigantic sum of $5,000 dollars paid upfront.  Lots of delays, problems and denials later the body finally arrived along with a new steel frame for $500 bucks plus shipping.  To condense this story down I spent the first five years rebuilding the body so the parts would fit before I modified the windshield to a vertical mount to match the original aluminum top.

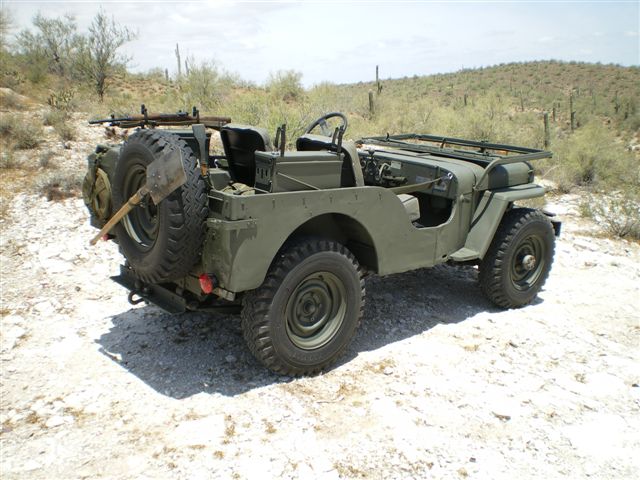
The more I inspected the top the more hidden damage I found so I cut the top apart and duplicated each 50 thousandth thick aluminum piece in 50 thousandth thick stainless steel keeping the outside appearance original but modifying the interior so I’d fit in it better.  Since I’d duplicated the top it made sense for me to duplicate the doors, window sliders, hinges and door handles from stainless also.  I’d purchased stainless seats but I made my own fuel tanks and I put one under the passenger side instead of the original storage compartment.  That’s why the Willys has a recessed fuel filler on each side.  I know, the original M38 had huge fuel caps but the only stainless caps I could find were normal sized ones so the filler neck is much smaller in diameter and the recessed fillers were built accordingly.

When I sit in the Jeep the top of the dash is below my knees so I moved the instrument panel above the windshield and fabricated an overhead center console filled with a CD player and lots of switches.  Between the seats is a pair of stainless cup holders (1/4″ thick so I don’t worry about them getting damaged), the ignition switch and a bunch of shift levers.  The normal three speed, Warn overdrive, four wheel drive and high/low range … I call it a four on the floor!  The engine was replaced with a Buick 225 odd fire V 6, 11 inch drum brakes with hanging clutch and brake pedals, a hydraulic clutch slave and master cylinder and of course a five position stainless steel tilt steering column complete with a leather wrapped stainless steering wheel custom made by Ididit in Michigan.  The steering column alone has a heck of a story about it but that will wait for another time.  I’m just trying to give you a brief overview covering the last 23 years.

I’m not done, I’m getting closer but there’s still lots of items left on my to do and to buy list but at least I’m closer to being done than I was 23 years ago!  Normally I don’t like to say anything bad about my mom but I have to admit it appears she raised an idiot.

passenger_side

back

inside

inside2

welding_on_buckets

[Editor’s Note:  Paul comments on the roof corners. The next four pics show the creation of a corner]   It took me four tries to make the first successful rear corner on the Willys top, the initial three attempts just irritated the metal and burned my fingers.  By the time I finally stumbled on the magic formula for making compound corners in stainless each successful corner took twenty hours to build.  The left rear corner (drivers side) is corner number four and the right rear corner (pass. side) is corner number five.  Naturally I had stupid people visit to see the progress on the Jeep, look at the corners and ask “What else have you done?”   I’m pretty sure it’s ok to kill the really stupid folks among us, don’t dumb people cause global warming or something?

corner1

corner2

corner3

corner4

[Editor’s Note:  Below is the stainless cup transformed into a shifter knob]

The Goddess (that’s my girlfriend, her name is Deborah but many years ago she told me to call her the Goddess so I do and she’s still here) wanted to go out for oriental food since she didn’t feel like cooking so we went to an All You Can Eat and Keep Down Chinese buffet.  Naturally she wanted tea but I had a Coke which I just about blew out my nose when I saw the waitress setting down double wall stainless steel tea cups on the table.  Not only were these tea cups the perfect size for gearshift knobs, the bottom of the cup had an embossed ring slightly larger than a nickel.  With a stainless nut welded to a stainless fender washer and this assembly welded to the teacup, the welds ground down and buffed, the new shift knob installed on the lever I finished this installation by attaching a Buffalo nickel in the embossed ring.  I really did buy these teacups from the buffet folks, it’s kind of difficult to steal four cups from a table with only two people sitting there but I only had to give them five bucks each!  What a deal !  The big knob on the transmission lever was some kind of float for a pump operating in caustic chemicals which another friend found and gave to me.

transfercase_knobs

[Paul didn’t explain these, but this shows the transformation from stainless pieces into a door handle]

door_handle1

door_handle2

[Editor’s Note:  You can see the old aluminum doors (right) and new stainless doors (left)]
doors

 
To Top

Ebro Trucks from a Jeep Pickups website

• CATEGORIES: Features, Fire/Police/Industry Vehicles, International, Unusual This site contains affiliate links for which I may be compensated.

Here’s some a couple great pics of an early Ebro Cameador.  You can view more images at http://www.angelfire.com/nb2/jeeppickups/Ebro.html.

Jeeps first started being assembled in Spain in 1952 by a company called VIASA, which means Vehículos Industriales y Agrícolas, S.A in spanish. I am not sure if VIASA ever made pickups, as I cannot find any records of them being produced. However, in the late 1970’s VIASA was absorbed into EBRO, another spanish company. The only pickup that I know of produced by EBRO was called the Campeador. It was a forward control pickup available in either single or double cab version, which was called the Duplex, as well as a van, called the Toledo/Furgon. At some time, Hotchkiss in France also produced these vehicles, but I can’t find any pictures of them. Production of these vehicles was from 1971-1985 in France.  The Ebro name was discontinued in 1980.

ebro_jeeps

brochure_ebro_van

 
To Top

Wooden Jeep Sonora, CA **SOLD**

• CATEGORIES: Features, Models, Unusual, Wood bodies This site contains affiliate links for which I may be compensated.

UPDATE: **SOLD** Was $600.

It runs and drives.

“This is a custom built 1/4 scale Willys Jeep with a wood and metal body using an electric motor from a walk along golf cart. It has a single disk brake and chain drive. The wheels are from a wheelbarrow. A real craftsman made this and he had lots of time on his hands!”

wooden_jeep_mini_sonora

 
To Top

The CJ-3B Page Interviews Jim & shows off his past 3Bs

• CATEGORIES: Features, News This site contains affiliate links for which I may be compensated.

Jim’s become a good friend.  He is full of stories, jeeps and life (and apparently cooks some mean brisket, too).  Derek Redmond gave him a call the other day and asked him to do a story for the CJ-3B Page.  It’s a great story and a nice synopsis of a good niche he’s carved for himself.  You might also remember that Jim builds seat covers that have been selling very well — buyers around the world are enjoying the covers.  Congrats Jim!  Below is one of his before and after projects (go here to see more pics of this):

Before:

After:

 
To Top

Stainless Steel Flattie Winston, OR **SOLD**

• CATEGORIES: CJ-3A, Features, stainless/jewels, Unusual • TAGS: This site contains affiliate links for which I may be compensated.

stainless_flattie_winstonUPDATE: **SOLD** Was $8000

(08/21/09) It appears the suspension is customized as well.

“Stainless Steel Body (Body cost 6000.00) 350/350hp 4 bolt with 350 trans with extra clutches. Assembled with Advanced Adapters parts. Less than 1000 miles on engine and trans. Aluminum custom built radiator. Over 17,000.00 invested.”